Google dynamic remarketing enables you to display personalized targeted ads to previous visitors across the Google Display Network and Google Search Network, utilizing data from Google Ads and Google Analytics tools.
That’s why it’s important to correctly integrate dynamic remarketing to your Shopify store.
Analyzify's Google Ads Dynamic Remarketing tracking integration provides:
- Easy Setup and Management: Quick integration process with no technical expertise required
- Detailed Event Tracking: Industry-leading coverage of all critical e-commerce events throughout the customer journey (page_view, view_item_list, view_item, add_to_cart, remove_from_cart, add_contact_info, add_address_info, add_shipping_info, add_payment_info, purchase)
- ID Matching: Aligning feed and tracked IDs for accurate dynamic remarketing
- Compatibility and Flexibility: Two different setup methods to accommodate all Shopify stores
Why Dynamic Remarketing Is Important?
Dynamic remarketing is a powerful tool that helps you reconnect with users who have previously visited your store. By displaying personalized ads based on their interactions, you can significantly improve your marketing effectiveness and drive better results. Here are the key advantages:
- Better Customer Retention : Show personalized ads to previous visitors and make them remember your brand
- Increased Brand Awareness : Display ads to previous users to reinforce brand loyalty
- Improved ROI : Achieve higher return on investment through targeted advertising
- Reduced Cart Abandonment : Re-engage visitors by reminding them of products left in cart
- Automated Management : Let Google Ads handle the work based on your optimized product feed
To help you implement these remarketing capabilities effectively, Analyzify provides a straightforward integration process. Our solution ensures accurate data flow between your store and Google Ads, allowing you to focus on creating impactful remarketing campaigns.
Google Ads Dynamic Remarketing Integration Methods with Analyzify
Analyzify offers two integration methods for Google Ads dynamic remarketing tracking setup:
- Direct Integration
- Customized Integration (with GTM)
To understand the differences between these methods and choose the one that best suits your needs, please read our guide on choosing the right integration method .
⚠️ Important Notes Before Setup:
- Choose only one integration method. Do not activate both methods simultaneously.
- Enable the Analyzify app embed toggle on your live theme, otherwise completing the integration steps wouldn’t activate the dynamic remarketing tracking.
- Don’t forget to connect your custom pixel.
1. Direct Integration Method
Setting up Google Ads Dynamic Remarketing through Direct Integration is the recommended approach for most e-commerce businesses due to its streamlined implementation and easier maintenance. Follow these steps to enable dynamic remarketing with Analyzify Direct Integration method:
Step 1: Configure Remarketing Details
Enter Google Conversion ID
- Enter your Google Ads Conversion ID starting with 'AW-'
- If you've already set up Google Ads Conversion Tracking, you can use the same Conversion ID
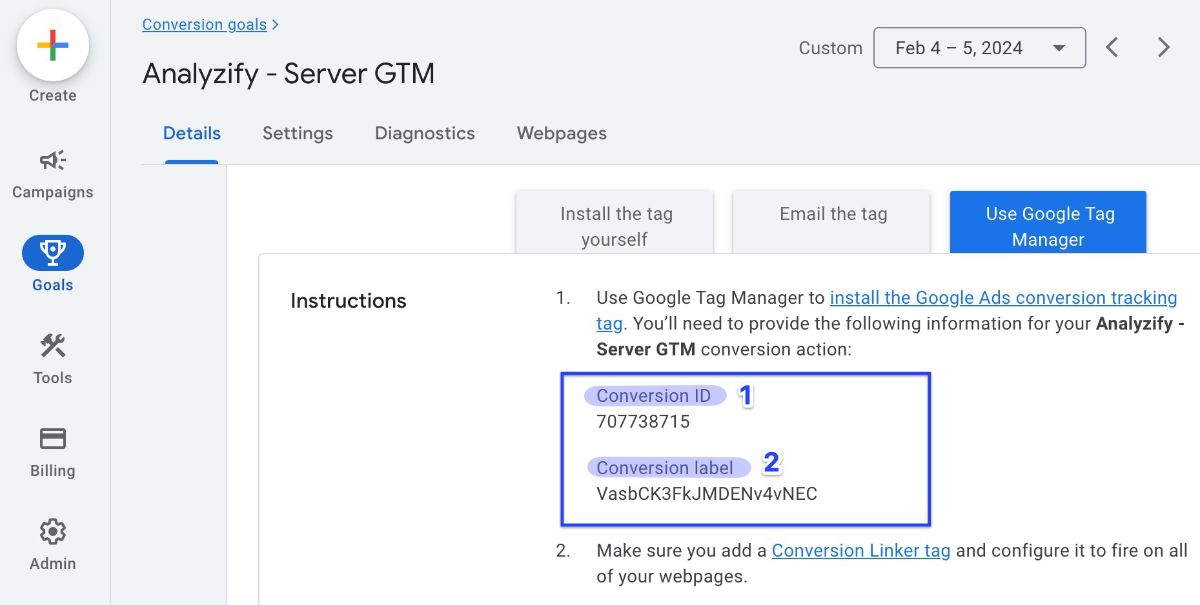
To find your Conversion ID:
- Go to Goals in the new Google Ads interface
- Click your conversion action
- Find the Tag Setup section
- Click "Use Google Tag Manager"
- Copy your Conversion ID

Important: If Tag Setup section is missing, your conversion isn't properly configured. Please use our "Create a New Google Ads Conversion" tutorial first.
Step 2: Select Item ID Format
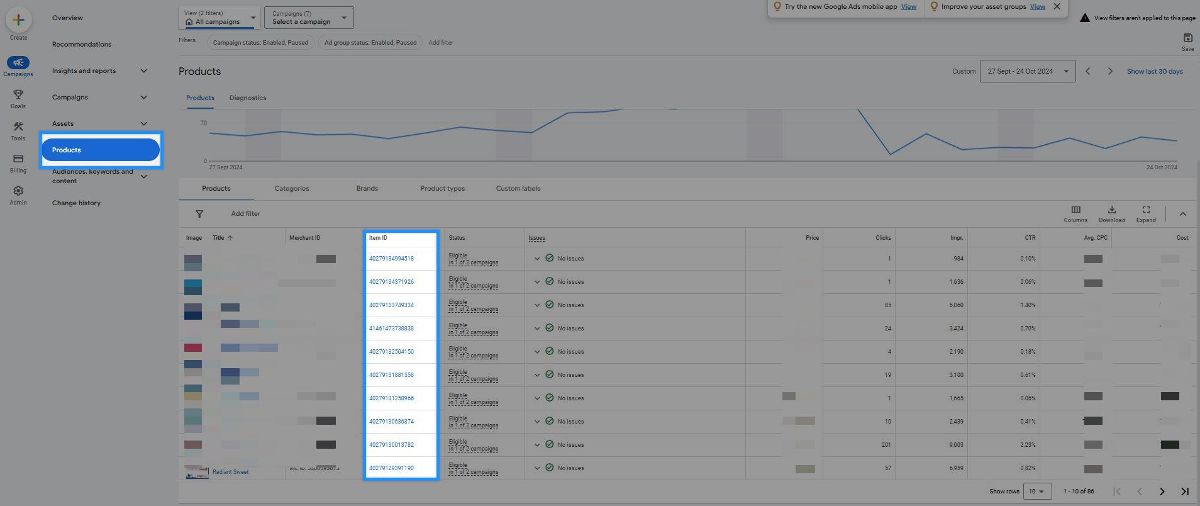
First, locate your item IDs in Google Ads:
1- Go to Products in Google Ads
2- Click Products again to view your Item IDs
- Note: If Products isn't visible, click your PMax/shopping campaign first
Item IDs can also be located directly within the Google Merchant Center. For instructions on how to access and identify your item IDs through the Merchant Center, please refer to our guide .

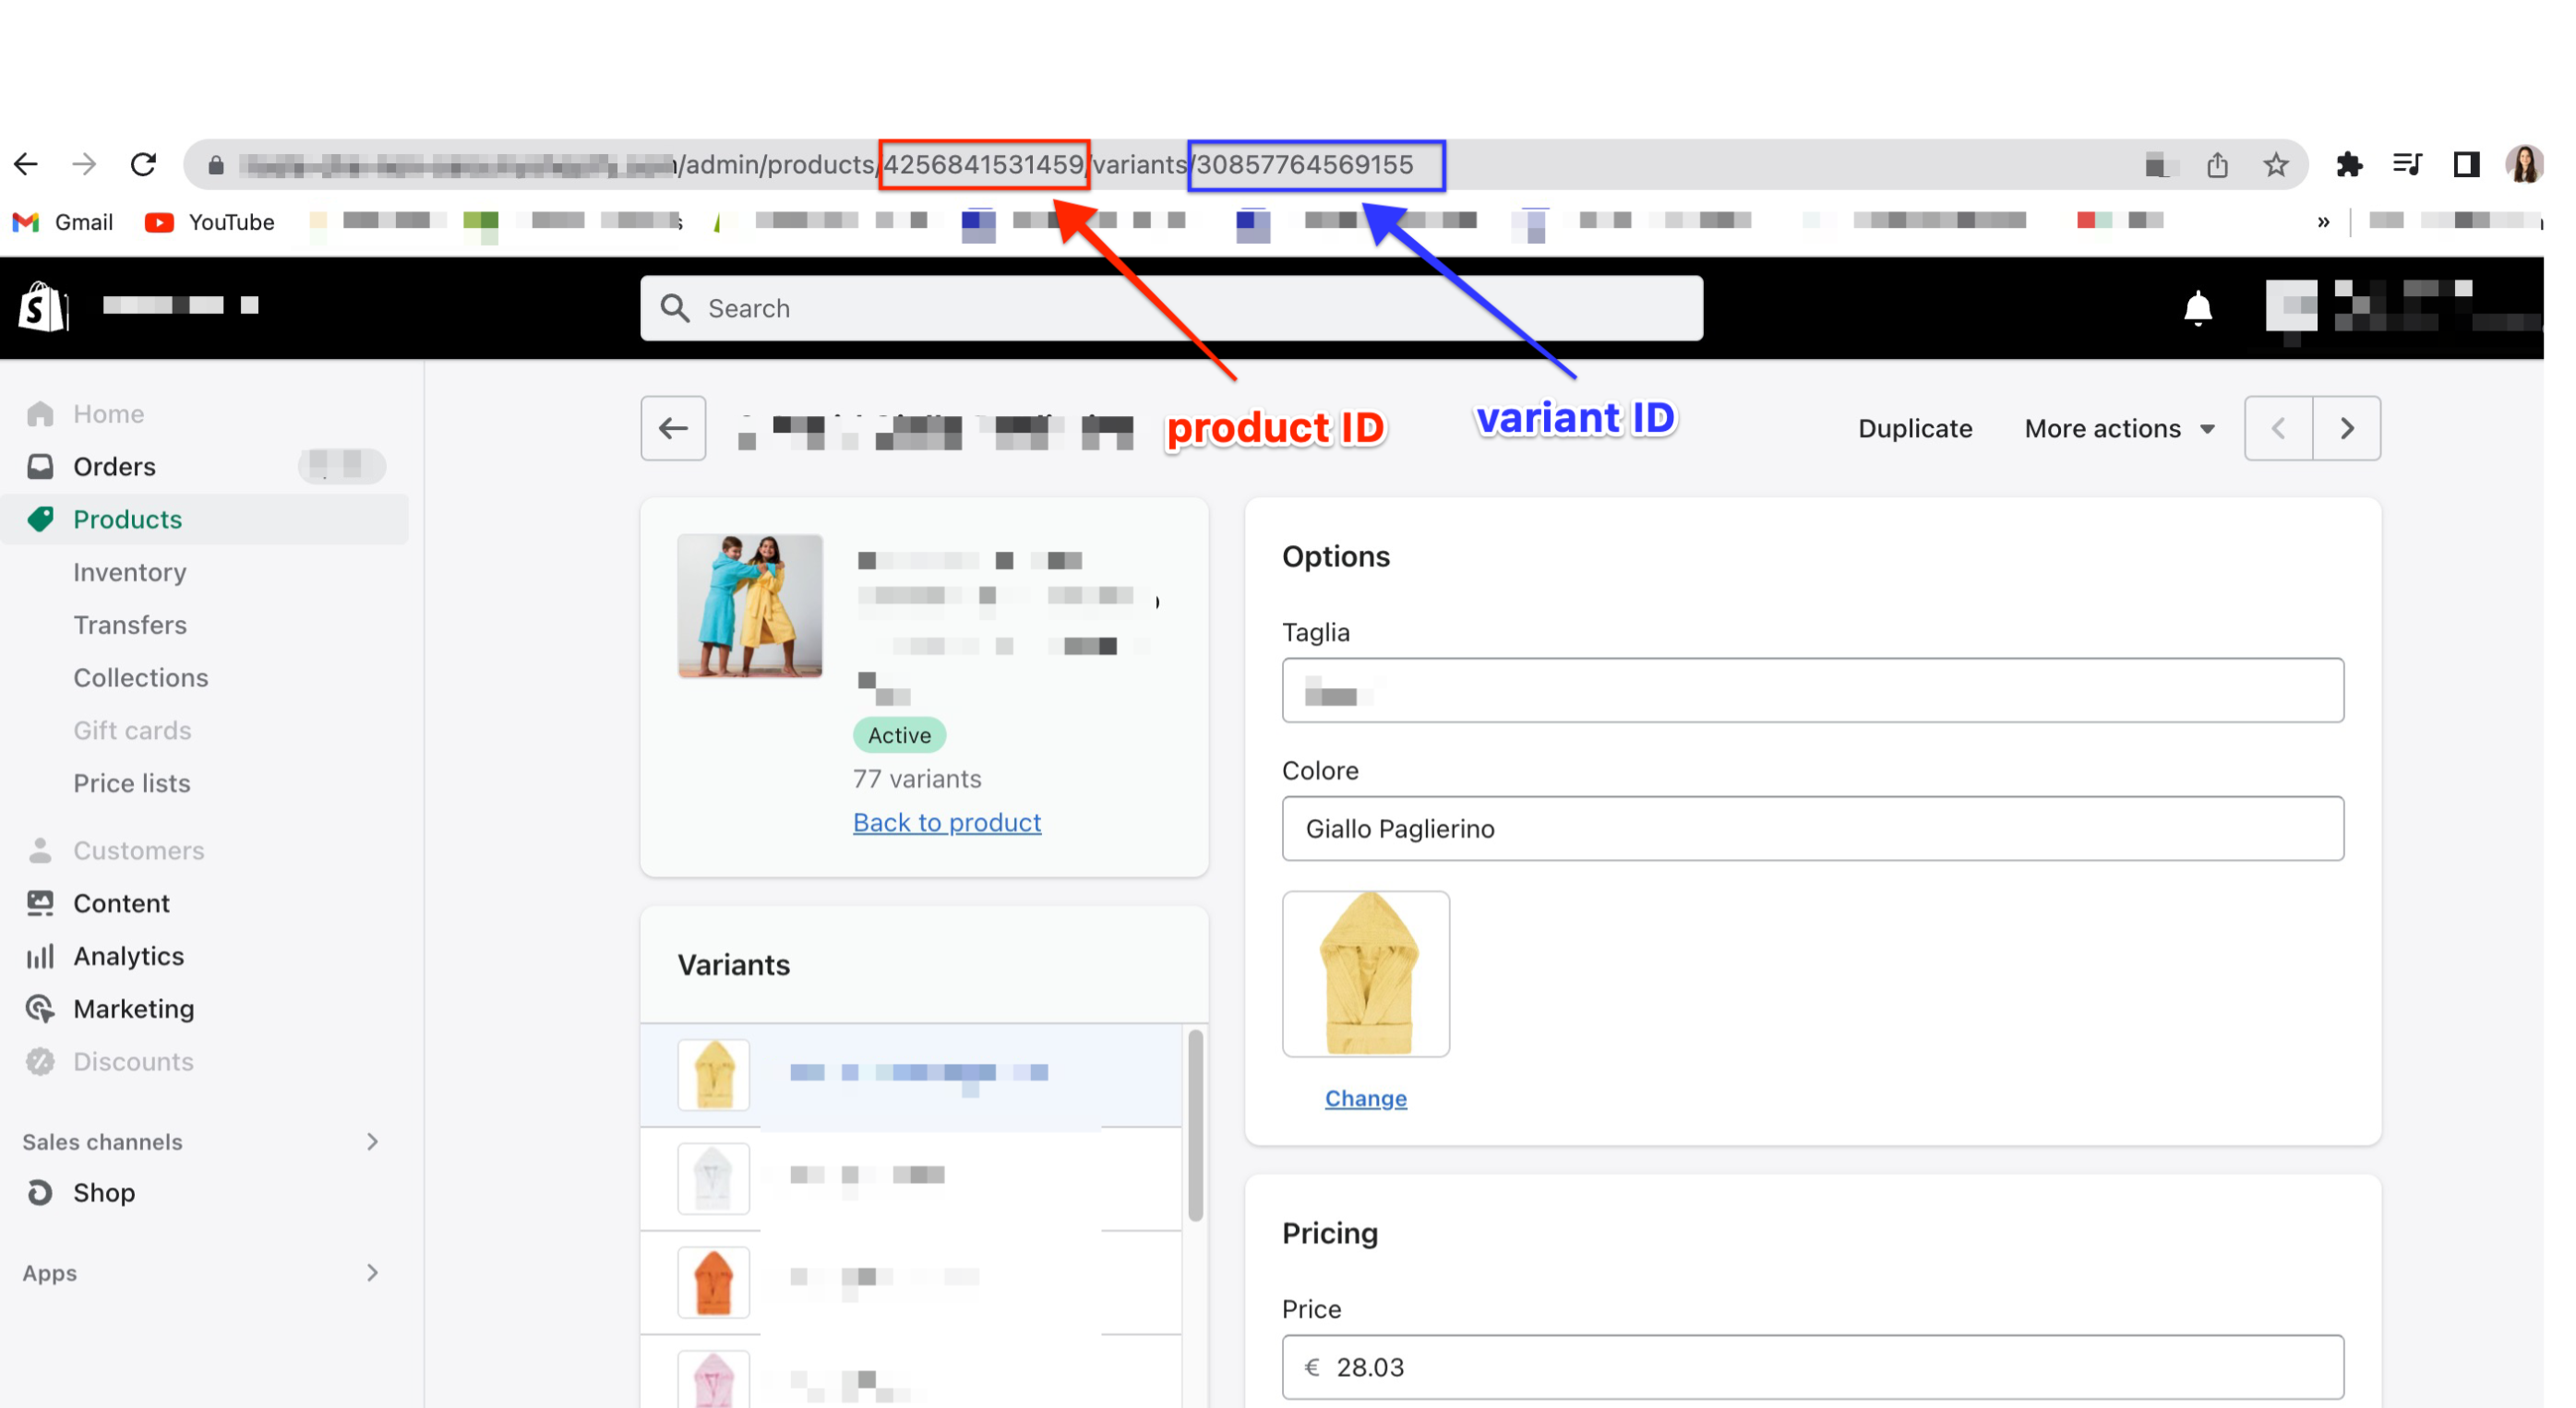
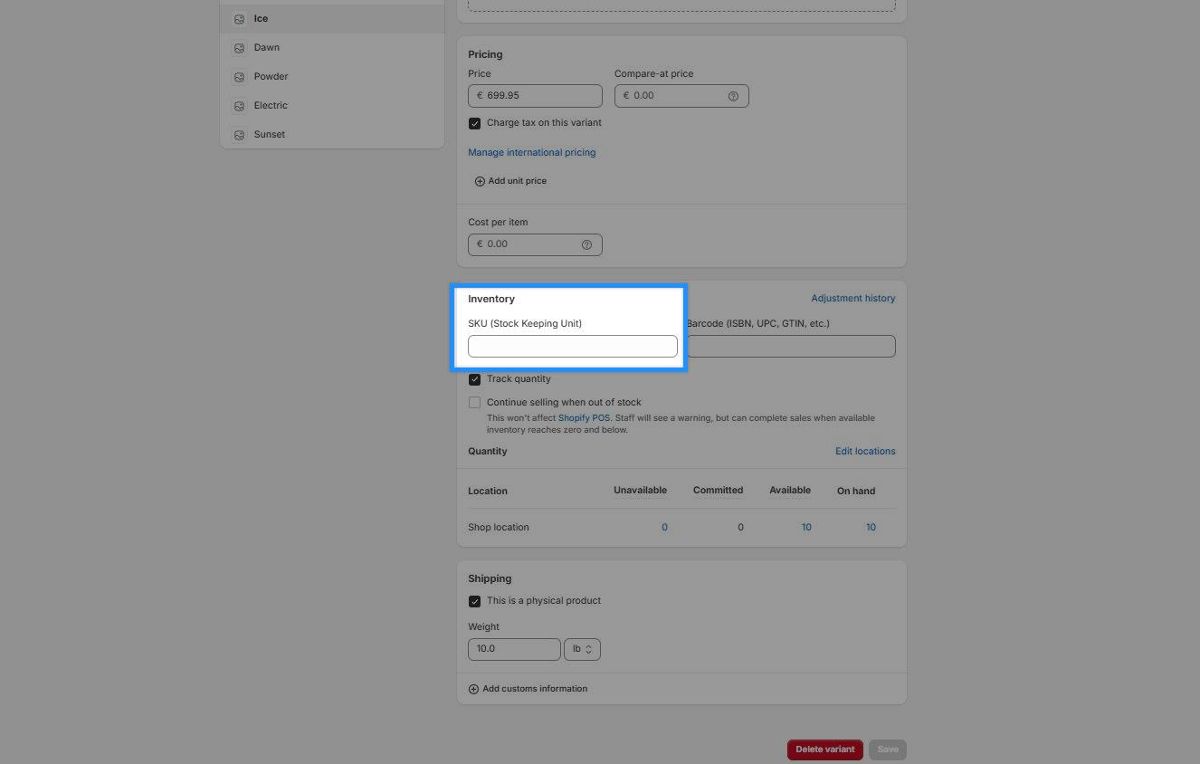
After locating your item IDs, you'll need to determine which IDs correspond to product IDs, variant IDs, or SKUs in your Shopify store. Here's how to identify them:
1) Go to Products in Shopify admin
2) Open any product with variants
3) Check the URL to find Product and Variant IDs

4) Look in the variant details to find the SKU

Once you've identified which ID type matches your Merchant Center feed, select that format in Analyzify.
Note: Make sure to use the same Item ID format you selected for Google Ads Conversion Tracking to maintain consistency.
After choosing your item ID:
- Click "Next" to proceed to the next screen
- Copy the provided code block
- Go to Shopify Customer Events
- Click "Add custom pixel"
- Name it as "Analyzify 4.0 GAds Remarketing"
- Under Customer Privacy:
-
- Choose "Not required"
- Check "Data collected does not qualify as data sale"
- Paste the code block you copied into the Code field
- Click "Save" then select "Connect."
- Go back to the Analyzify app and mark "I added the code and connected the new pixel." as done.
- After a couple of minutes, your remarketing data flow is ready!
Note: If you already have an existing Google Ads Remarketing Tracking pixel, make sure to disconnect and delete the old version before adding the new one to avoid duplication.
2. Customized (GTM) Integration Method
The Customized (GTM) Integration method uses Google Tag Manager (GTM) to set up dynamic remarketing tracking. Note that this method requires familiarity with GTM and additional technical setup compared to direct integration.
To proceed with the GTM integration, make sure you have a Google Tag Manager account and access to your Google Ads account. Then follow these steps:
- Access your Analyzify app and start your Customized (GTM) Integration.
- Complete the storefront and custom pixel steps.
- During the final setup stage, select "Google Ads Dynamic Remarketing" when choosing your desired integrations for the GTM container creation.
- Download the generated container and import it to your Google Tag Manager account following our guide.
- Add your conversion ID and product ID format to the related variables.
-
- For detailed variable customization instructions, visit our Customize and Import Analyzify Tags into GTM article.
- Test the configuration using GTM Preview mode .
- Publish your container once testing is complete.
For detailed instructions and best practices, refer to our complete GTM setup guide .
Google Ads Account Settings
Before activating your remarketing setup, verify these settings in your Google Ads account:
Check for Existing Remarketing Sources
- Navigate to: Tools → Shared Library → Audience Manager → Your Data Sources
- Look for any active remarketing data sources
- Ensure no other apps are pushing remarketing data
Verify Your Item ID Format
- Confirm your product feed's item ID format matches Google Ads
- Use supported formats: product ID, variant ID, SKU, or Shopify product ID format
Confirm Your Conversion ID
- Copy the correct conversion ID from Google Ads
- Enter it accurately in your Analyzify settings
Frequently Asked Questions (FAQs)
If you currently don't have remarketing data flow from any other apps (such as Google & YouTube or other feed apps), or if you're uncertain about the remarketing tracking from other apps, our remarketing setup would be an excellent solution for you.
When choosing Analyzify for remarketing tracking, remember to discontinue the remarketing data flow from other apps to prevent any double counting.
For dynamic remarketing, it's crucial that the item ID formats in your feed align with those pushed to Google Ads. Google Ads relies on matching these item IDs to serve ads with the exact products that users have previously viewed on your site. If there's a mismatch, it could lead to issues where ads don't display the correct items, which may impact the performance and accuracy of your campaigns.
Our setup supports multiple ID formats (product ID, variant ID, SKU, and Shopify product ID format (shopify_CountryCode_ProductID_VariantID) from Shopify to provide flexibility. However, for any formats you've added to your feed (and that Shopify doesn't natively include), our ability to match them accurately to Google Ads can be limited.
To ensure the most consistent tracking and a seamless remarketing data flow with Analyzify, we recommend using the supported formats (product ID, variant ID, SKU, or Shopify's product ID format).
Click on 'Tools' from the left menu, then under 'Shared Library,' click on 'Audience Manager,' and then 'Your Data Sources.'
Google Ads tag collects data from websites to advertise to people who visit the website. Dynamic remarketing data collected from Google Ads tags and codes is also aggregated here.
To review the data for this tag, click on "details."
If you see an event & ID flow here, it indicates that remarketing data is already being collected. Notably, if you observe eComm data (ecomm_pagetype, ecomm_prodid, and ecomm_totalvalue), you can be certain that data is being collected from a different channel.
If your event match rate for dynamic remarketing data appears as 0%, it could be due to one or more of the following reasons:
- No Active Campaigns: If you don't have any Display or Performance Max campaigns running, the event match rate will remain 0% because dynamic remarketing data is only used in these campaign types.
- Item ID Mismatch: The item IDs being sent from your website may not align with the IDs in your product feed.
- Incomplete Tag Implementation: The remarketing tag may not be properly installed on key pages.
- Feed Issues: If your product feed is outdated or contains incorrect information.
- Delay in Data Processing: Google Ads may take some time to process and match the data.
First, locate your item IDs in Google Ads:
- Go to Products in Google Ads
- Click Products again to view your Item IDs
Note: If Products isn't visible, click your PMax/shopping campaign first.
Item IDs can also be located directly within the Google Merchant Center. For instructions on how to access and identify your item IDs through the Merchant Center, please refer to our guide.
Need Additional Help?
You can create a service ticket and ask for our expert team's help.
