When you use Analyzify's GA4 integration, you gain access to enhanced data tracking capabilities for your Shopify store. Our integration provides 20+ additional reports and metrics compared to Shopify's native integration, with complete e-commerce tracking through Shopify's latest technologies.
Your enhanced tracking capabilities include view item list, select item, and cart interactions, along with complete checkout step monitoring. We capture enriched data including SKUs, variants, collection information, and comprehensive order details like coupons and payment methods.
Key benefits of our GA4 integration:
- Additional events like newsletter signups and product page interactions
- Complete funnel visibility with checkout step tracking
- Extended parameter tracking for products, orders, and customers
Google Analytics 4 Integration Methods with Analyzify
Analyzify offers two integration methods for GA4 setup:
- Direct Integration
- Customized Integration (with GTM)
To understand the differences between these methods and choose the one that best suits your needs, please read our guide on choosing the right integration method .
Important Notes Before Setup:
- Choose only one integration method. Do not activate both methods simultaneously.
- Enable the Analyzify app embed toggle on your live theme, otherwise completing the integration steps wouldn’t activate the GA4.
- Don’t forget to connect your custom pixel to track checkout steps.
1. Direct Integration Method
Follow the steps for direct integration method:
Step 1: Choose Your Setup Method
Automated Setup (Recommended)
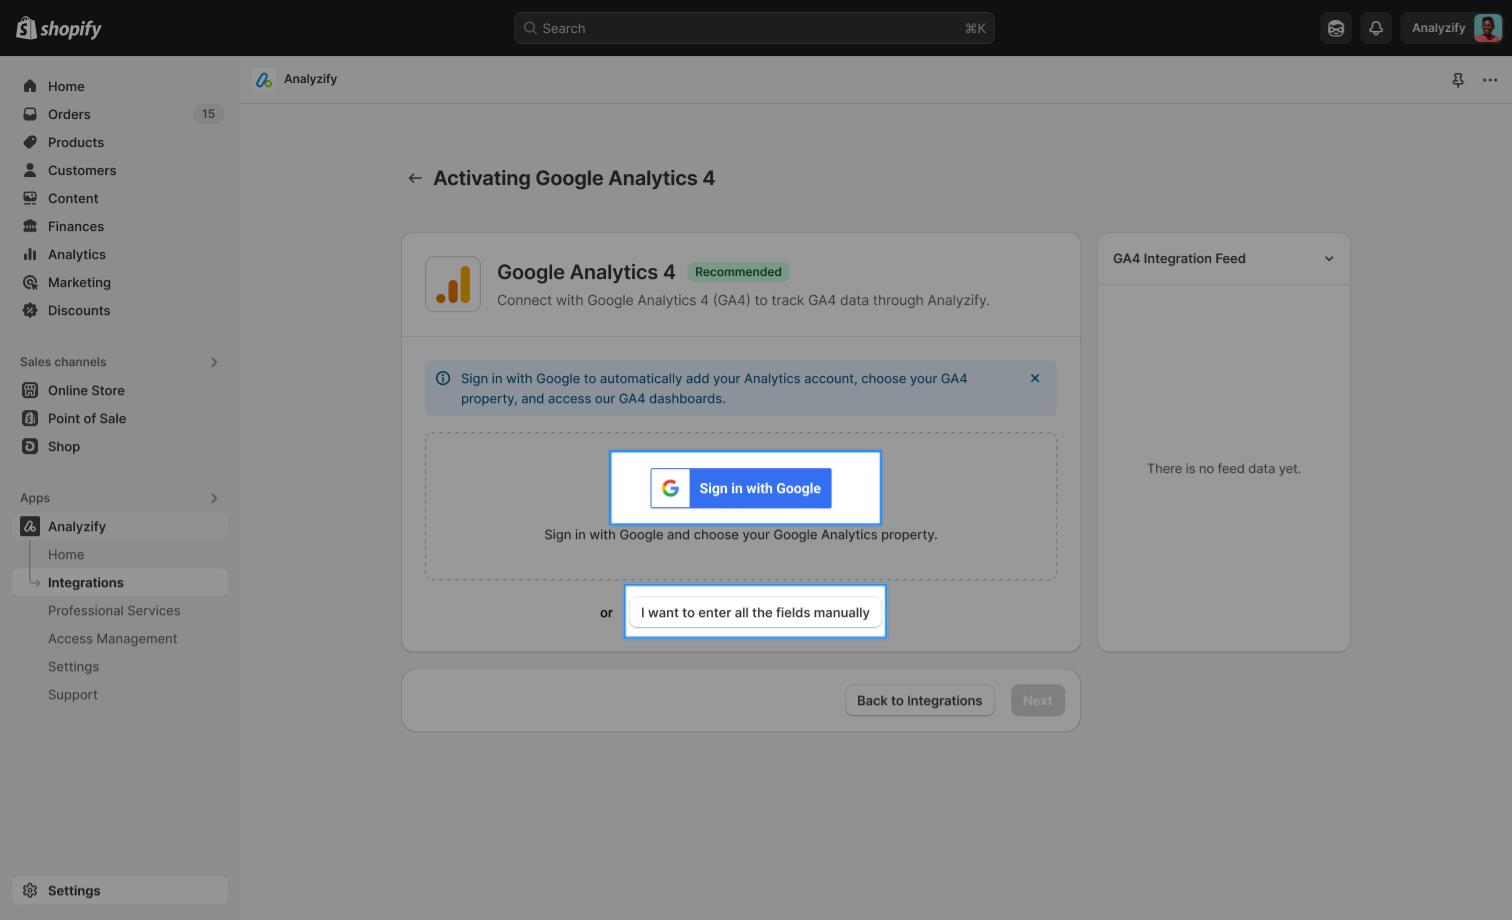
- Click "Sign in with Google"
- Select your Google account with GA4 access
Note: Choose Manual Setup option if you prefer to enter your GA4 Measurement ID manually. If you choose Automated Setup your GA4 Measurement ID will be automatically populated.
Step 2: Authorization (For Automated Setup)
- After selecting your Google account, complete the authorization steps
- Once you see the "Authorization Completed" message, click "Next Step" to proceed
Step 3: Configure Analytics Settings
Choose Your Analytics Details
- Select your Analytics Account from the dropdown
- Choose your Analytics Property
- Select the appropriate Measurement ID
- Click "Save" to complete this step
Note: If needed, click "Re-authorize" to authenticate with a different Google account
Step 4: Configure Analytics Data
4.1 Enter GA4 Measurement ID
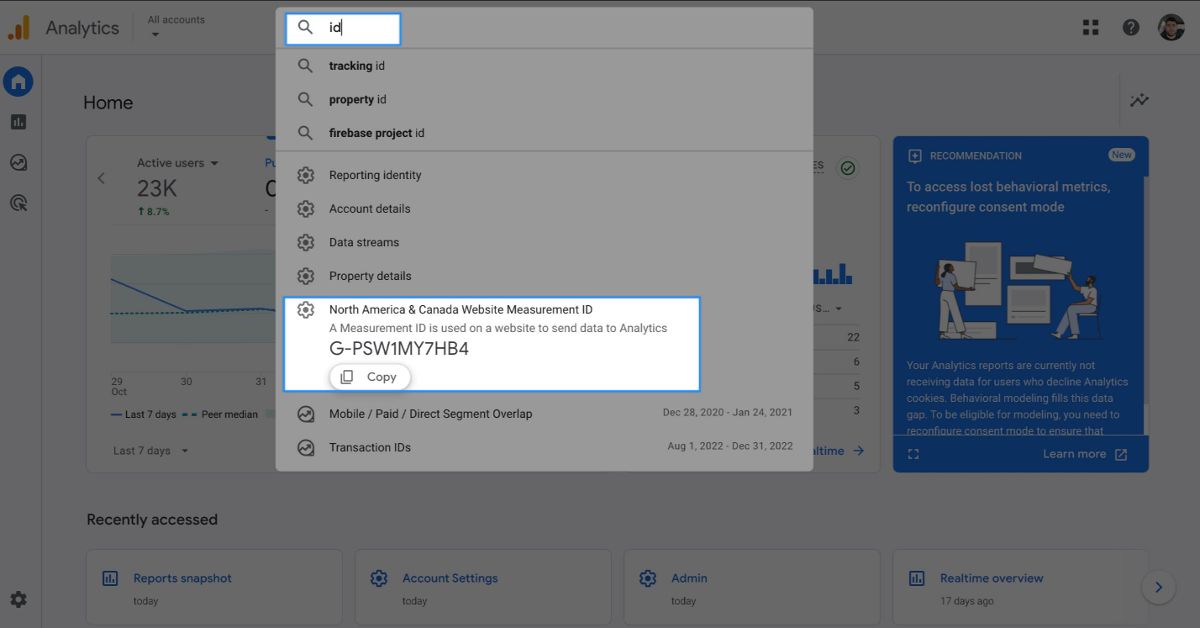
The GA4 Measurement ID is a unique identifier used in Google Analytics 4 to track data for your property. It always starts with 'G-'. If you're using manual setup or if the field isn't auto-populated, you'll need to enter this ID. You can find your Measurement ID by logging into Google Analytics and typing 'ID' in the search bar at the top.
4.2 Add GA4 API Secret
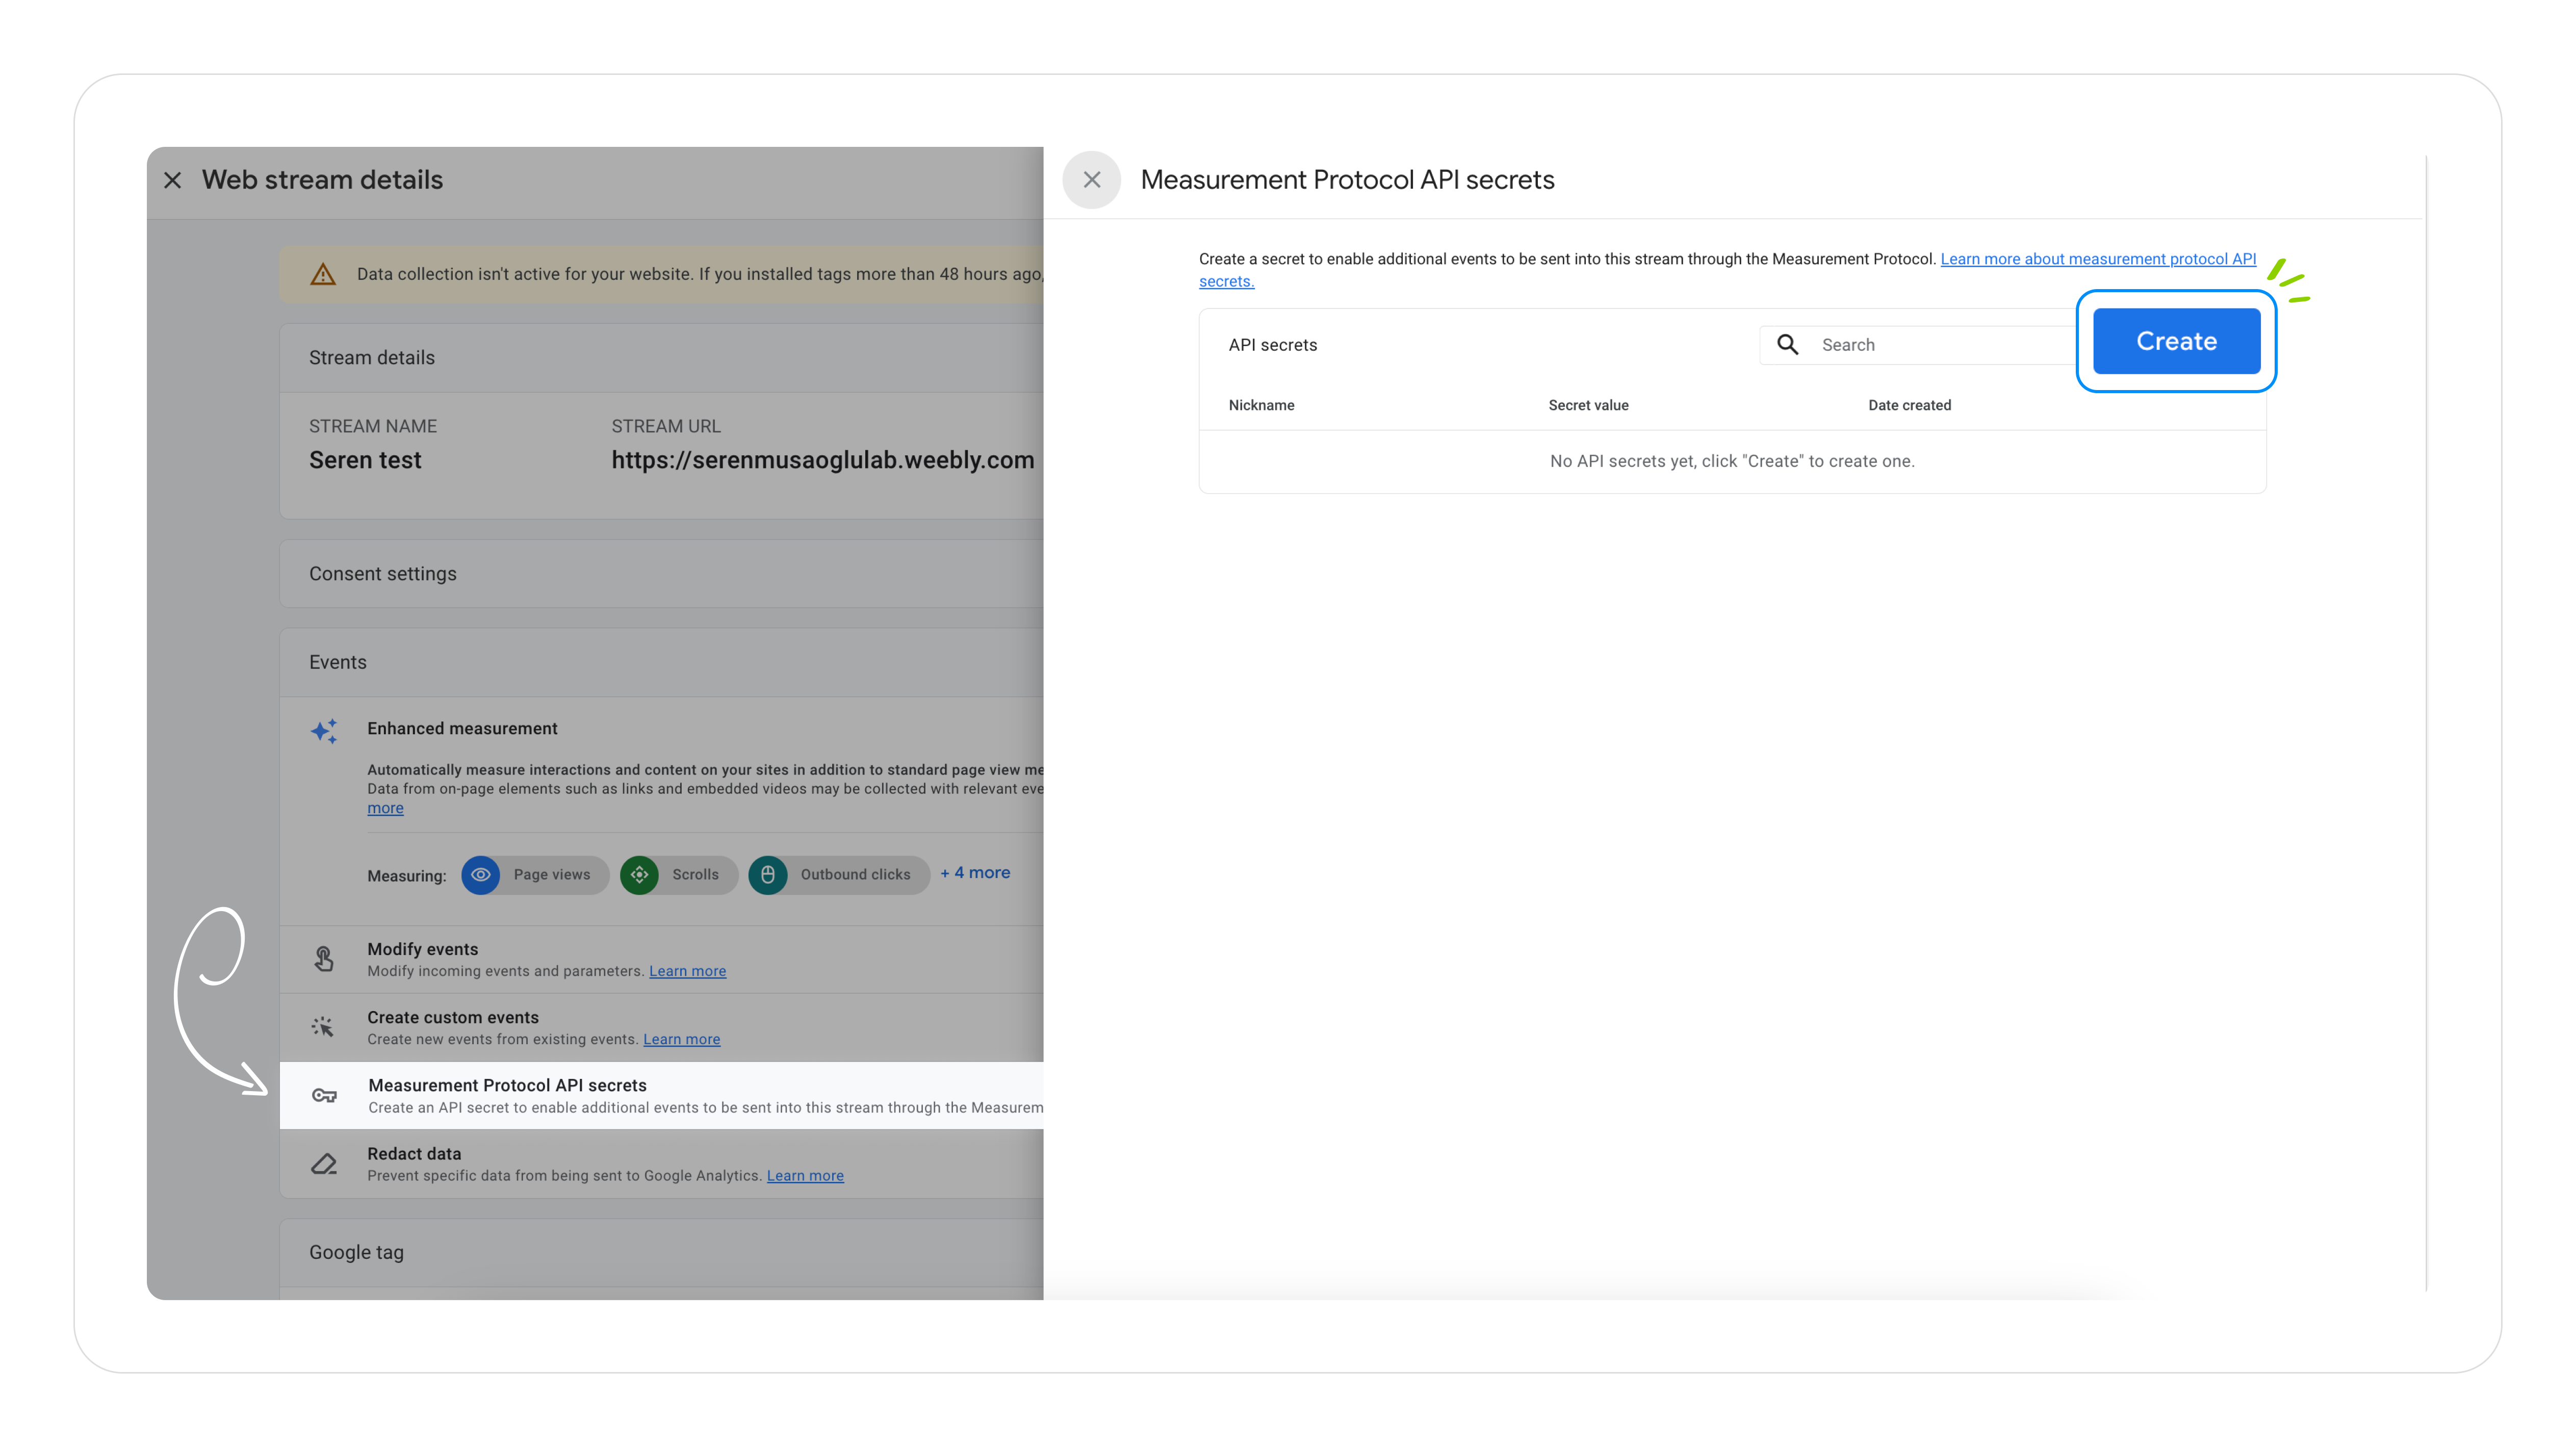
You need to generate a Measurement Protocol API Secret in GA4 to track checkout events. The API secret is a secure key used to send data directly to GA4 safely. Here's how to create it:
- Go to Google Analytics 4 > Click gear icon (bottom left)
- Under property column, click Data Streams
- Select your website's web stream
- Find "Measurement Protocol API Secret" under Events section
- Click Create > Enter a nickname > Click Create
- Copy the secret value and paste it into Analyzify
4.3 Find Your Item ID Format
First, locate your item IDs in Google Merchant Center:
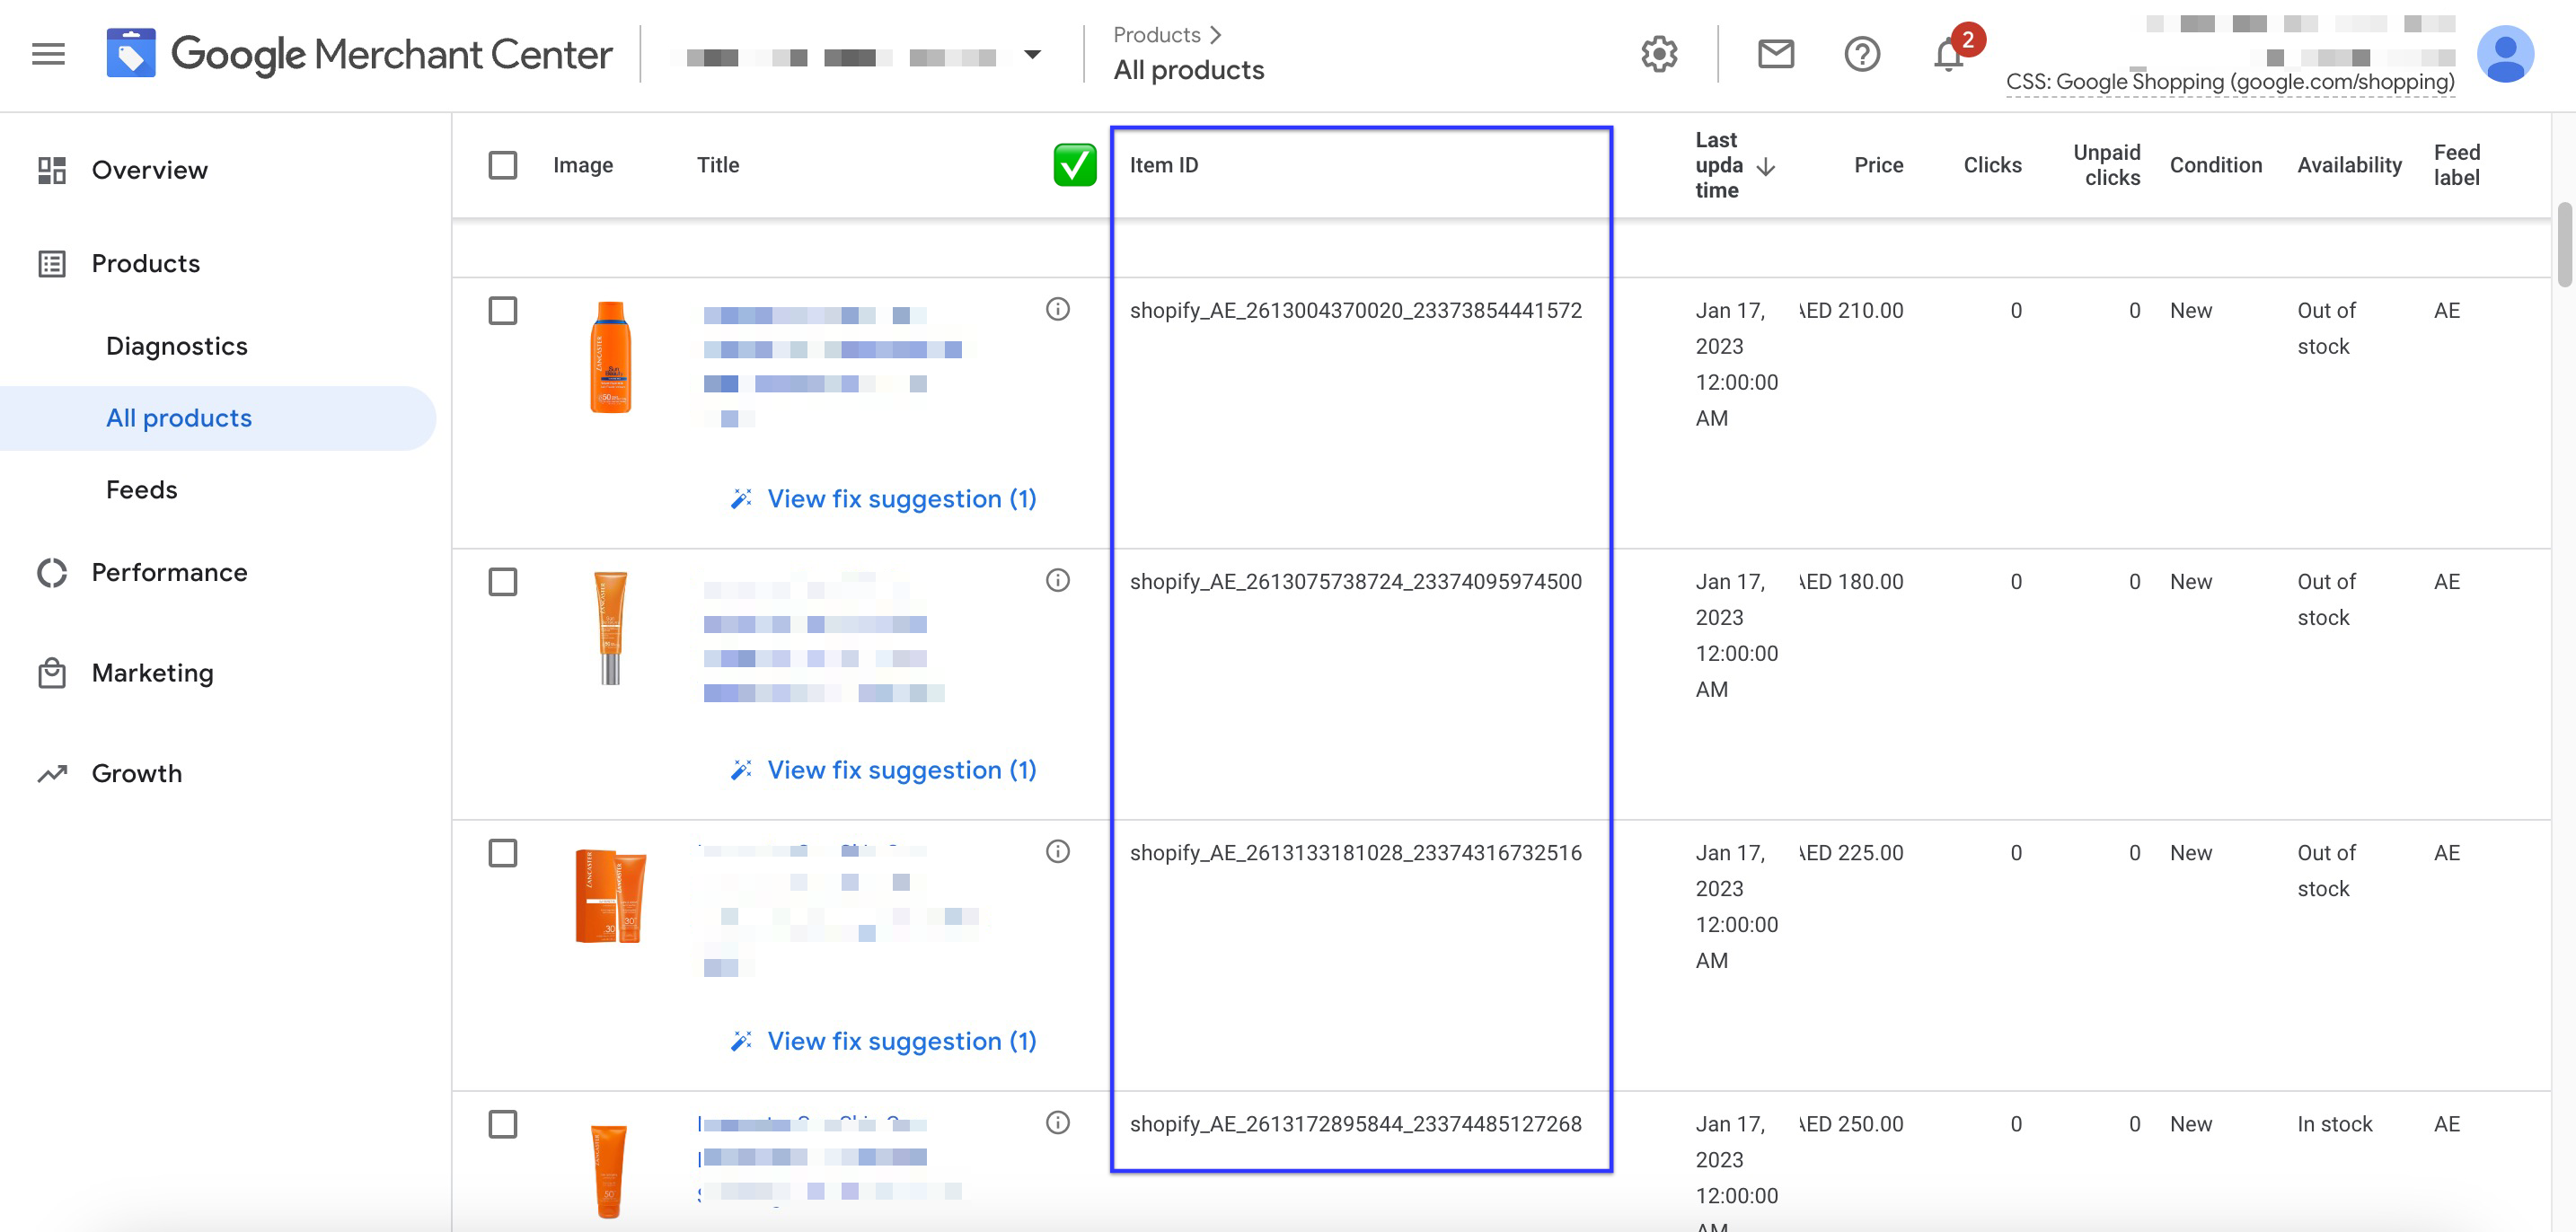
- Go to Products > All Products in Merchant Center
- Review the product details to see your item IDs
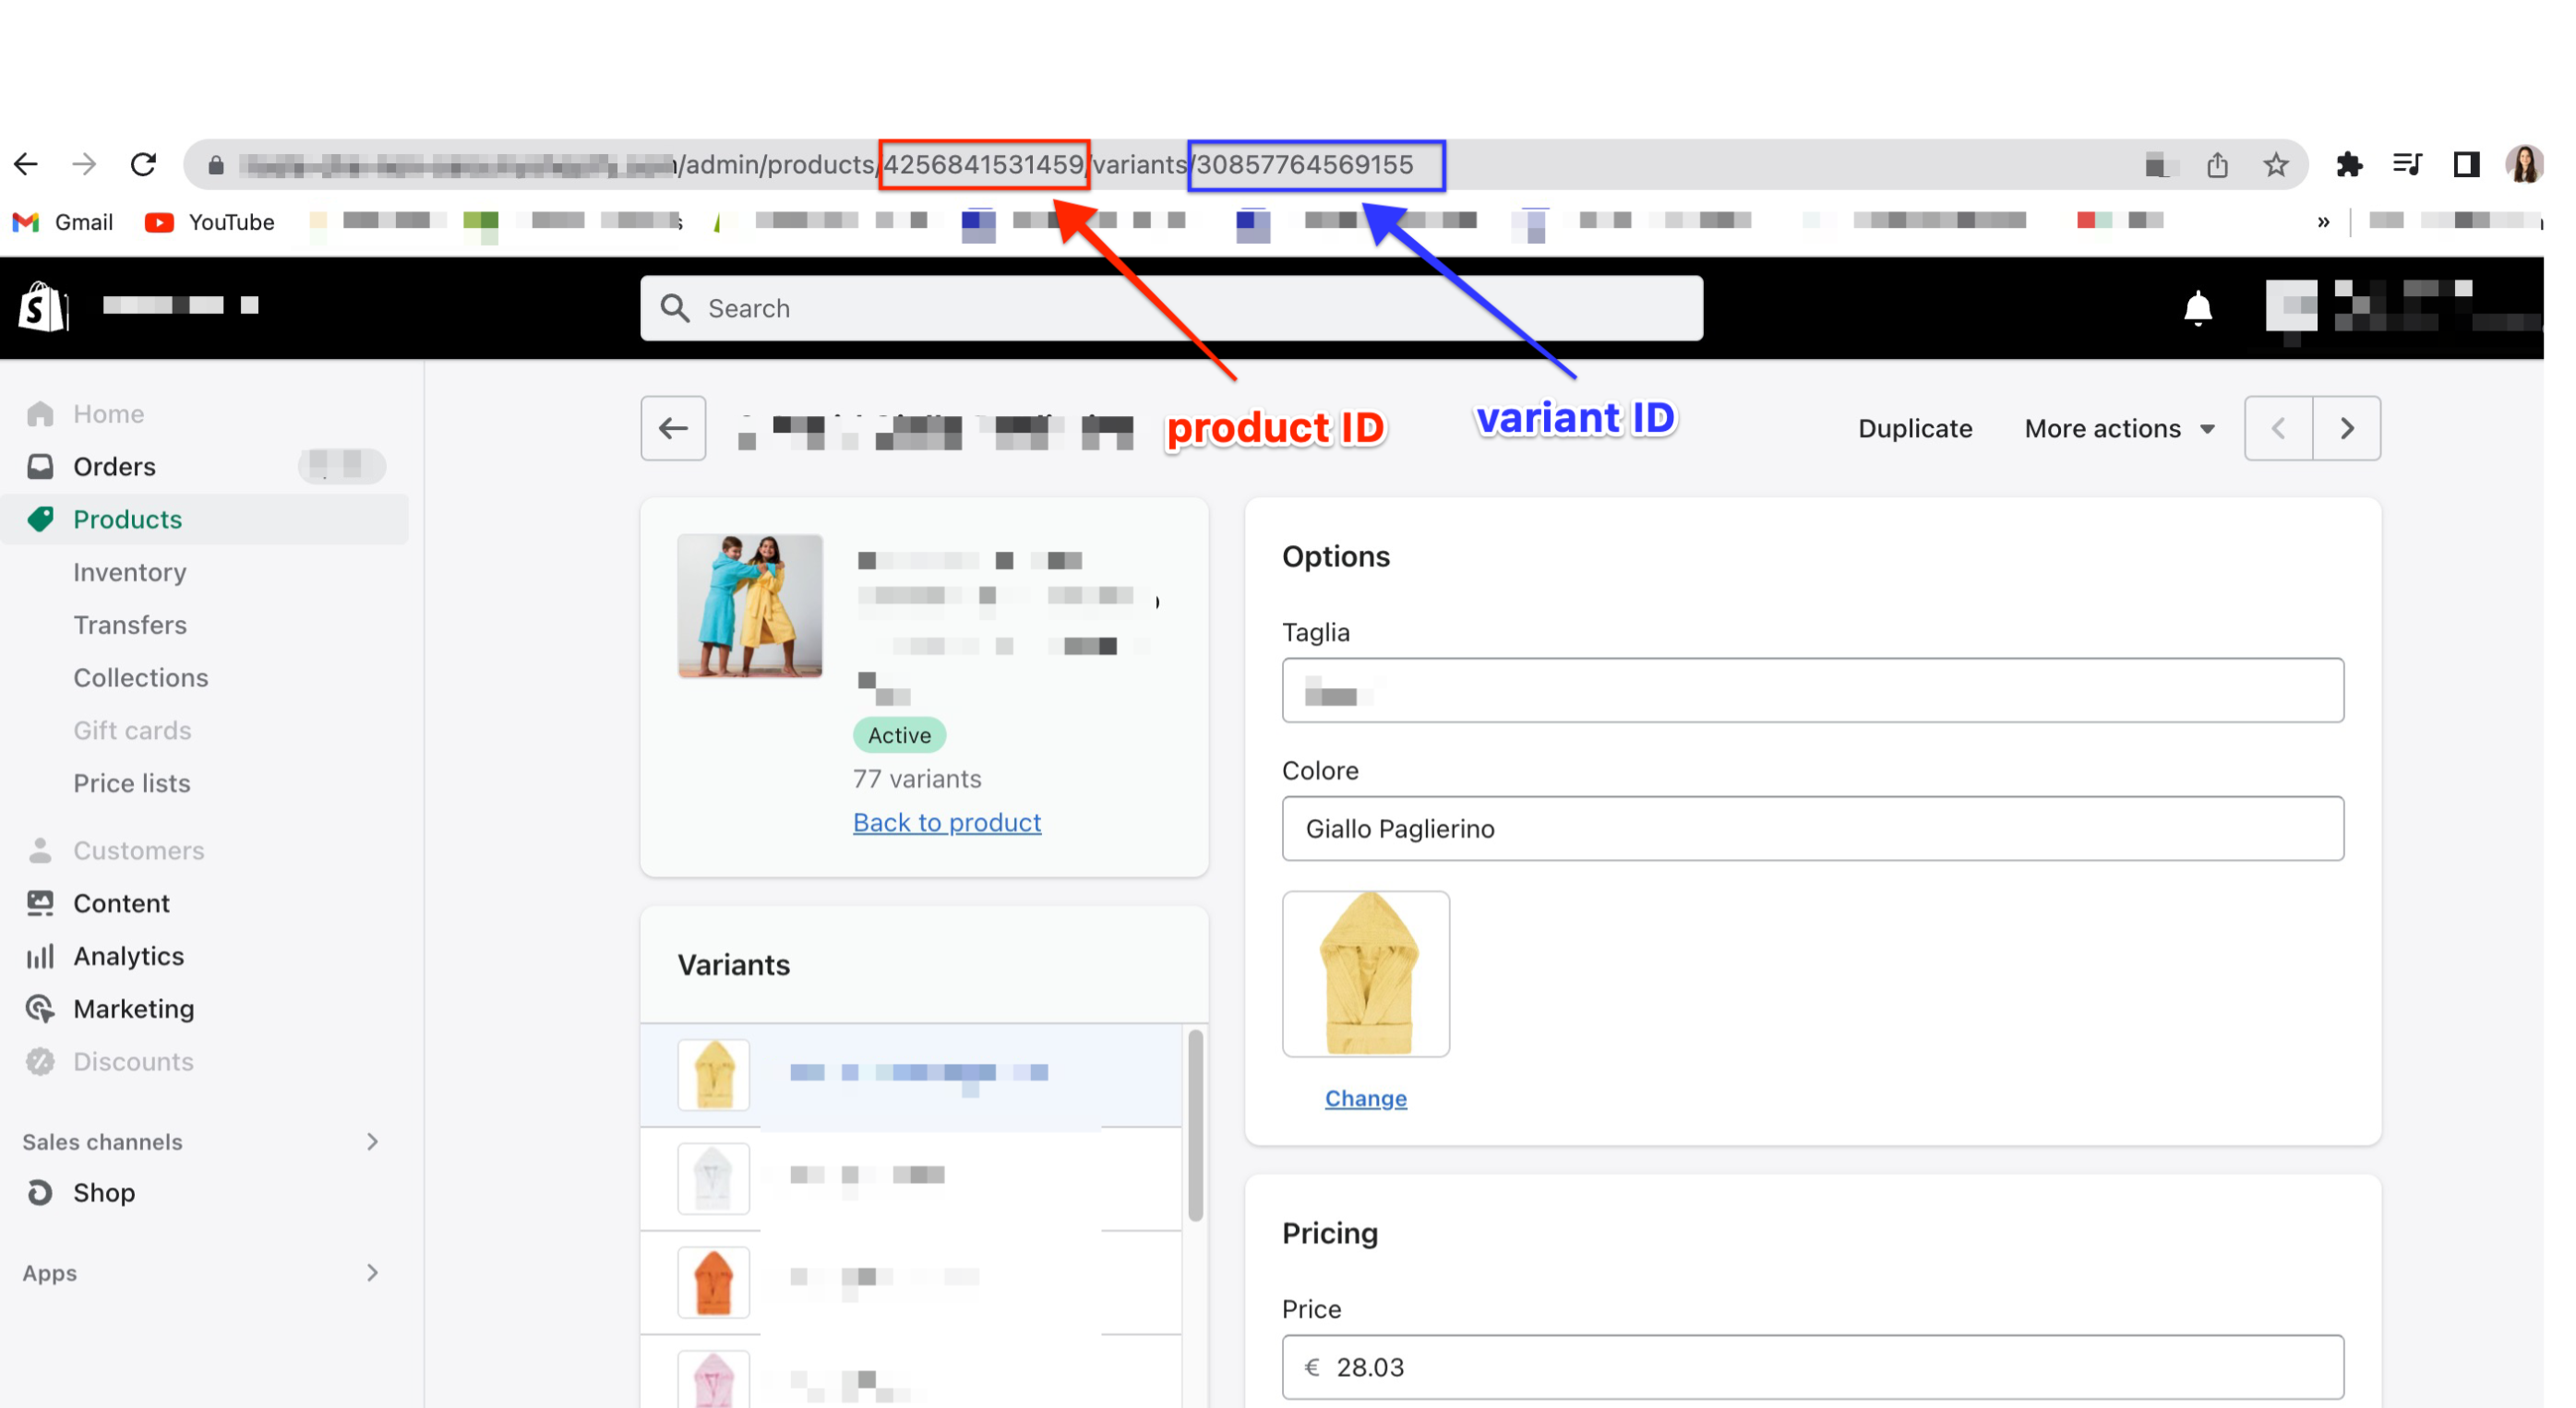
After locating your item IDs in Merchant Center, you'll need to determine which IDs correspond to product IDs, variant IDs, or SKUs in your Shopify store. Here's how to identify them:
1) Go to Products in Shopify admin
2) Open any product with variants
3) Check the URL to find Product and Variant IDs
4) Look in the variant details to find the SKU
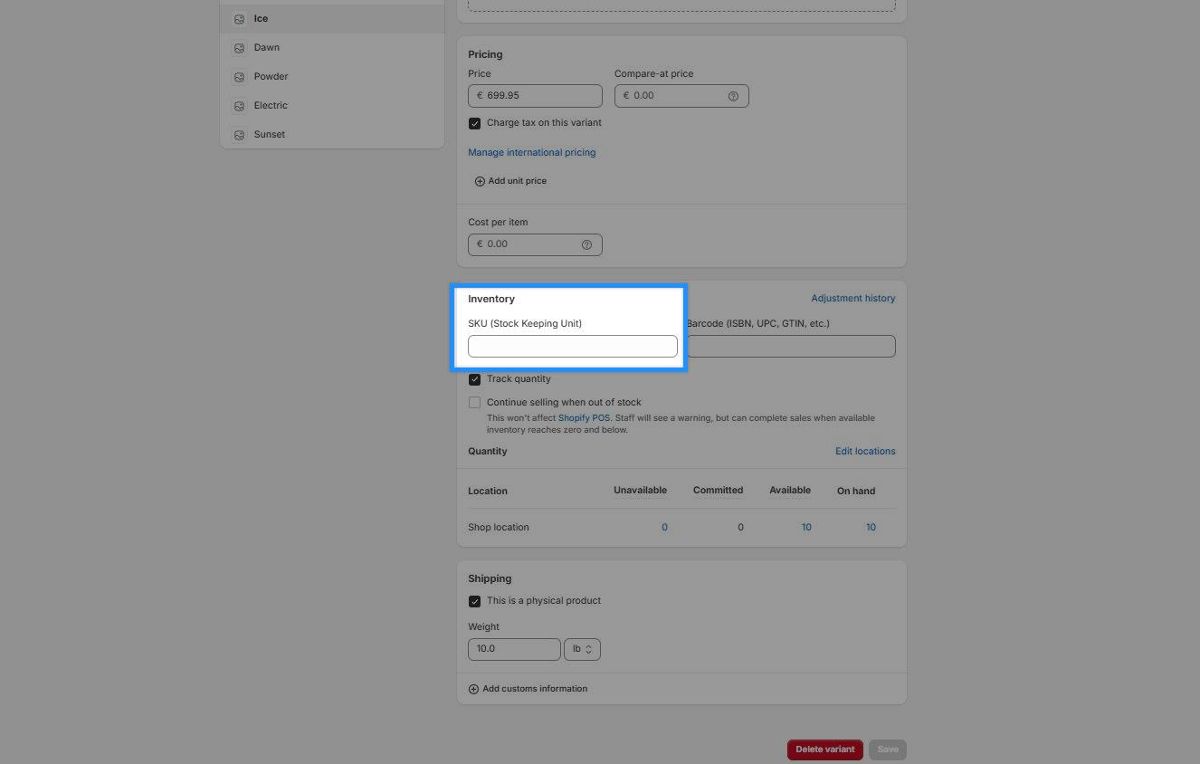
Once you've identified which ID type matches your Merchant Center feed, select that format in Analyzify.
- Click "Next" to proceed to the next screen
- Copy the provided code block
- Go to Shopify Customer Events
- Click "Add custom pixel"
- Name it as "Analyzify 4.0 GA4"
- Under Customer Privacy:
-
- Choose "Not required"
- Check "Data collected does not qualify as data sale"
- Paste the code block you copied into the Code field
- Click "Save" then select "Connect."
- Go back to the Analyzify app and mark "I added the code and connected the new pixel." as done.
- After a couple of minutes, your GA4 data flow is ready!
Note: If you already have an existing Google Analytics 4 pixel, make sure to disconnect and delete the old version before adding the new one to avoid duplication.
2. Customized (GTM) Integration
To proceed with the GTM integration, make sure you have a Google Tag Manager account and access to your GA4 property. Then follow these steps:
- Activate the customized (GTM) Integration within the Analyzify app.
- During the final setup stage, select GA4 when choosing your desired integrations for the GTM container creation.
- Download the generated container and import it to your Google Tag Manager account. See our step-by-step guide here .
- Configure your GA4 variables by following our documentation .
- Test your GA4 tags using GTM Preview mode to ensure everything is working correctly. Learn more about how to use GTM preview mode .
For detailed instructions and best practices, refer to our complete GTM setup guide .
GA4 Account Settings
Check these critical GA4 configuration settings to ensure accurate data collection:
- Custom Events : Ensure custom events don't use standard e-commerce event names to prevent duplicate counting.
- Google Tags Structure: Use one tag with "G-" prefix and one with "GT-" prefix, both pointing to a single destination ID. Multiple tags or destinations can cause unstable data and duplicates.
- Referral Exclusions : Properly configured referral exclusions help maintain data accuracy by preventing internal traffic and payment gateways from being counted as referral sources. Learn more in our guide: https://docs.analyzify.com/referral-exclusions-on-ga4
- Universal Analytics : Turn off Universal Analytics Events Collection to prevent duplicate counting.
Frequently Asked Questions (FAQs)
Key setup considerations include:
- Use a separate GA4 property for Analyzify
- Generate an API secret for checkout tracking
- Choose your preferred item ID format (we recommend SKU)
- Ensure your Google tag has a single destination
- Configure referral exclusions and cross-domain measurement
Need Additional Help?
You can create a service ticket and ask for our expert team's help.
