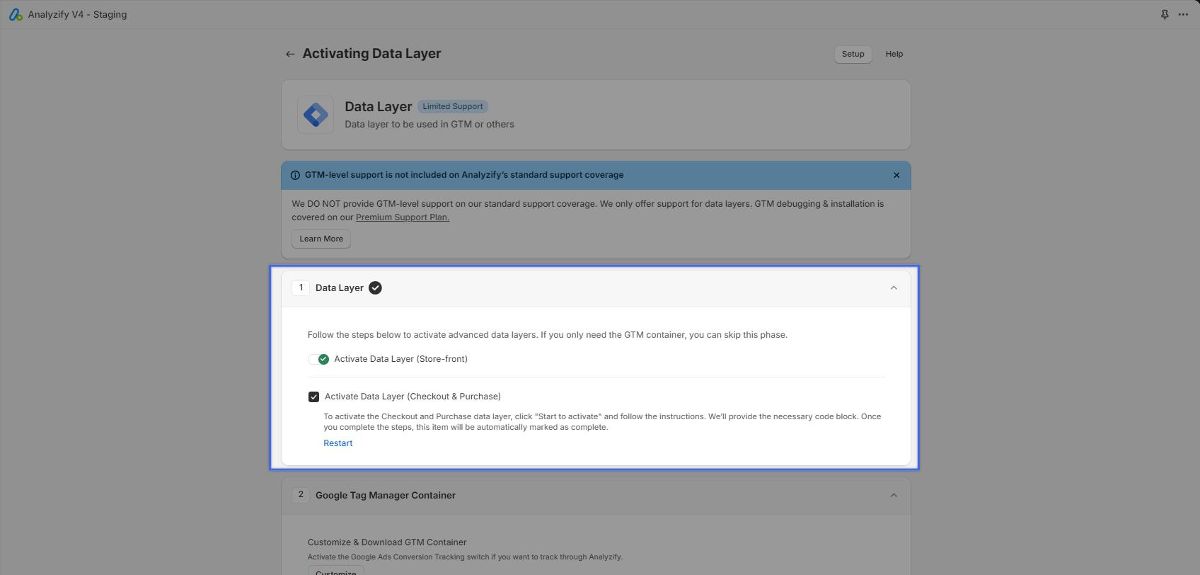
Analyzify v4 provides dataLayer activation with app embed, custom pixel code and the Google Tag Manager (GTM) container to ensure your setup works smoothly.
If you choose to use Google Tag Manager, follow this step-by-step tutorial to activate our data layers and obtain the GTM container for your setup.
Here’s the updated information and instructions for adjusting tags in GTM. If you need assistance, you can opt for our Premium Support Plan.
What's New
In previous versions, users who downloaded the GTM container from the app had their constants automatically generated during onboarding, including:
- Google Analytics 4: Measurement ID, Product ID Format
- Google Ads: Conversion ID, Conversion Action IDs (Purchase, Begin Checkout, etc.), Product ID Format (Item ID format)
With v4, the GTM container no longer automatically populates these constants, as they may vary between stores. If you made customizations in the Analyzify v3.3 GTM container, those changes will be lost when upgrading to v4. This includes any adjustments made based on your specific needs.
To avoid an incomplete or incorrect setup, be sure to manually update the necessary constants before publishing the GTM container downloaded via v4. Skipping this step can lead to errors in tracking and data collection.
Alternative: Keeping Your v3.3 GTM Container
If you’re not comfortable making these changes, don’t worry. Analyzify v4 dataLayer codes are fully compatible with the v3.3 GTM container. You can complete the migration steps by turning off the Analyzify v3 (Legacy) and enabling Analyzify v4 (Latest) app embed. However, to ensure optimal performance, we recommend keeping your GTM container up to date.
Activate the dataLayer codes with v4
Before starting the GTM setup, we need to activate the dataLayer codes first. Analyzify dataLayer codes are managed through the App Embed until the checkout step, and via the Custom Pixel during the checkout steps. While the App Embed integration can be toggled on and off within the app, adding codes to the checkout steps must be done manually.

Follow these steps:
Note: If you prefer, you can skip this step and download only the GTM container.
Note:If your theme doesn’t already have a GTM snippet, keep in mind that Analyzify v4 doesn't inject the GTM code until the checkout stage. Since checkout steps are handled by the Custom Pixel in a sandboxed environment, the GTM snippet for these steps will be injected via the Custom Pixel code we provide. Once you’ve completed the steps, click "Next" to continue.
GTM Custom Pixel Code
Analyzify's Custom Pixel codes offer various configuration parameters that you can adjust to fit your specific setup.
IMPORTANT: The constants related to checkout and purchase events must remain unchanged. Do not modify the "true" value to "false" for these parameters, as these events can only be executed through this code.
- GTM ID (Required): You must enter the correct GTM ID to ensure the right GTM container is downloaded during the checkout steps.
- consentModeEnabled (Required): Set this parameter to "true" if you need compatibility with Consent Mode, especially for Google destinations during checkout and purchase events. If not required, leave it set to "false."
When enabled, this setting reads the user’s consent preferences from Shopify's consent cookie and pushes both the Google Consent Mode v2 argument and a custom event (consentUpdate) to the dataLayer.
Feed Region ID (Recommended)
This parameter corresponds to the country code used in your product IDs for the Merchant Center feed, especially if you're using Shopify’s product ID format like
shopify_XX_product-id_variant-id
. In this format, "XX" represents the country code.
Flags
Required Flags:
-
- page_viewed: Must be set to “true” to send page view events for checkout pages.
- checkout_contact_info_submitted: Sends the "add_contact_info" event to GA4.
- checkout_address_info_submitted: Sends the "add_address_info" event to GA4.
- checkout_shipping_info_submitted: Sends the "add_shipping_info" event to GA4.
- payment_info_submitted: Sends the "add_payment_info" event to GA4.
- checkout_completed: Sends the "purchase" event to GA4.
Note: Do not change the default value ("true") for the above variables. These are required for essential tracking events.
Optional Flags:
-
- product_added_to_cart: Enables/disables the “add_to_cart” event via Custom Pixel. Set to "true" only if the default App Embed event isn’t functioning properly.
- product_removed_from_cart: Enables/disables the “remove_from_cart” event via Custom Pixel. Set to "true" if the default App Embed event isn’t working correctly.
- checkout_started: Enables/disables the “begin_checkout” event via Custom Pixel. Set to "true" if the default App Embed event isn’t functioning properly.
Other Configurations (Optional):
- add_to_cart_only_collections: Set this to "true" to send add_to_cart events only from collection pages via Custom Pixel. If enabled, the “product_added_to_cart” flag must also be set to "true."
- user_data: Sends user email or other data as part of enhanced conversions. Set this to "email" to send only user emails, or leave it as “null” to include no additional data.
- itemName_option: If your store offers services in multiple languages, set this to “item_name_alt” to use alternate item names in reports.
- totalValue_option: Configures how the "value" parameter is sent in checkout events to GA4. Adjust this based on your reporting needs.
⚠️ Important : The Analyzify v4.0 dataLayer integration is already compatible with your existing Google Tag Manager tags (v3.3). If you're migrating from v3.3 or don't have technical GTM experience, you don't need to proceed with any GTM updates - your data is being transmitted properly through the current setup.
We strongly recommend against modifying the GTM configuration as incorrect changes could lead to tracking errors.
⚠️ Important Note for GTM Experts : For users with GTM expertise who need custom configurations, you can follow our guide on how to Adjust Analyzify v4 GTM Container . Only proceed if you're confident in your GTM technical knowledge.
