Analyzify's Klaviyo Server-Side integration helps you send customer events directly to Klaviyo with richer event data and a simplified setup.
Events reach Klaviyo more reliably, and each one carries additional customer and product properties you can use for segmentation and flows.
This article covers connecting the integration, verifying it's working, and migrating from Analyzify's client-side integration.
Benefits
After connecting the integration, you'll benefit from:
- Reliable event delivery: events reach Klaviyo even when ad blockers or Safari's tracking restrictions block browser-based tracking.
- Richer customer and product properties: additional detail such as city, ZIP, shipping method, payment method, coupon usage, and referrer arrive with each event, so you can build segments the Shopify-Klaviyo integration alone can't support.
- Additional ecommerce events: including checkout step events (Added Shipping Info, Added Payment Info) and Email Captured, which the Shopify-Klaviyo integration doesn't send at all.
- Simplified setup without GTM: connect with your API keys, no tag containers to maintain.
- Existing integration compatibility: runs alongside Shopify's Klaviyo integration rather than replacing it.
- Consent-aware by default: no events are sent for customers who haven't granted marketing consent.
Connect the Integration
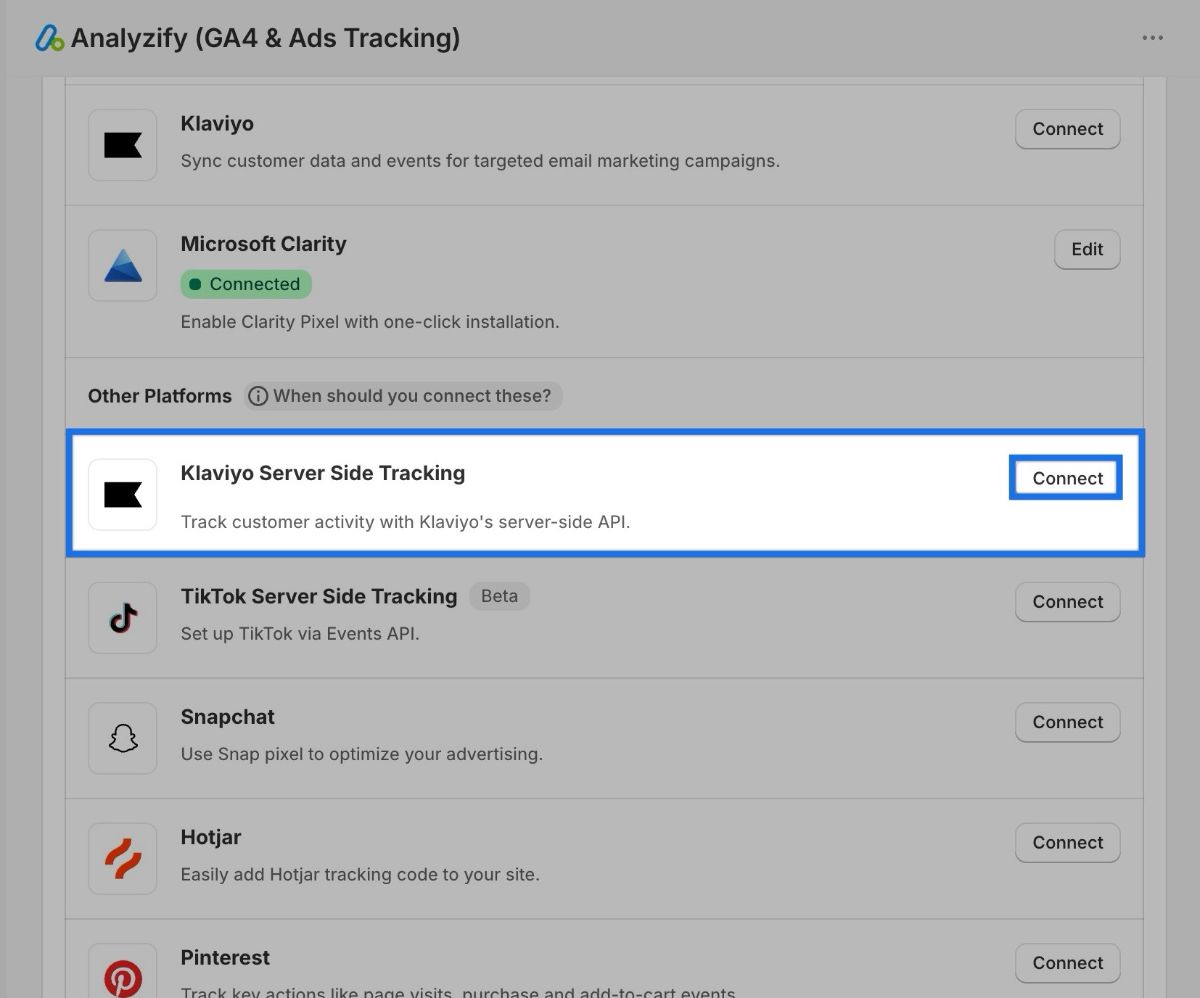
To start connecting your integration, navigate to Analyzify > Integrations. Then, click “Connect” next to Klaviyo Server Side Tracking.
Next, enter your Public API Key and Private API Key .
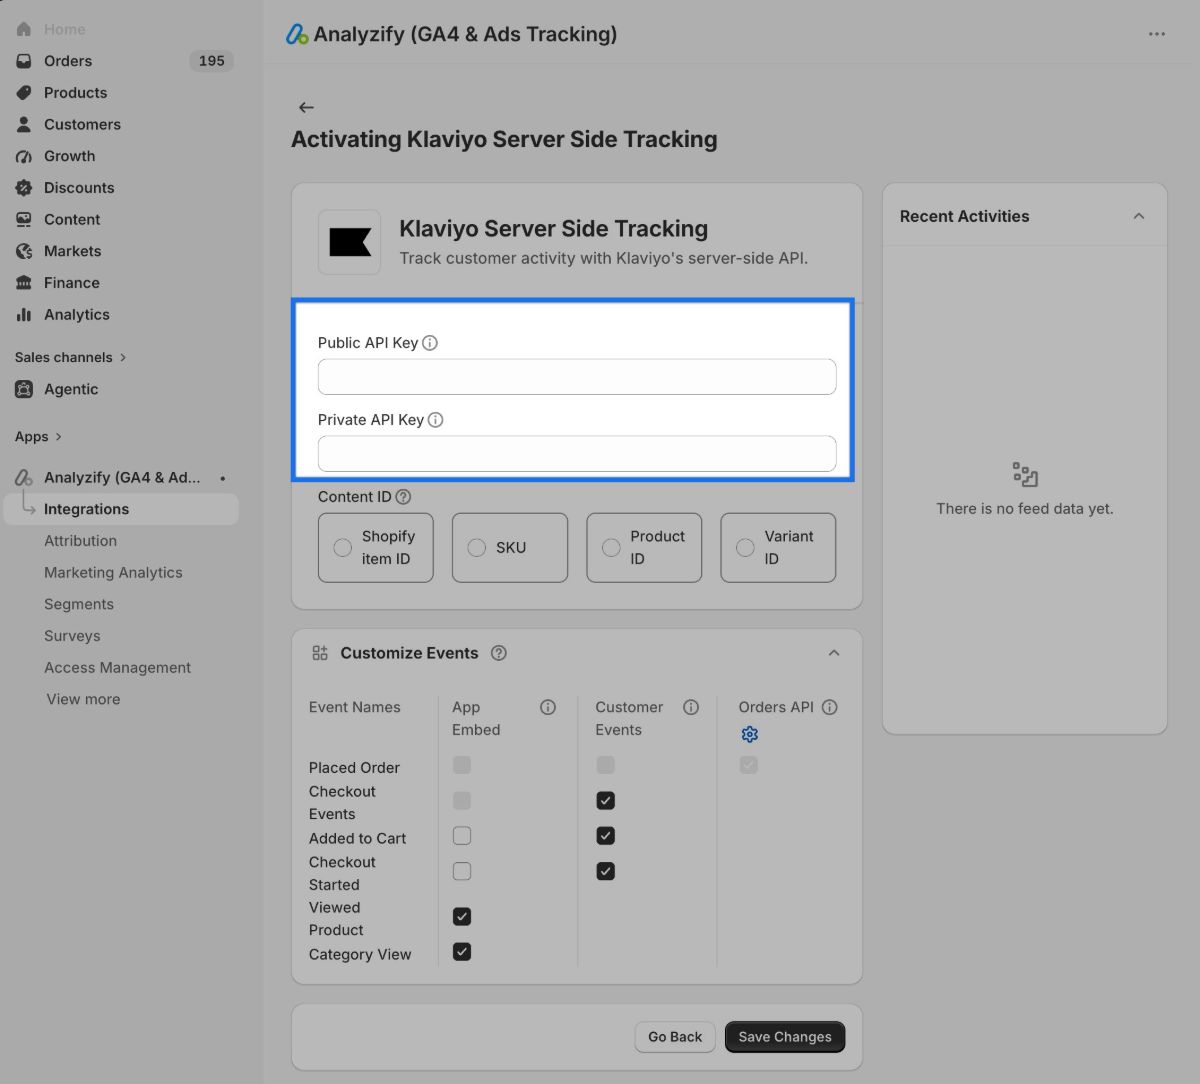
After that, choose your content ID to customize item-level data in your reports and add/remove the events you want to track. Note: The default setup follows the best practice.
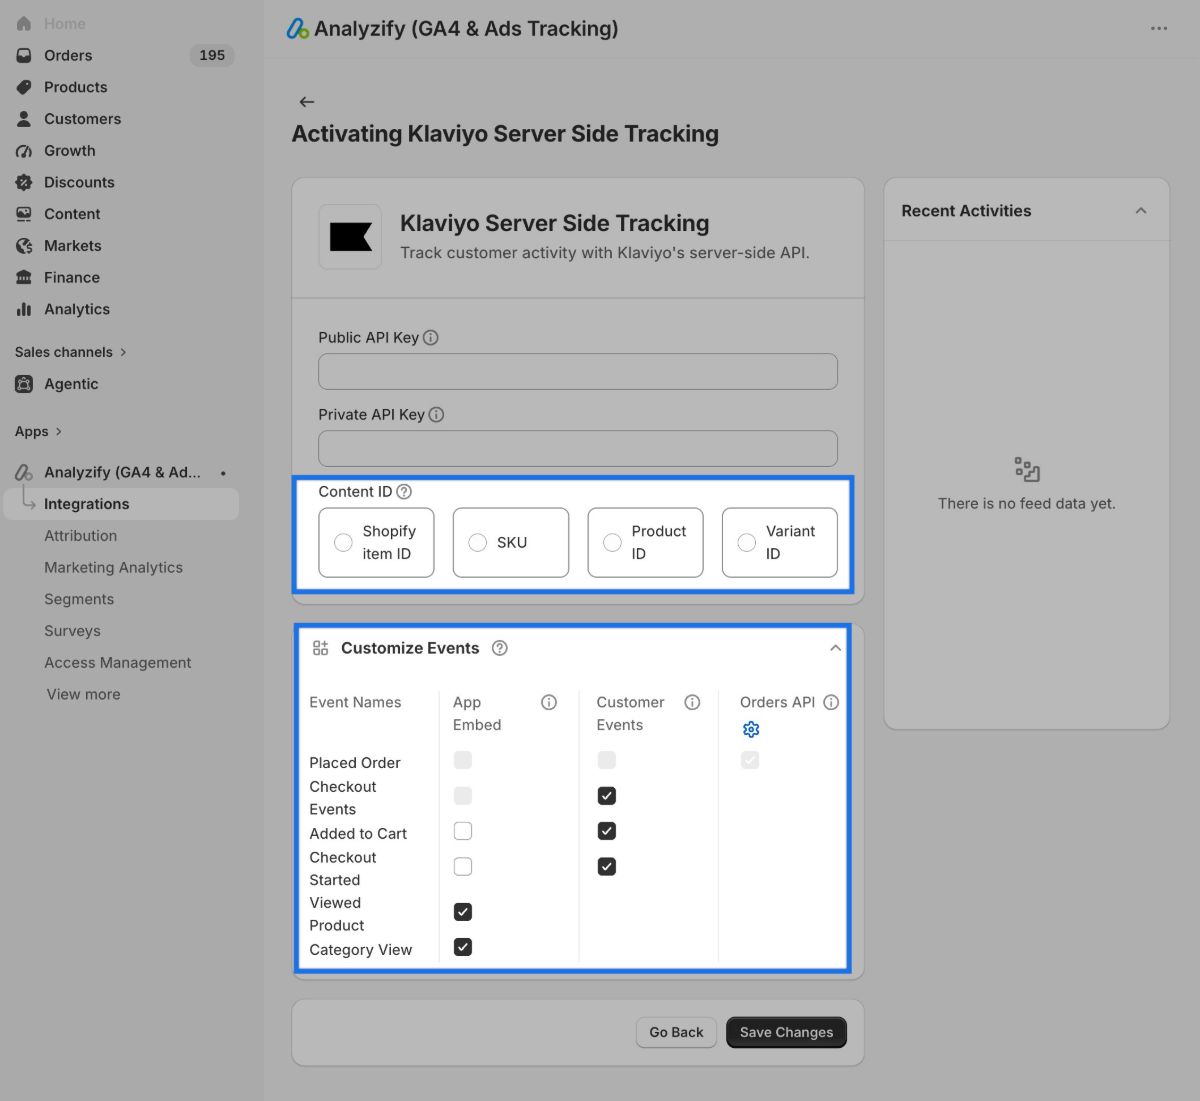
Finally, click Save Changes and your integration is now active!
Important: Viewed Product & Active on Site
Most events can safely coexist with Shopify's Klaviyo integration. The only exceptions are Viewed Product and Active on Site , which require a little extra attention.
The Viewed Product event is generated by Klaviyo's onsite JavaScript. If Shopify's native onsite tracking is enabled while Analyzify is also sending the same event, Klaviyo will record duplicate product views.
To avoid this, open Klaviyo → Integrations → Shopify and review your Onsite Tracking settings. If Add Viewed Product tracking to my site is enabled, we recommend disabling the Viewed Product event in Analyzify’s client-side integration, or turning off Klaviyo's native Viewed Product tracking. Either approach prevents duplicate events.
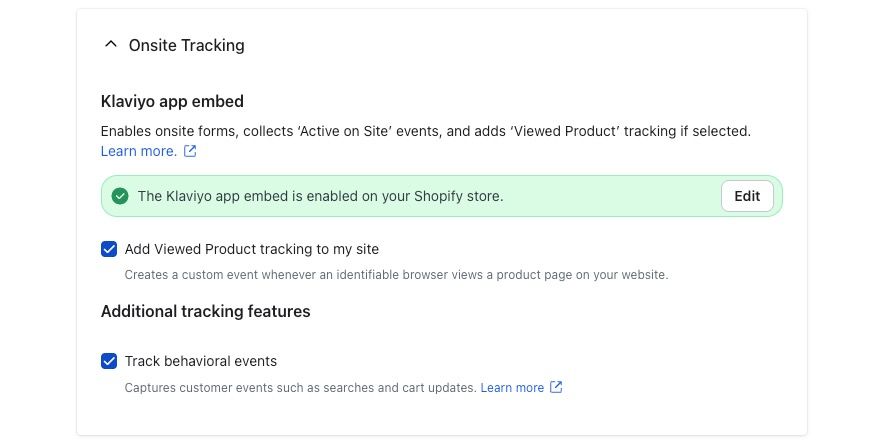
The Active on Site event is also generated by Klaviyo's onsite JavaScript and should be considered when reviewing your tracking setup.
Verify Your Setup
We recommend verifying your installation before removing any previous implementation.
After connecting:
- Visit your storefront.
- Trigger a few ecommerce events (View Product, Add to Cart, etc.).
- Open Klaviyo → Analytics → Metrics .
- Confirm new Analyzify metrics begin appearing.
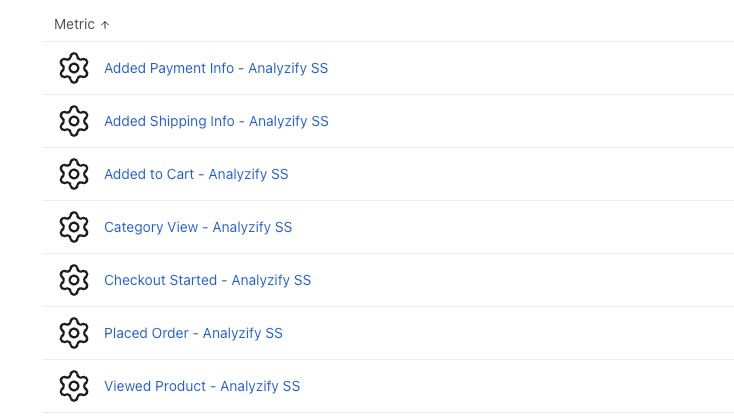
Events will start flowing immediately. Then you can build your flows in Klaviyo for example, a Cart Abandonment flow that triggers when someone adds a product to cart but doesn't complete checkout. Klaviyo will handle the automation; Analyzify handles the data.
Migrating to Klaviyo Server-Side
If you're already using Klaviyo with Analyzify, migrating to the new Server-Side integration only takes a few minutes.
The migration process depends on how you're currently sending Klaviyo events. Whether you're using Analyzify's Client-Side integration or a custom Google Tag Manager (GTM) setup, you'll simply replace your existing implementation with the new Server-Side integration.
Migrating from Analyzify Client-Side
If you're currently using Analyzify's Client-Side Klaviyo integration, migration is straightforward.
Open the Klaviyo Client-Side integration in Analyzify, click the three-dot menu , and select Disconnect . This removes your previous implementation without affecting your Klaviyo account or historical data.
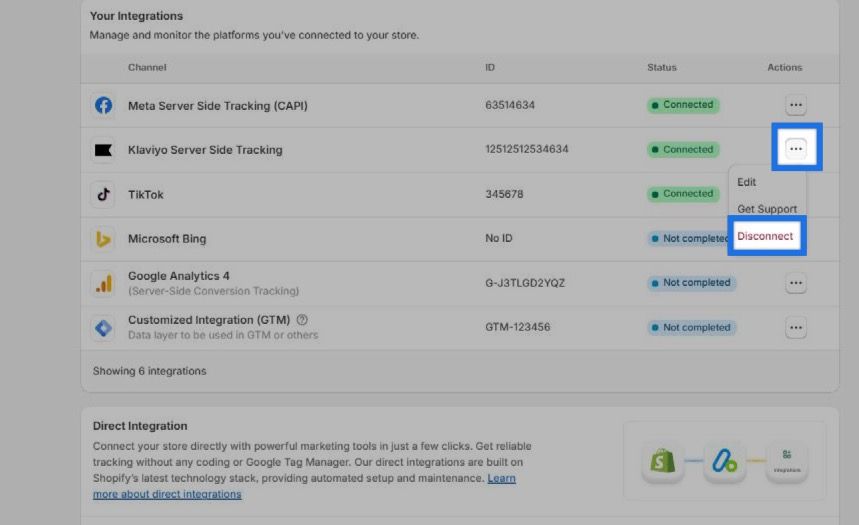
Next, find the Klaviyo Server-Side integration and click Connect .
Next, you should enter your Public API Key and Private API Key .
To find your Public API Key , go to Klaviyo and click your account name (bottom left) > Settings > API Keys.
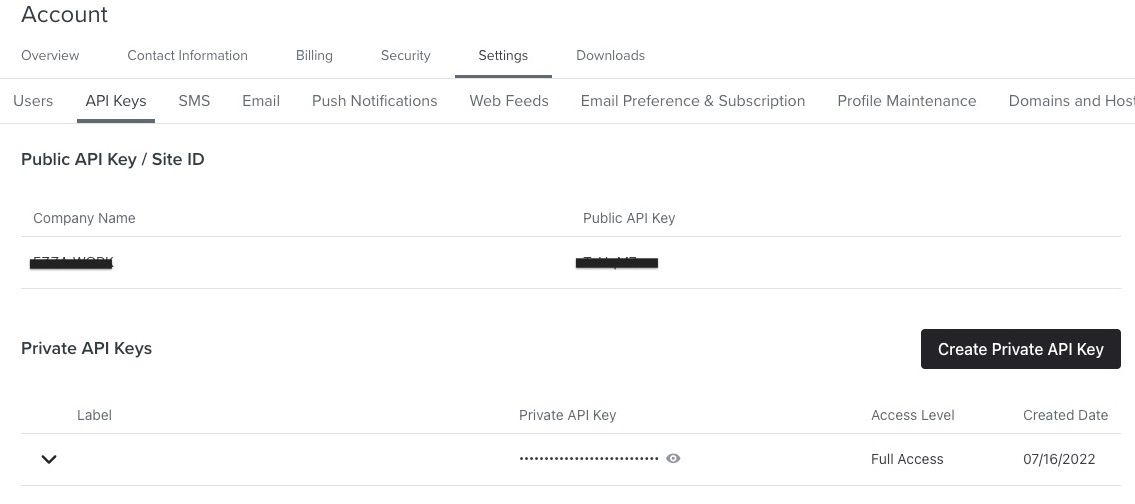
To find your Private API Key , click Create Private API Key. Enter a name, choose Custom as the access level, and grant Full Access to Events, Metrics, and Profiles. These are required for server-side tracking. Click Create and copy the key immediately (it starts with “pk_” and can’t be viewed again later). Treat it like a password.
Then, choose your content ID to customize item-level data in your reports and add/remove the events you want to track. Note: The default setup follows the best practice.
Once you click Save Changes , all new events will be sent through the Server-Side integration.
Migrating from Google Tag Manager (GTM)
If you're sending Klaviyo events through Google Tag Manager, you can simplify your setup by moving the event delivery to Analyzify.
First, pause or disable your existing Klaviyo tags in GTM to prevent duplicate events. Then open the Klaviyo Server-Side integration in Analyzify, click Connect , enter your API keys, and save the configuration.
From this point forward, Analyzify will handle event delivery directly, eliminating the need to maintain custom GTM tags.
Using Shopify's Klaviyo Integration Together with Analyzify
In most cases, you can continue using Shopify's Klaviyo integration alongside Analyzify.
The two integrations complement each other rather than replace one another. Most events are stored as separate metrics, allowing you to decide which metrics power your Flows, Segments, and automations. Shopify and Analyzify also send different event properties, giving you greater flexibility when building personalized customer experiences.
Only Viewed Product (and, depending on your configuration, Active on Site) requires additional configuration to prevent duplicate tracking.
