Some of Analyzify’s data layer events (such as add_to-cart, remove_from_cart, and begin_checkout) are triggered when a user clicks on a specific button on a website.
Since these buttons can differ in terms of style and HTML code from store to store, there may be times when such events may not be working as expected on your own website.
With the new version of Analyzify, you can now easily fix when one of the click-based events is not working.
Suppose that the add_to_cart event is not being fired when you click on the “Add to cart” button on a product detail page. Let’s go through what should be done and fix it together:
1. Locate the button on your website
First of all, you should go to your website and find the button that doesn’t trigger the necessary event. In our scenario, the “add to cart” button on a product detail page is not working. Open a product detail page, find the add-to-cart button, and right-click on it. Then, choose “Inspect”. This will open the developer panel of the browser and show you the HTML attributes of this button.

2. Choose a proper attribute name and value
The red arrows in the following screenshot show attribute names while the blue ones show attribute values.
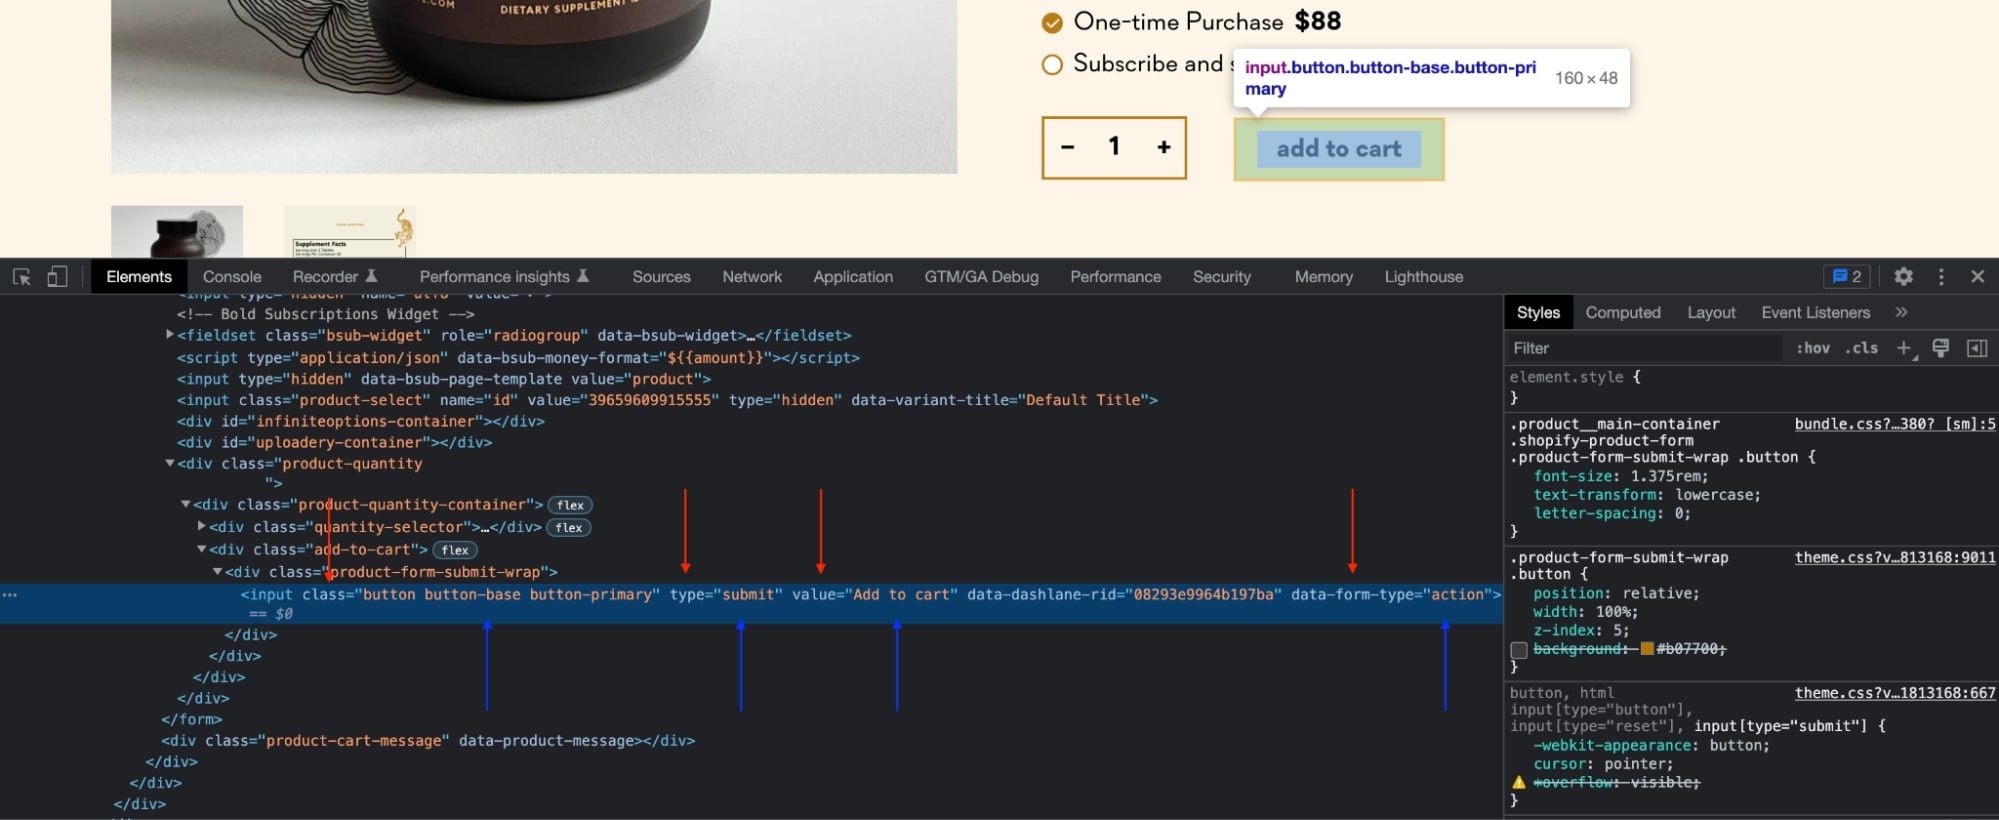
Important: Please select an HTML attribute value that doesn’t have a common name like “button”, “btn”, “form”, etc. Otherwise, add-to-cart events will be sent when you click other buttons that have the same attribute.
In this case, choosing the attribute name as “class” and the attribute value as “button” is not a good idea. Instead, you can choose the attribute name as “value” and the attribute value as “Add to cart”. If you cannot find a proper attribute, you can ask your developer to add it for you.
3. Locate Analyzify’s liquid file and choose the related configuration line
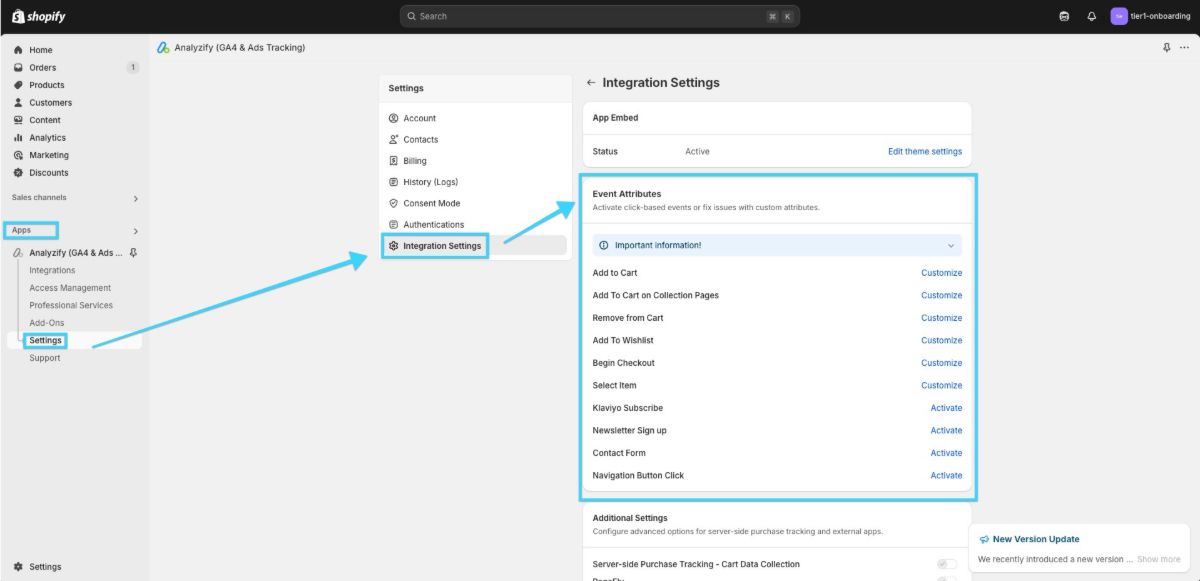
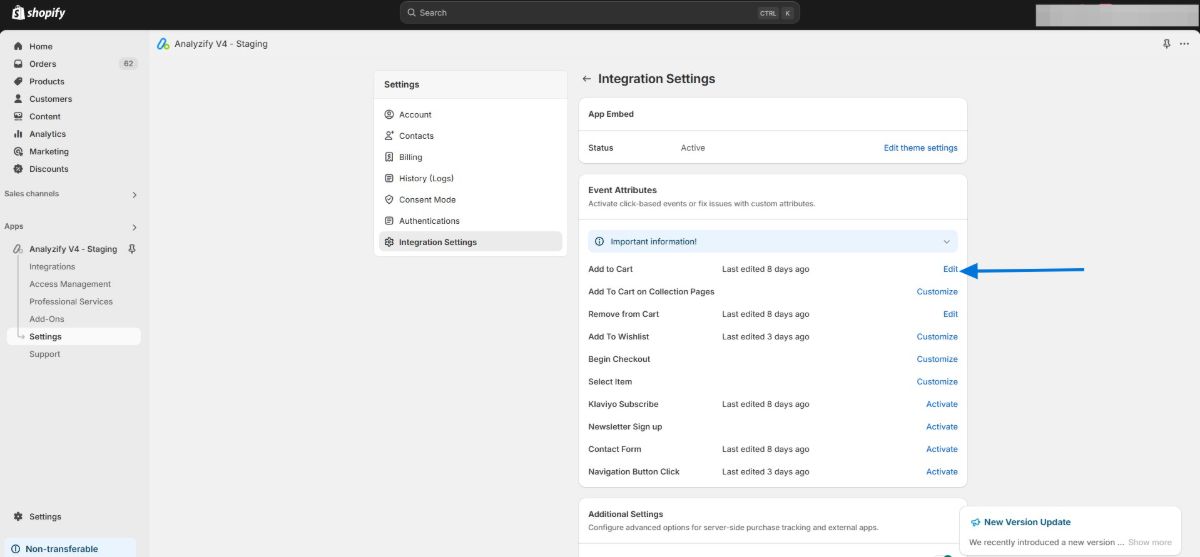
Start by heading to your Shopify Admin panel > Apps > Analyzify > Settings , then select the “Integration Settings” menu and locate the “Event Attributes.”
If you can’t navigate to this part of your app, it means that your Analyzify version is outdated. Start by upgrading your Analyzify setup. You can benefit from our detailed How to Upgrade Analyzify guide .
In the “Event Attributes” section, select and modify the attributes for your target event.
Please refer to the following table to find the necessary configurations according to your need.
|
Configuration Name |
Description |
|
addtocart_btn_attributes |
Modify this configuration if you do not see any ee_add_to_cart data layer event when clicking the add-to-cart button on a product detail page, or if the add_to_cart event is missing from the data layer across other integrations. |
|
collection_atc_attributes |
Modify this configuration if you do not see any ee_add_to_cart data layer event when clicking the add-to-cart button on any collection page, or if the add_to_cart event is missing from the data layer across other integrations. |
|
removefromcart_btn_attributes |
Modify this configuration if you do not see any ee_remove_from_cart data layer event when removing an item from the cart on the cart page, or if the remove_from_cart event is missing from the data layer across other integrations. |
|
checkout_btn_attributes |
Modify this configuration if you do not see the ee_begin_checkout data layer event when clicking the checkout button on the cart page or cart drawer, or if the begin_checkout event is missing from the data layer across other integrations. |
|
collection_prod_click_attributes |
Modify this configuration if you do not see any ee_select_item data layer event when clicking on a product on collection pages, or if the select_item event is missing from the data layer across other integrations. |
|
search_prod_click_attributes |
Modify this configuration if you do not see any ee_search data layer event when clicking on a product in search result pages, or if the search event is missing from the data layer across other integrations. |
|
disclosure_attributes |
Modify this configuration if you do not see the ee_disclosure data layer event when interacting with disclosure elements, or if the disclosure event is missing from the data layer across other integrations. |
|
wishlist_btn_attributes |
Modify this configuration if you do not see the ee_add_to_wishlist data layer event when clicking the wishlist button, or if the add_to_wishlist event is missing from the data layer across other integrations. |
|
header_nav_btn_attributes |
Modify this configuration if you do not see the ee_navigate data layer event when interacting with header navigation buttons, or if the navigate event is missing from the data layer across other integrations. |
|
contactForm_btn_attributes |
Modify this configuration if you do not see the ee_submit_contact data layer event when submitting the contact form, or if the submit_contact event is missing from the data layer across other integrations. |
|
general_atc_btn_attributes |
Modify this configuration if you do not see any ee_add_to_cart data layer event when clicking general add-to-cart buttons, or if the add_to_cart event is missing from the data layer across other integrations. |
|
hero_banner_cta_attributes |
Modify this configuration if you do not see the ee_banner_cta data layer event when interacting with hero banner call-to-action elements, or if the banner_cta event is missing from the data layer across other integrations. |
|
hero_banner_area_attributes |
Modify this configuration if you do not see the ee_banner_view data layer event when the hero banner area is displayed, or if the banner_view event is missing from the data layer across other integrations. |
|
accordion_summary_attributes |
Modify this configuration if you do not see the ee_accordion_open data layer event when expanding accordion summaries, or if the accordion_open event is missing from the data layer across other integrations. |
|
hero_banner_title_attributes |
Modify this configuration if you do not see the ee_banner_title_click data layer event when clicking the hero banner title, or if the banner_title_click event is missing from the data layer across other integrations. |
|
hero_banner_subtitle_attributes |
Modify this configuration if you do not see the ee_banner_subtitle_click data layer event when clicking the hero banner subtitle, or if the banner_subtitle_click event is missing from the data layer across other integrations. |
|
submitNewsletterForm_btn_attributes |
Modify this configuration if you do not see the ee_newsletter_submit data layer event when submitting the newsletter form, or if the newsletter_submit event is missing from the data layer across other integrations. |
4. Update the related configuration
When you visit Analyzify > Settings > Integration Settings section, you can make changes to the relevant event from the Event Attributes section.
Let’s say the add_to_cart event is not working properly when you complete the Analyzify integration.
If you:
- Don't see the ee_add_to_cart event in the dataLayer
- Notice that the add_to_cart event isn't reflecting in GA4
- Find that the add_to_cart event isn't working
You can try to customize the event attributes.
Identifying Button Attributes
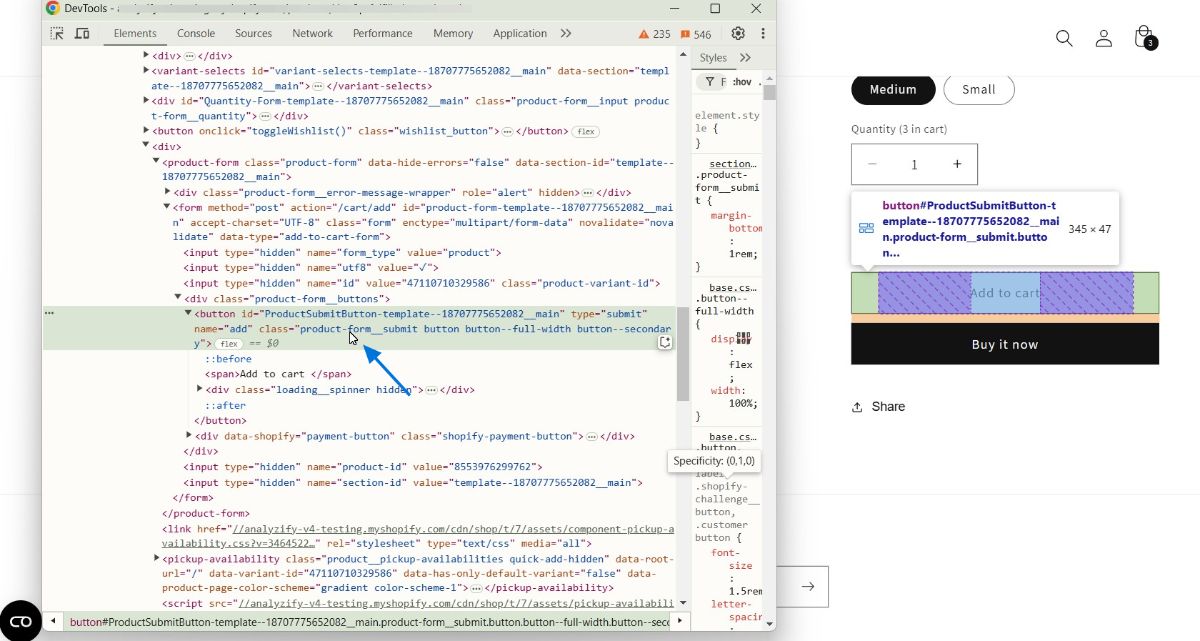
As it is discussed in the first chapter, you'll need to examine the Add to Cart button on your site. Navigate to any product page and locate the Add to Cart button. By right-clicking on this button and selecting "Inspect," you'll open the Developer Tools where you can see the Elements tab.
This tab reveals all the button's attributes such as class, id, and other important properties.
Examining Analyzify's Current Configuration
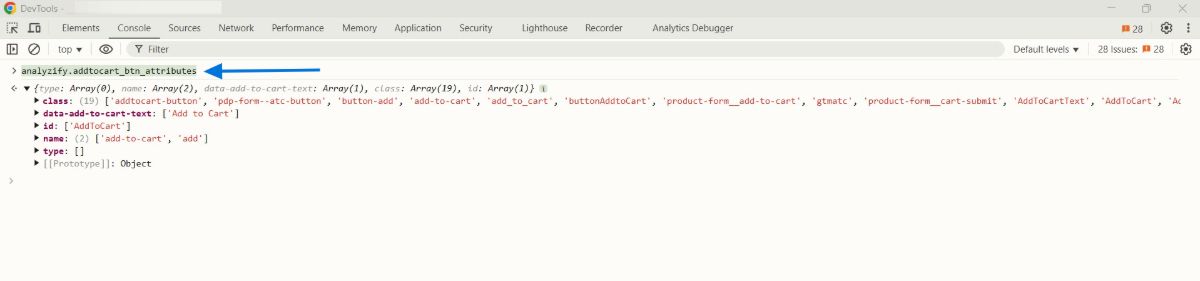
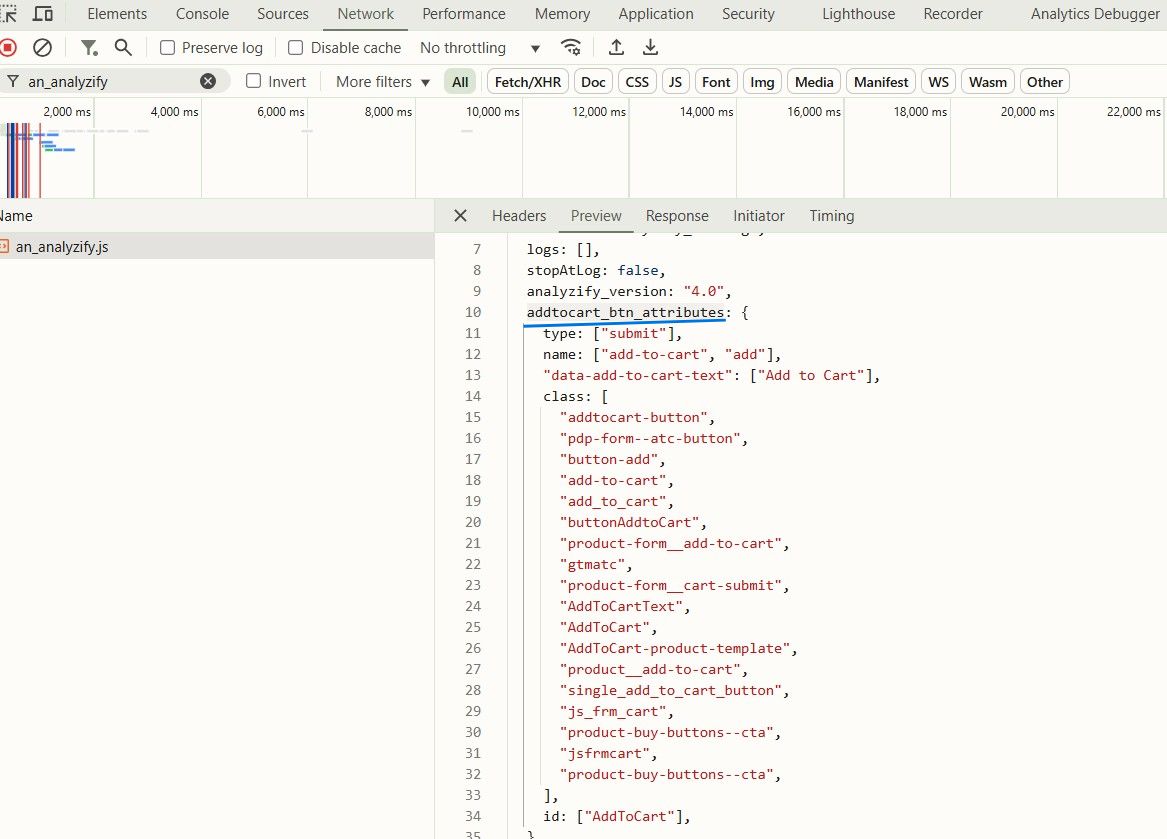
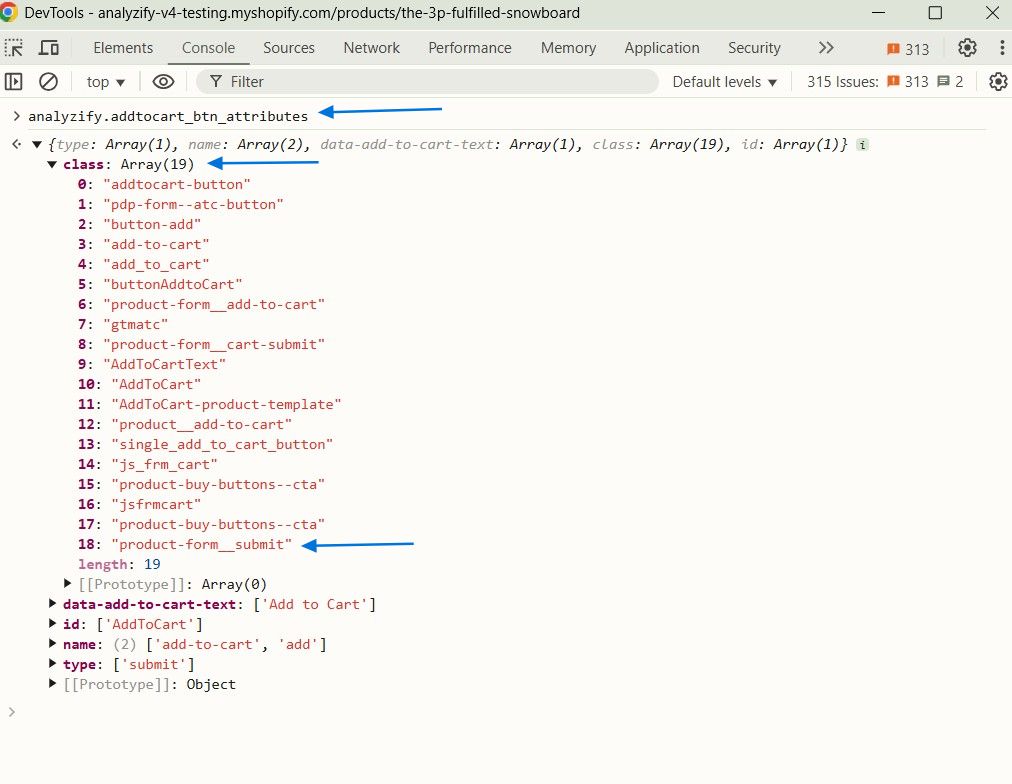
In the Developer Tools Console tab, you can view the attributes of a specific event by typing analyzify. followed by the event's "Configuration Name" and pressing Enter.
For example, to check the attributes of the Add to Cart event, you can type:analyzify.addtocart_btn_attributes and press Enter to see the relevant attributes.
Understanding and Adding Required Attributes
When examining the Elements tab, you might notice specific attributes on your Add to Cart button. For instance, you might see a class attribute with a value of “product-form__submit”.
If we don't see the value class: "product-form__submit" after typing analyzify.addtocart_btn_attributes in the Console, it’s possible that our add_to_cart event is not triggering because of this.
Verifying Attribute Uniqueness
Before adding any new attribute, it's crucial to verify that the attribute is unique on the page. We can only add the attribute if it appears only once or if it appears only for the relevant event on the page. To check this:
- Open Developer Tools on the relevant page
- Go to the Console tab
- Use document.querySelectorAll to verify if the attribute appears only once or if it appears only for the relevant event on the page
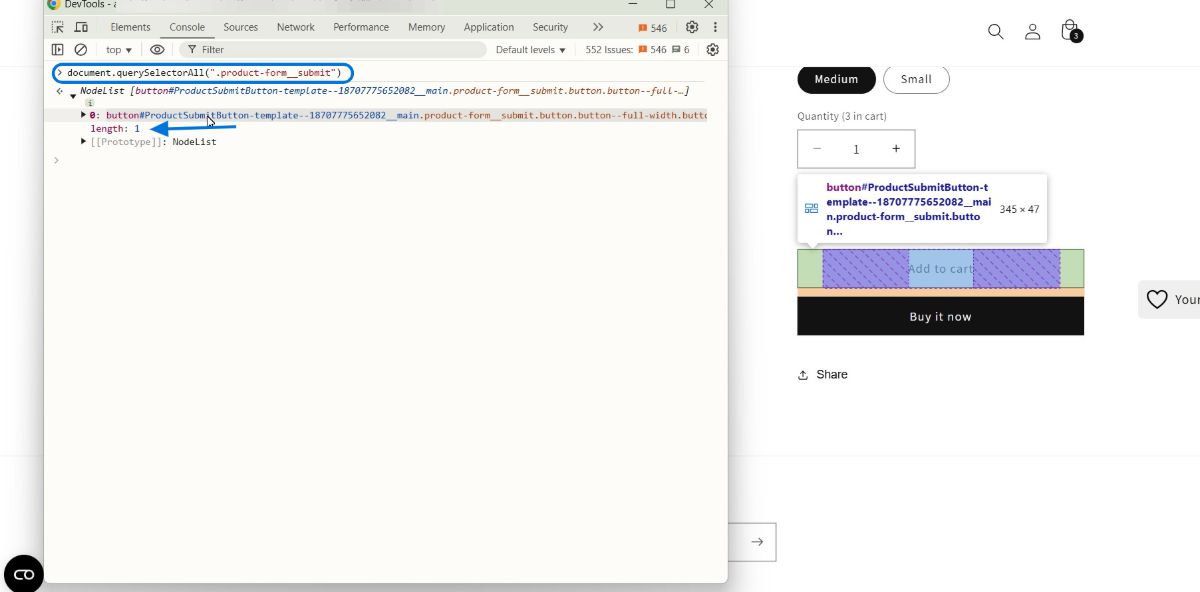
If the attribute is unique, you can proceed with adding it. If not, you'll need to identify a different, unique attribute to use.
When using the document.querySelectorAll method, you start by writing document.querySelectorAll(""), opening parentheses and double quotes, and then adding the values based on the attribute you want to search for.
For example, if you want to select an element by class, you need to prefix it with a dot (.). In our case, we use:
- document.querySelectorAll(".product-form_submit").
If you want to select an element by ID, you need to prefix it with a hash (#). For example:
- document.querySelectorAll("#MainContent").
If you want to search for the attribute name="add", you should go to the Console and type document.querySelectorAll(""), then add [name='add'] inside the double quotes.
So, it should look like this:
- document.querySelectorAll("[name='add']")

Configuring New Attributes
To add the missing attribute, you can follow these steps:
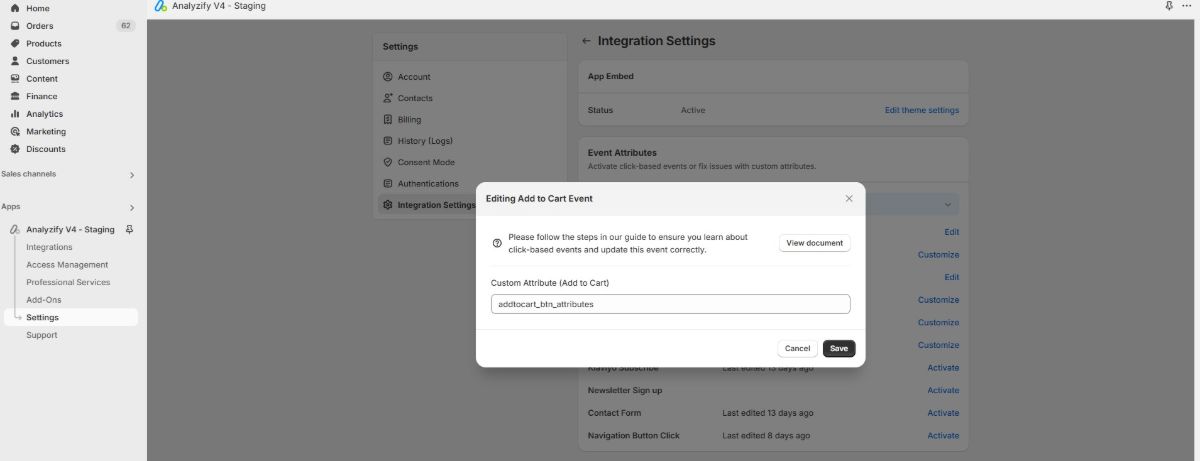
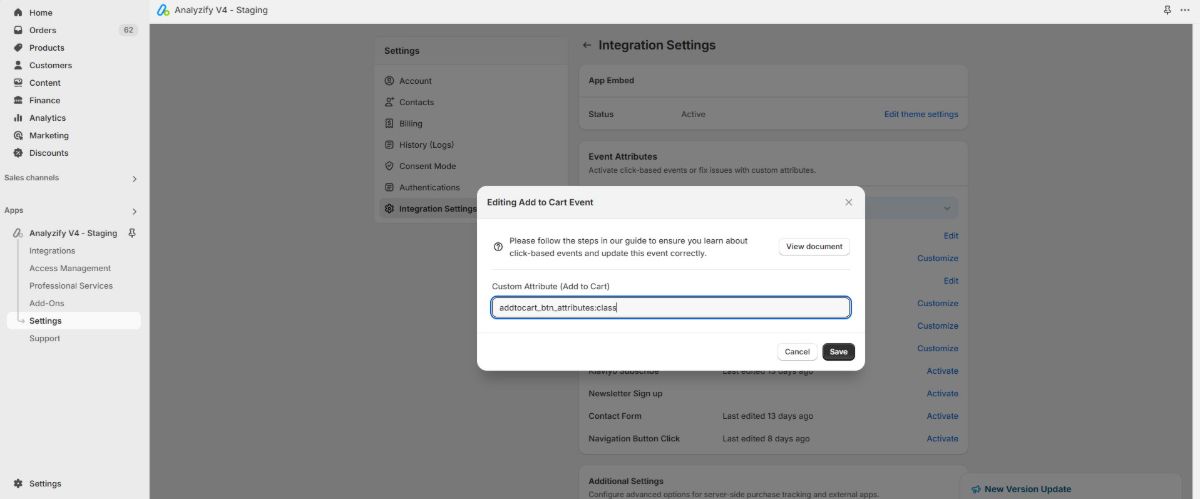
1. Access the Event Attributes section in your Analyzify app, locate and click the Edit button for the relevant event.
2. From the Network tab, select the appropriate attribute for your event
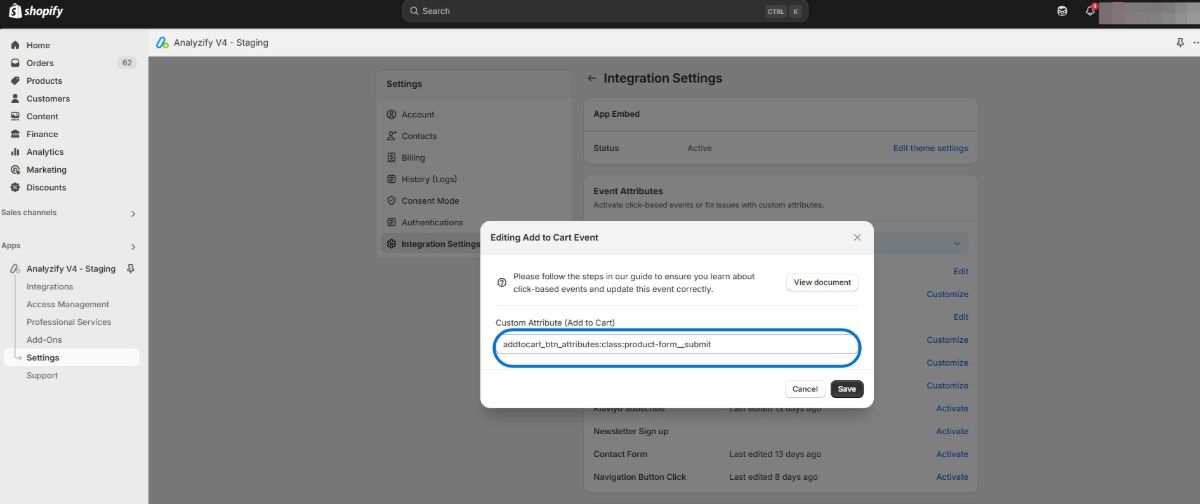
3. In the Edit section that opens, paste your selected attribute, in this case it will be: addtocart_btn_attributes.
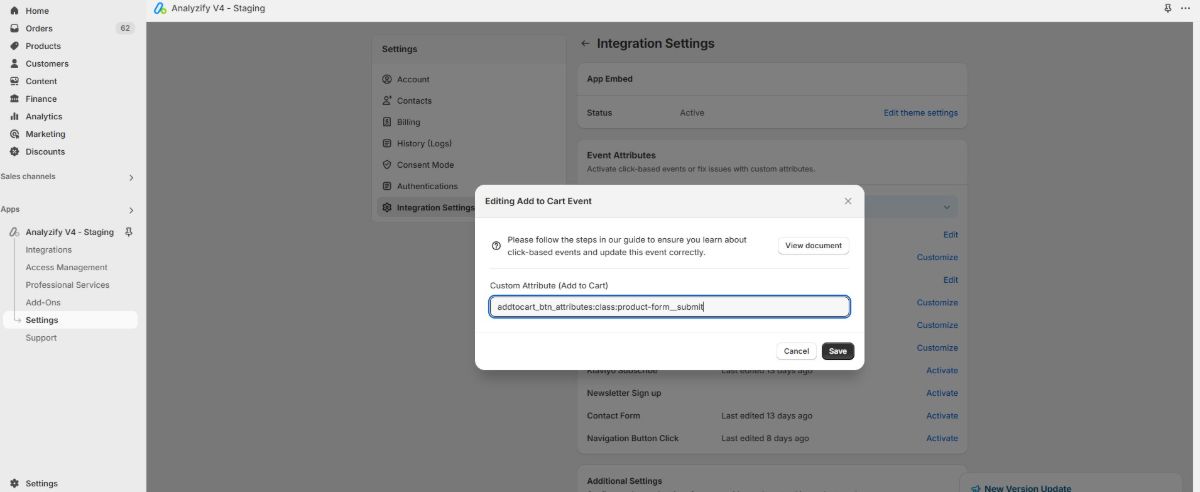
4. Then add the new attribute. Since “product-form__submit” is a “class” attribute start with writing “class” and then “product-form__submit” ensuring you use two colons as separators. The final result should be addtocart_btn_attributes:class:product-form__submit
5. Save your changes
Verification Process
After making these changes, it's essential to verify that everything is working correctly. This involves three main checks:
First , confirm that your attribute was successfully added:
- Open the Developer Tools to the Console tab
- Refresh your page
- Type "analyzify.addtocart_btn_attributes"
- Look for your newly added name attribute in the results
Second , verify that the event is properly triggering:
- Keep Developer Tools open
- Add a product to your cart
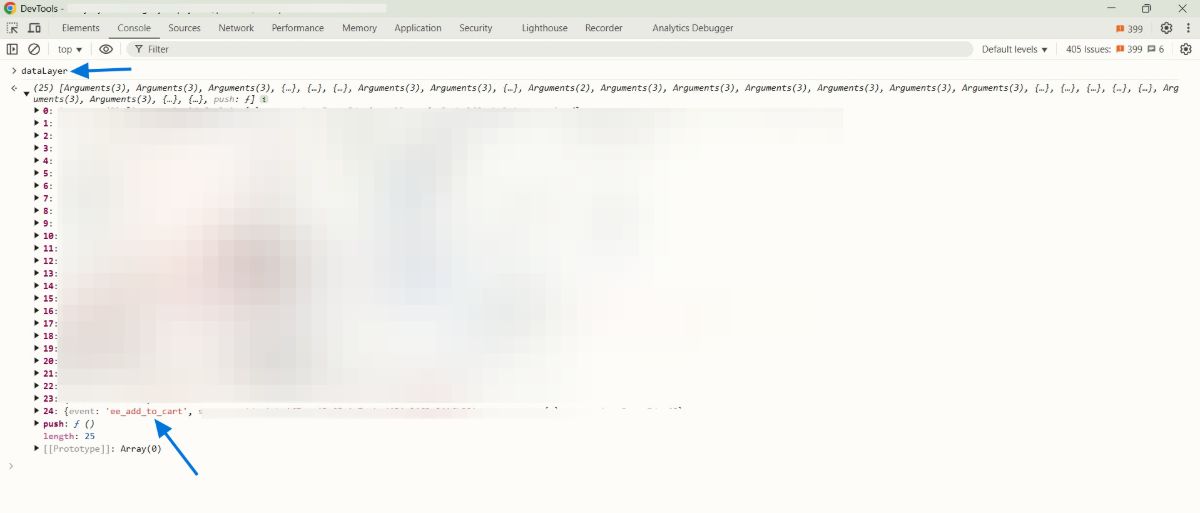
- In the Console tab, type "dataLayer" and press Enter
- Look for the ee_add_to_cart event - its presence confirms successful customization of the event attributes
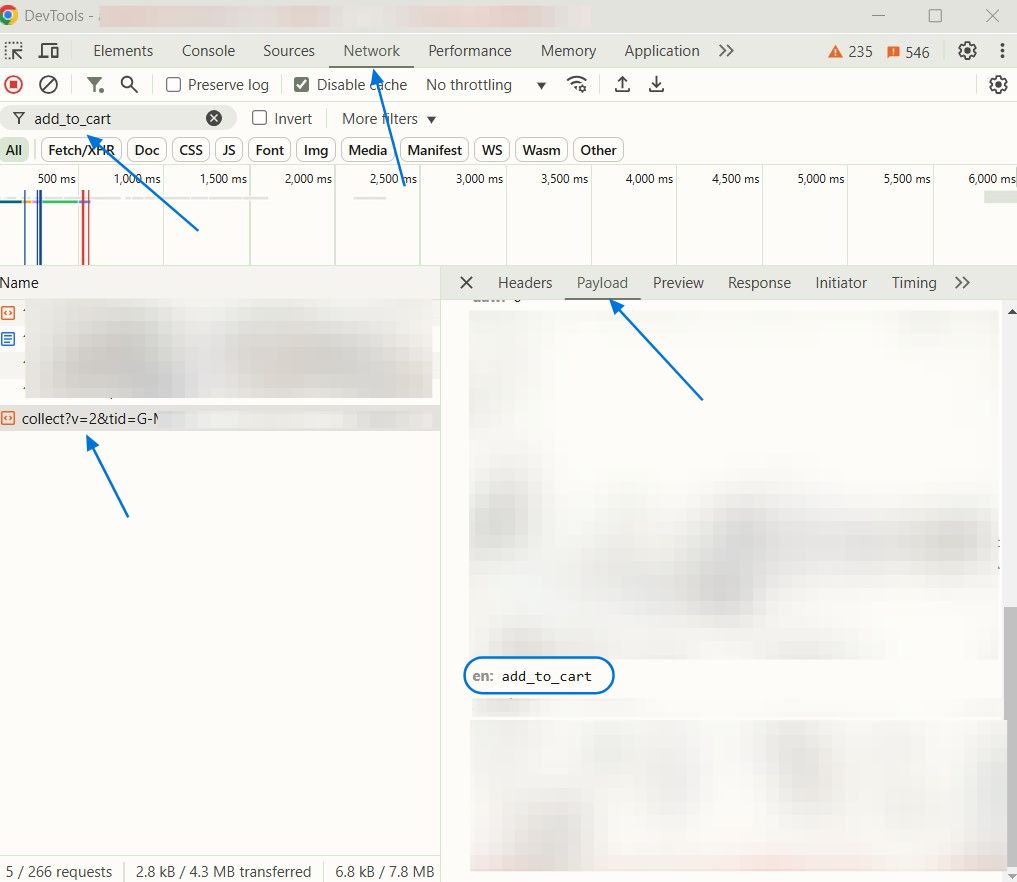
Finally , check the analytics integration:
- Go to the Network tab
- Enter "add_to_cart" in the filter
- Verify that the event is being properly sent to GA4
Removing Unwanted Attributes
Sometimes you may need to remove attributes, particularly if you're experiencing issues like double-triggering of events. The most common scenario is when your add_to_cart event triggers twice. In such cases, removing the type:submit attribute often resolves the issue.
To remove an attribute:
1. Go to the Analyzify app and click edit for the relevant event
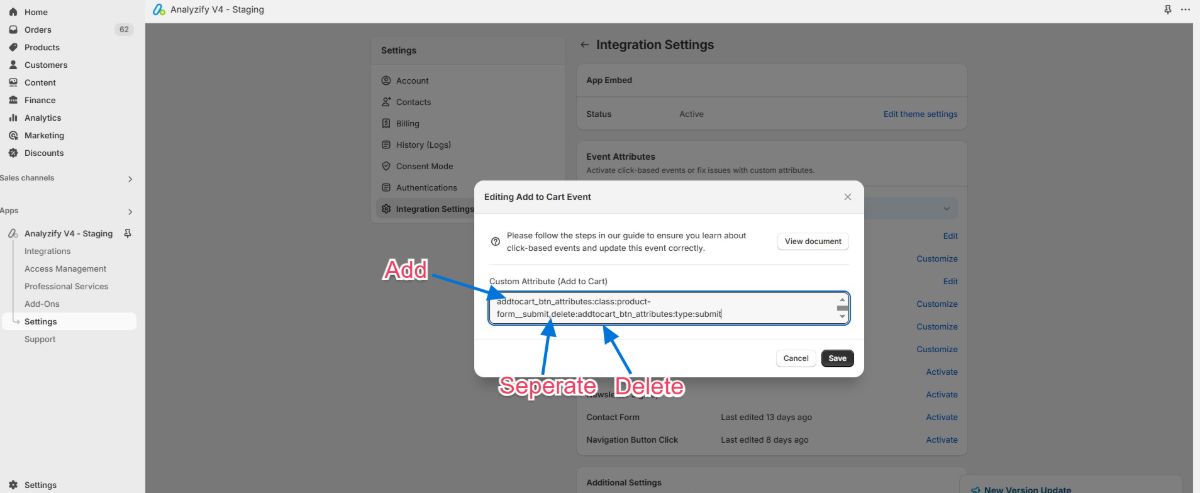
2. If you already have existing attributes (like the class attribute we added earlier):
- Add a comma after the existing attribute
- Write "delete" followed by the attribute configuration
- Example: addtocart_btn_attributes:class:product-form__submit,delete:addtocart_btn_attributes:type:submit
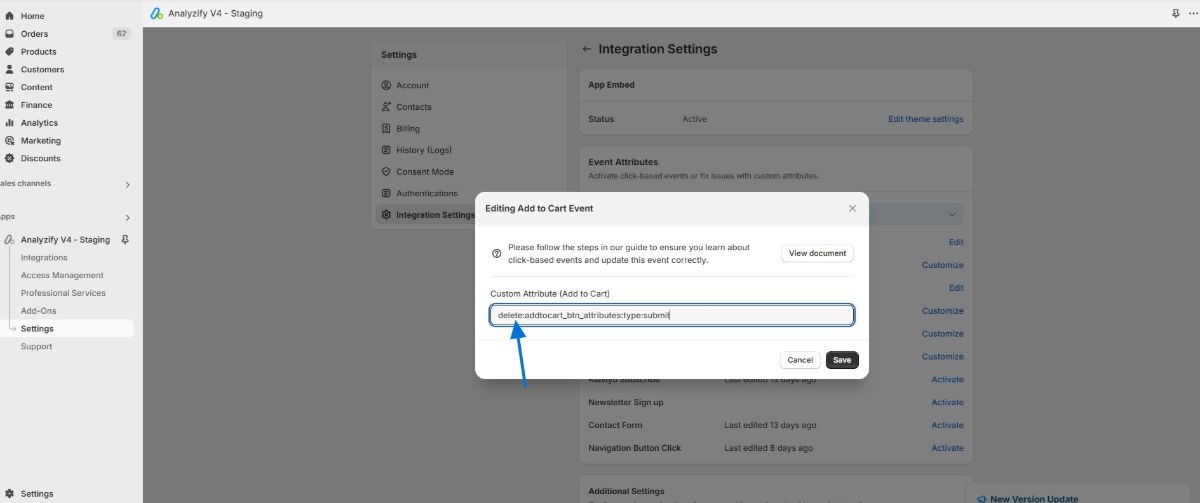
3. If you don't have any existing attributes:
- Simply start with "delete" followed by the attribute configuration
- Example: delete:addtocart_btn_attributes:type:submit
4. Click Save to apply your changes.
After removal, it's important to verify the event behavior again using the Console to check dataLayer pushes and the Network tab to monitor event transmission.
Usage Guide
So, to sum up, here is a quick usage guide on how to add or delete an attribute through your Analyzify app.
First step is selecting and entering the "Configuration Name" for the event you want to modify
After Configuration Name, you add the attribute you want to add using two colons as separators.
Then add the value of the attribute you added using two colons as separators again:
If you want to delete an attribute rather than add one, follow the same steps and just add "delete" before the "Configuration Name"
If you want to add multiple values, add a comma between these two operations and save without leaving spaces.
If you continue to experience issues after implementing these changes, our support team is always available to help you resolve any persistent problems.
