Analyzify Purchase Surveys is a post-purchase survey application that enables Shopify merchants to collect valuable customer feedback directly on their Thank You page after purchase completion.
Key Features
- Create and manage unlimited surveys with drafts and published states
- Multiple question types (multiple choice, single choice, text input, rating scales etc.)
- Real-time analytics dashboard with response metrics
- CSV export functionality for data analysis
- Team collaboration with multi-user access
- Targeting (all customers)
- Live preview of survey appearance
Testing User Flows
Flow 1: Create and Activate Your First Survey
1.1 Survey Creation
- Navigate to the Dash/Surveys page in the app
- Click the Create Survey button (blue button in top-right corner)
- On the Survey Creation page, complete the following:
Survey Details Section:
- Enter a Survey Name (Internal) - this is only visible to your team
- Add an optional Description (Internal) for your team reference
Targeting Section:
- All customers should see the survey
- Survey displays on the Thank You page after purchase completion
- Add questions to your survey (see Question Builder section below)
- Choose to Save as Draft (white button) or Save and activate (blue button)
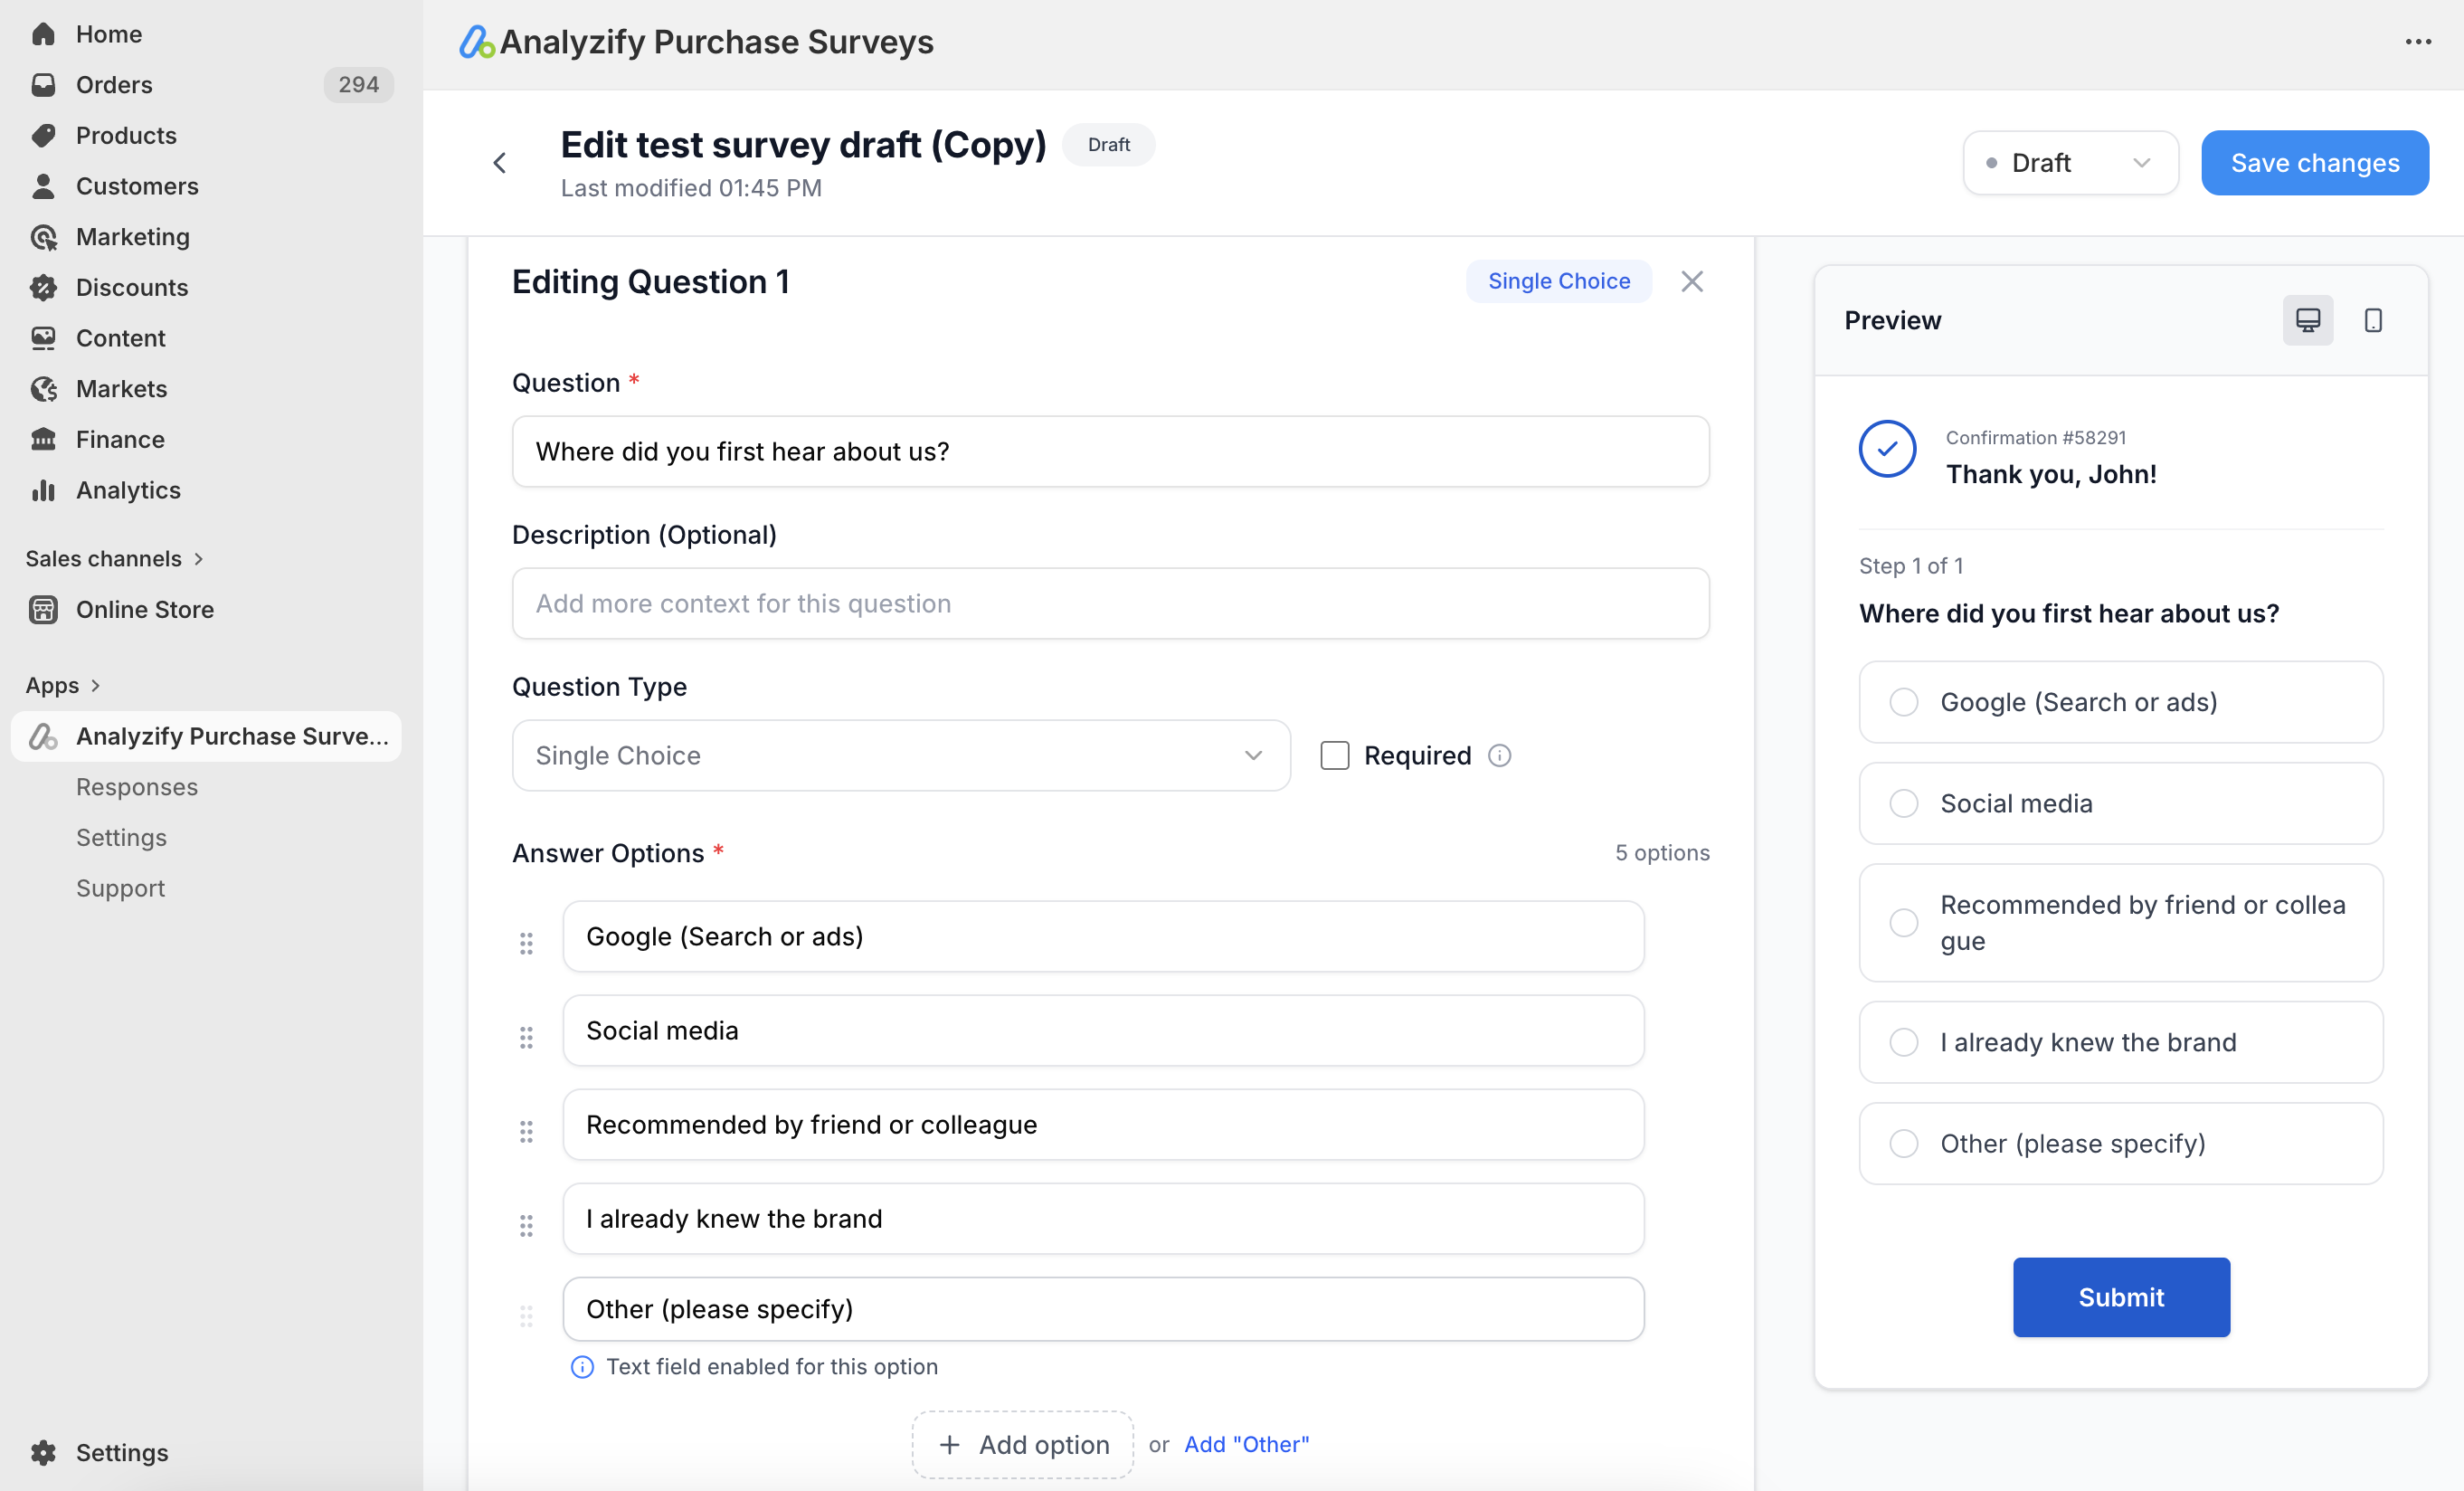
1.2 Question Builder
When adding a new question, you'll configure:
- Question Text: The main question customers will see (e.g., "How did you hear about us?")
- Description (Optional): Additional context for the question
- Question Type: Select from Multiple Choice, Single Choice, Text Input, etc.
- Required Toggle: Check this if customers must answer before submitting. When enabled, they cannot skip to the next question or submit without providing an answer.
- Answer Options: Add multiple options using the "Add option" button or include an "Other" field for custom responses
1.3 Post-Publication Setup (First-Time Only)
After publishing your first survey, you'll need to add the survey widget to your checkout:
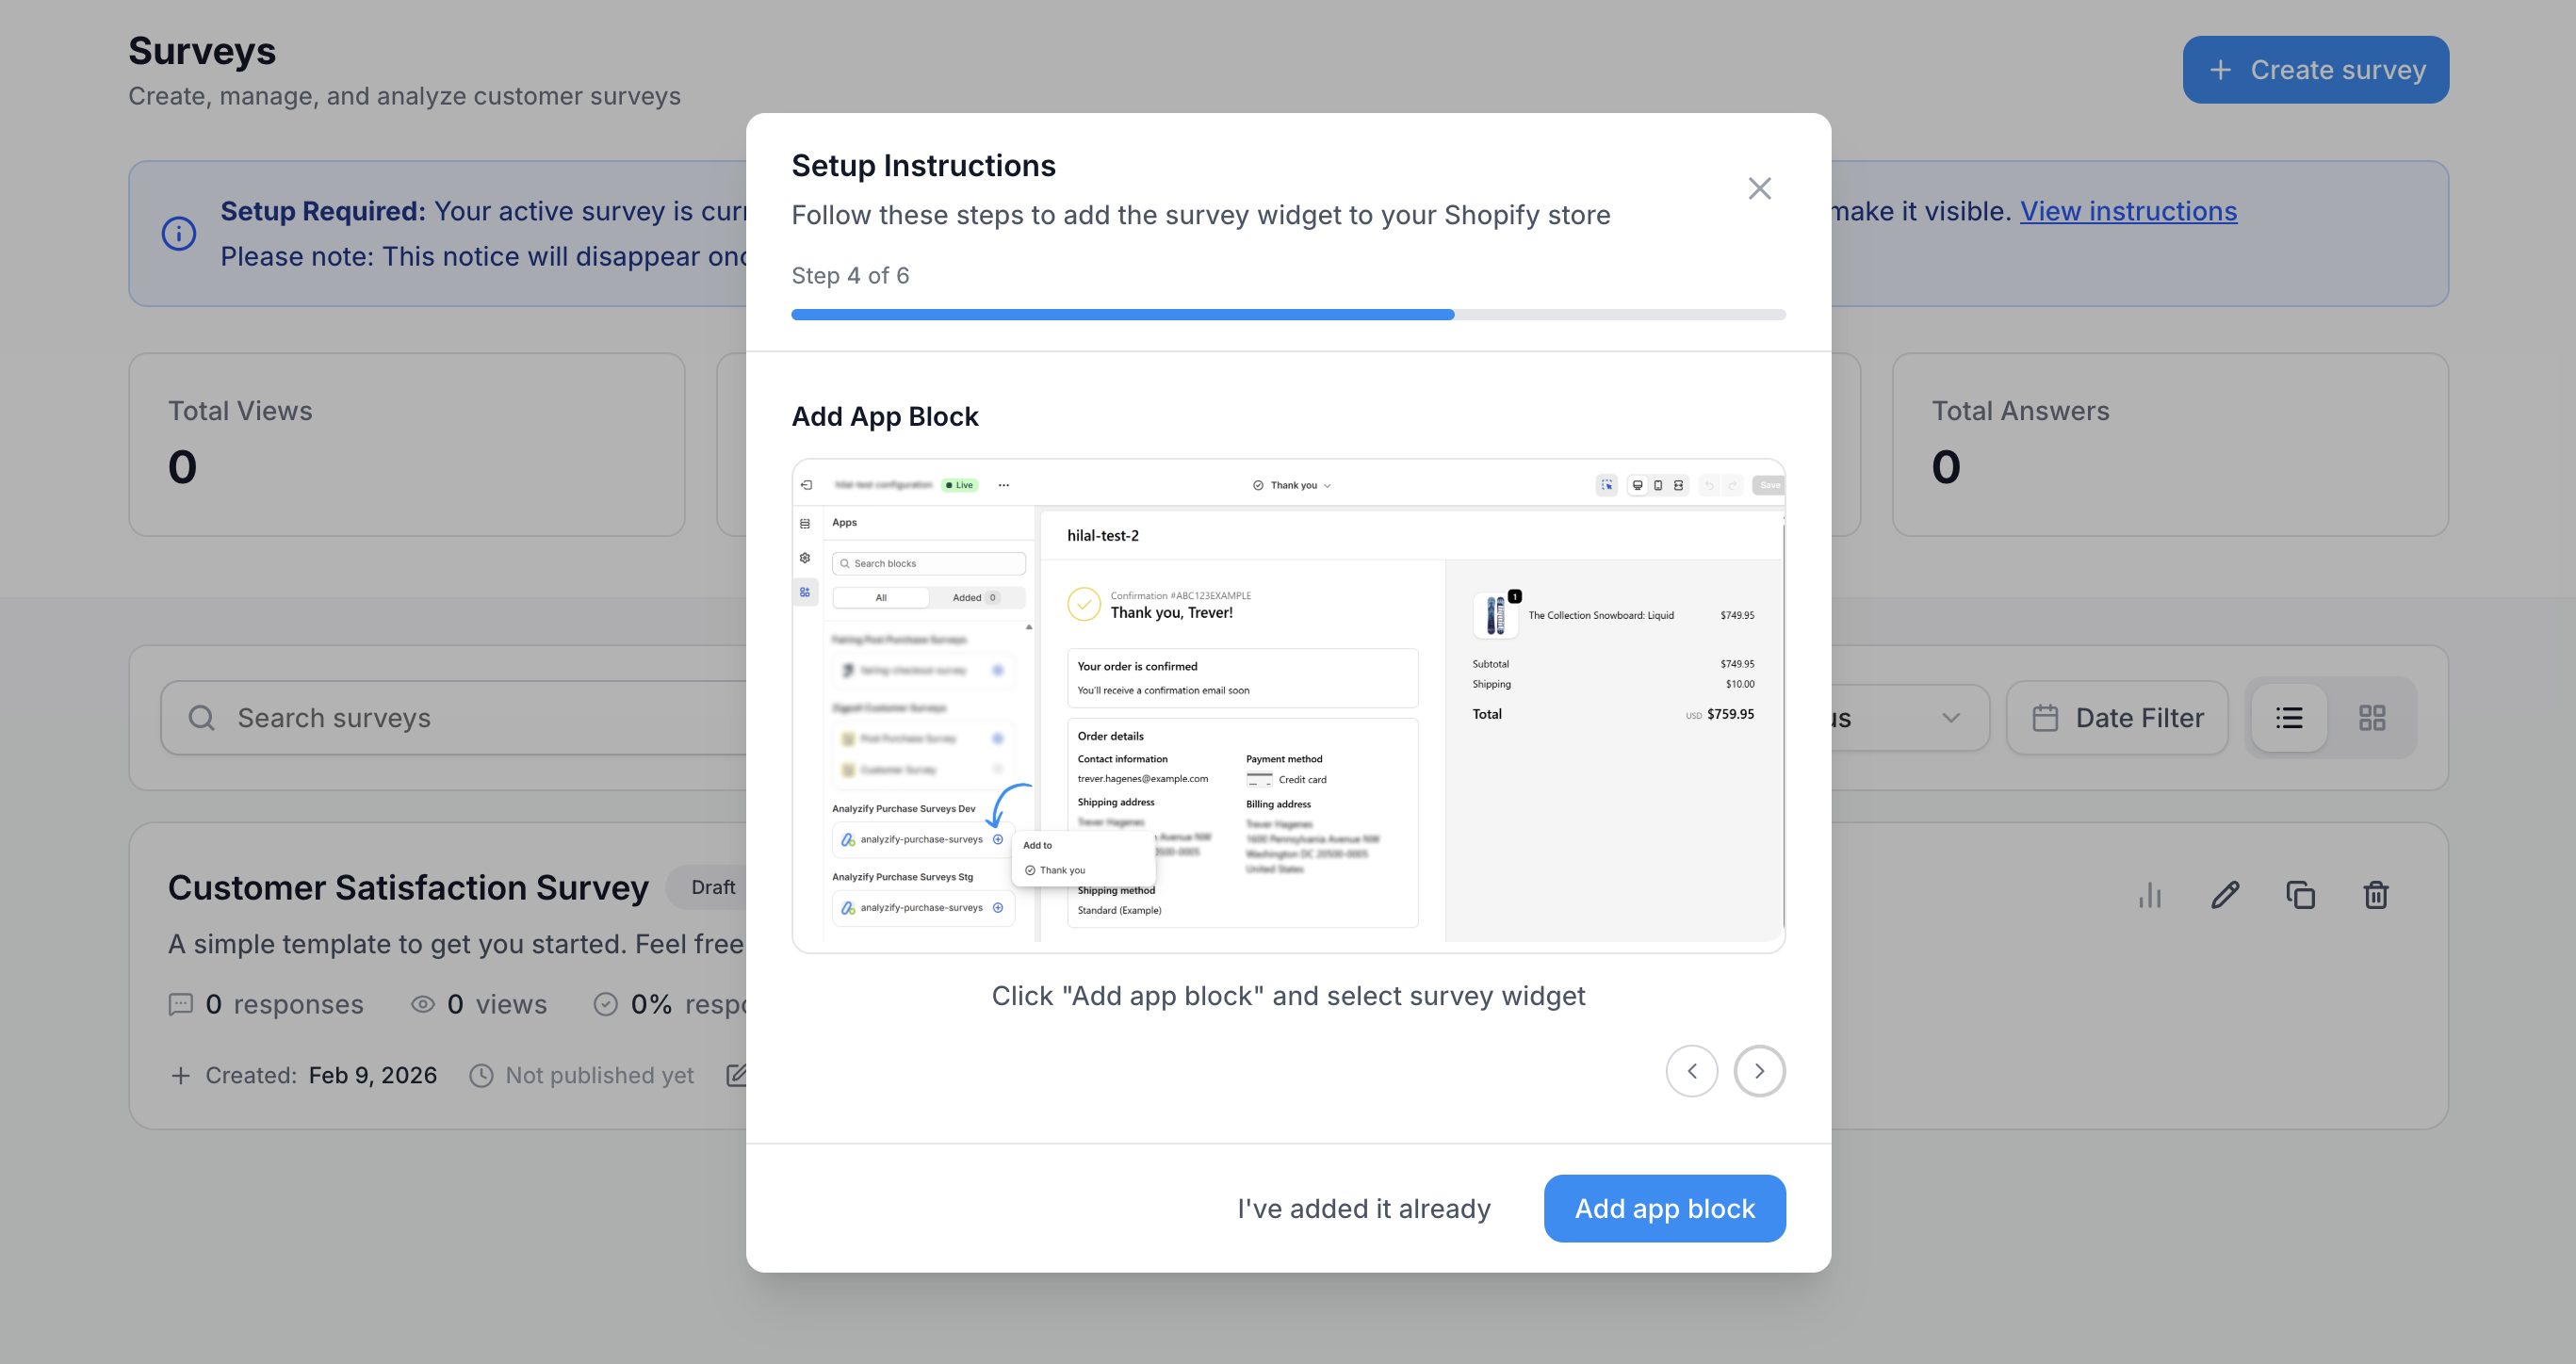
- You'll see a blue banner stating: "Setup Required: Your active survey is currently not displayed. Add the app block to your Thank You page."
- Click "View instructions" to open the setup modal
Modal Options:
- Close the modal at any time - you can return to it later
- Click "Add app block" for quick access to the theme editor
- Click "I've added it already" to dismiss the banner if setup is complete
Follow the 6-step process below to display your Active survey on your store:
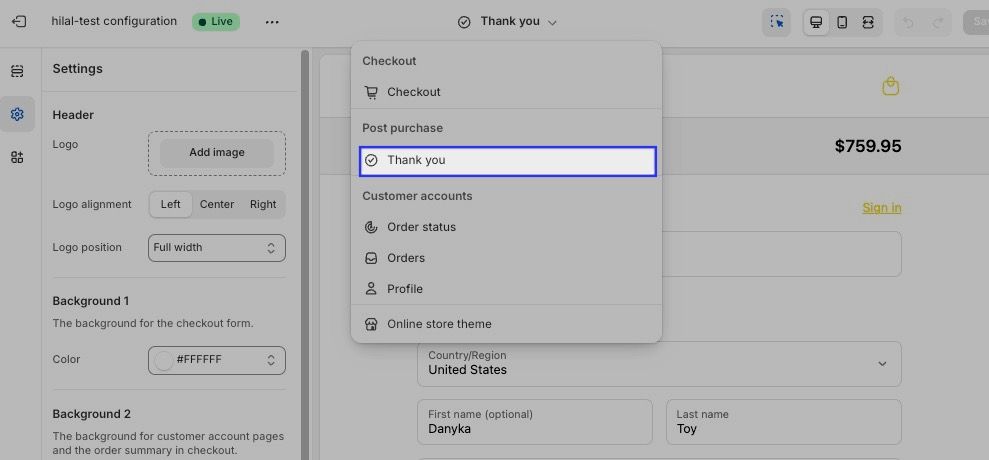
Step 1: Open Shopify Settings
Go to your Shopify Admin panel and click Settings in the bottom-left corner of the sidebar.
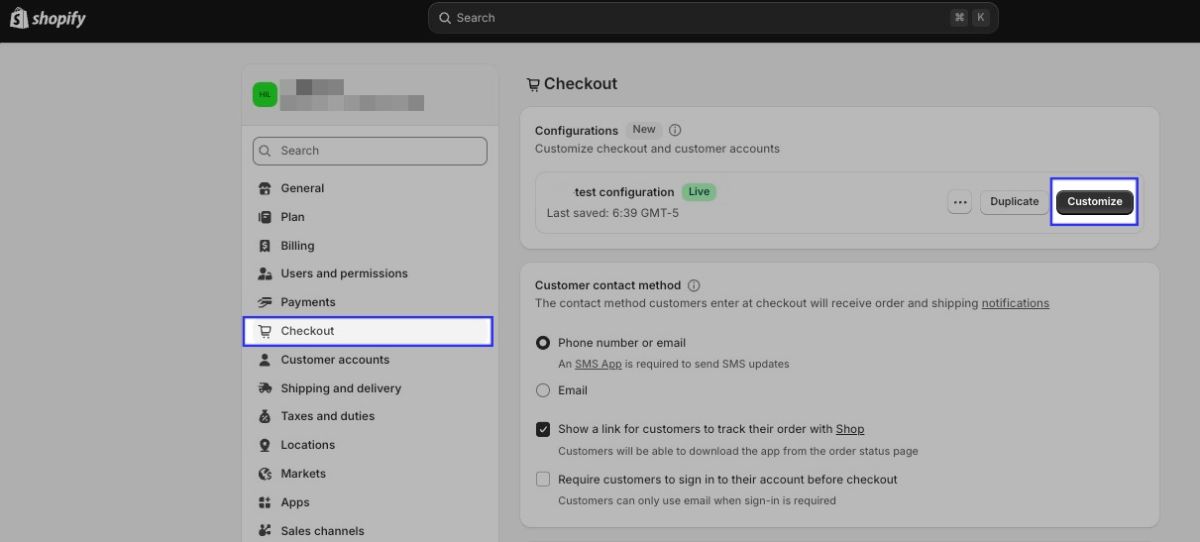
Step 2: Open the Checkout Editor
In the Settings menu, scroll to the Checkout section and click the Customize button.
Step 3: Select the Thank You Page
Use the page selector dropdown at the top to navigate to the "Thank you page" .
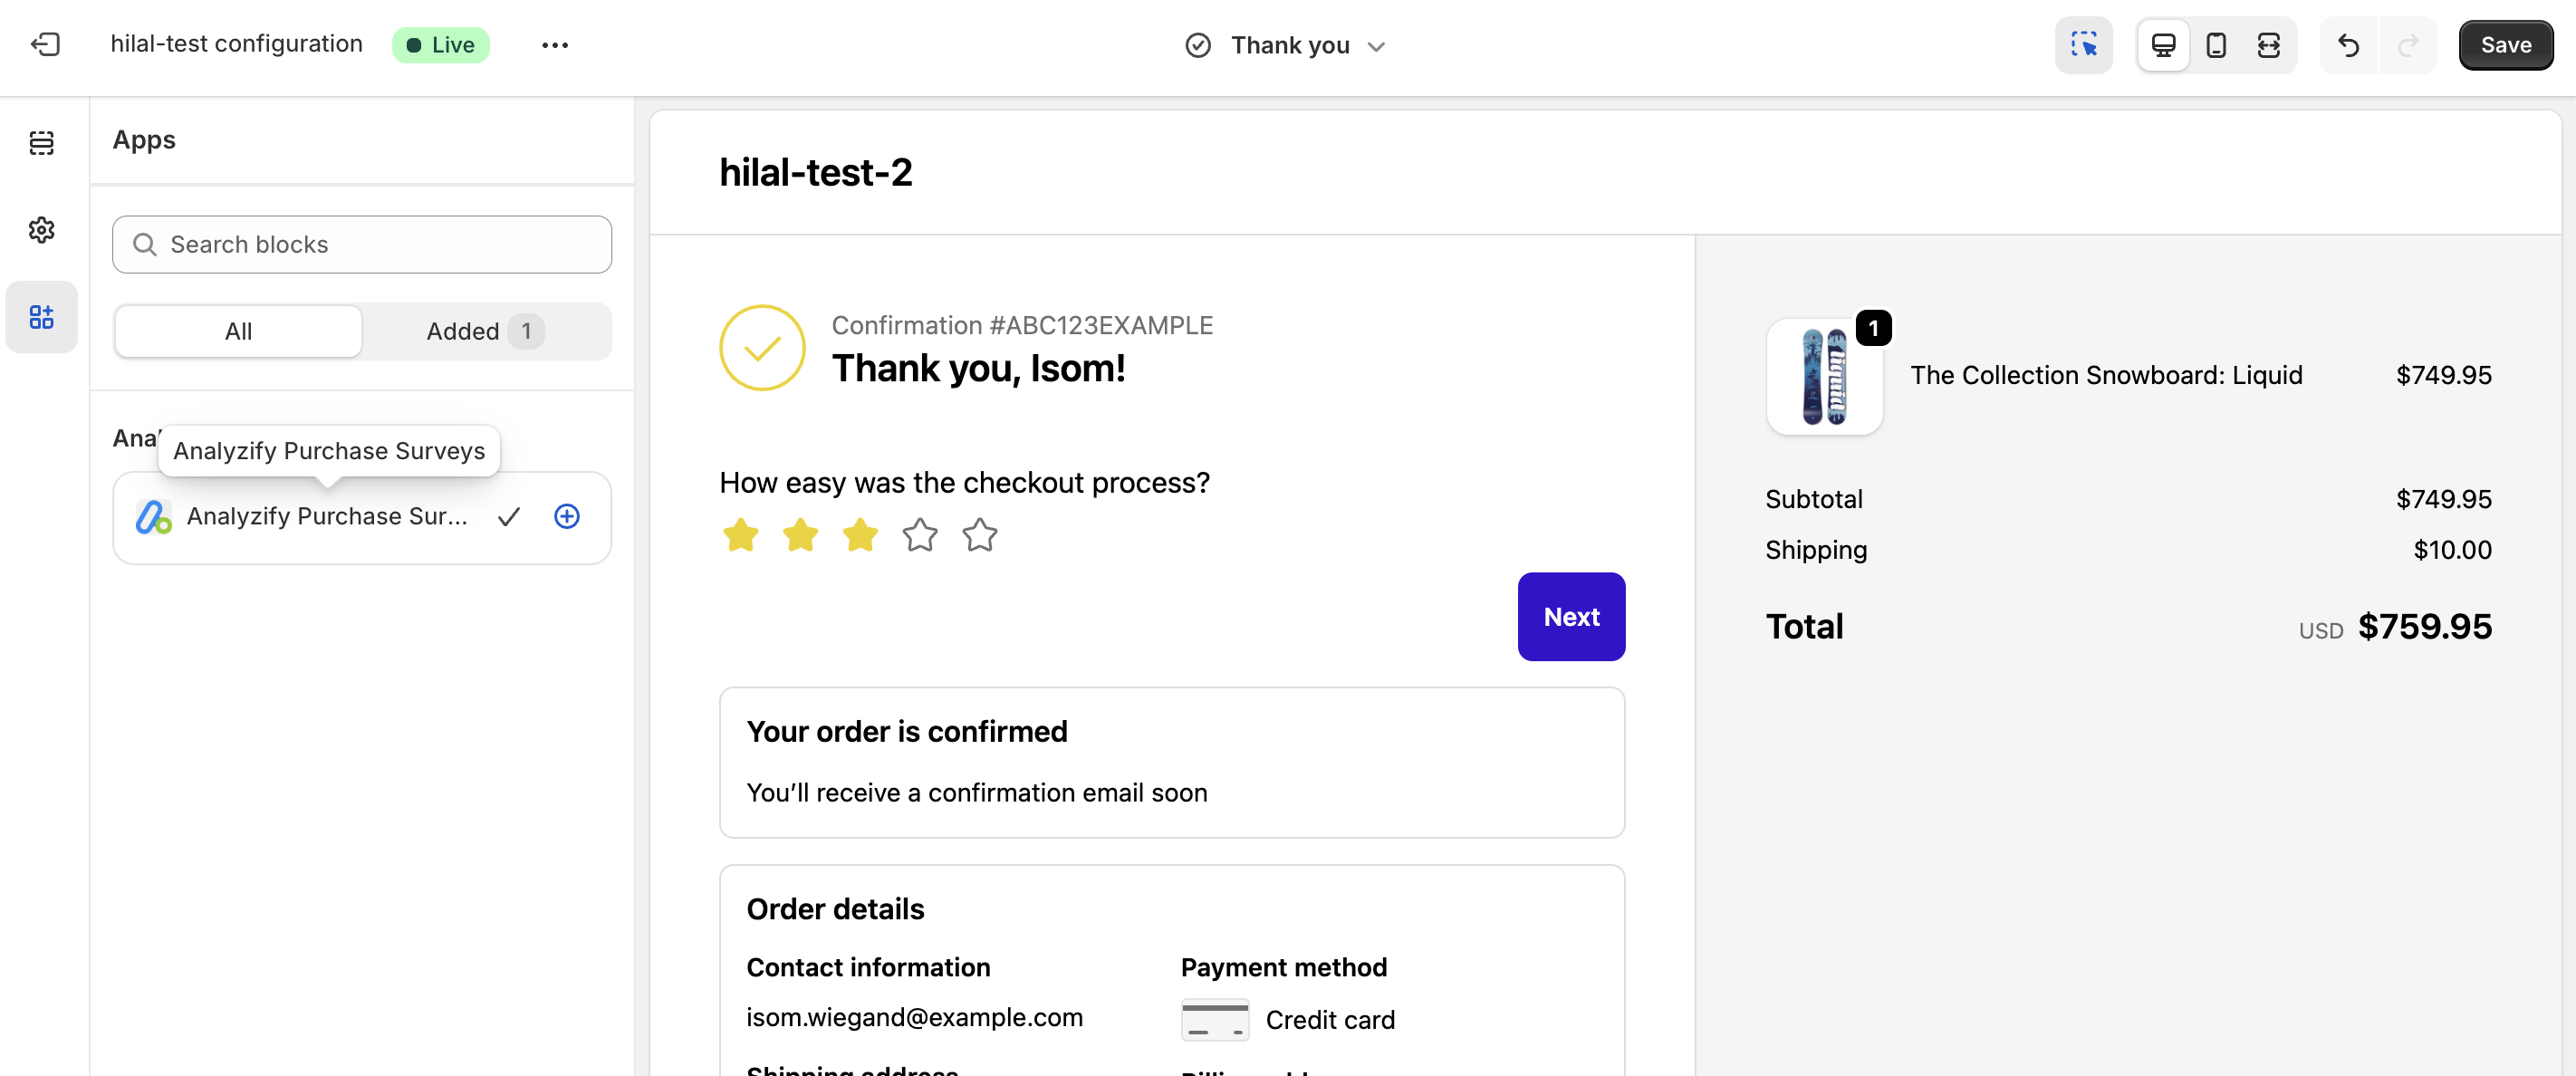
Step 4: Add the App Block
In the left sidebar, click "Add app block" and select "Analyzify Purchase Surveys" from the list.
Step 5: Position the Survey Block
Drag and drop the survey block to your preferred position on the page (above or below existing content).
Step 6: Save and Publish
Click the Save button in the top-right corner. Your survey is now live!
1.4 After First Survey View
- Once a customer views the survey, the blue setup banner automatically disappears
- The survey begins collecting responses normally
- View metrics are tracked in the analytics dashboard
Flow 2: View Survey Analytics and Responses
2.1 Accessing Analytics
You can access survey analytics in two ways:
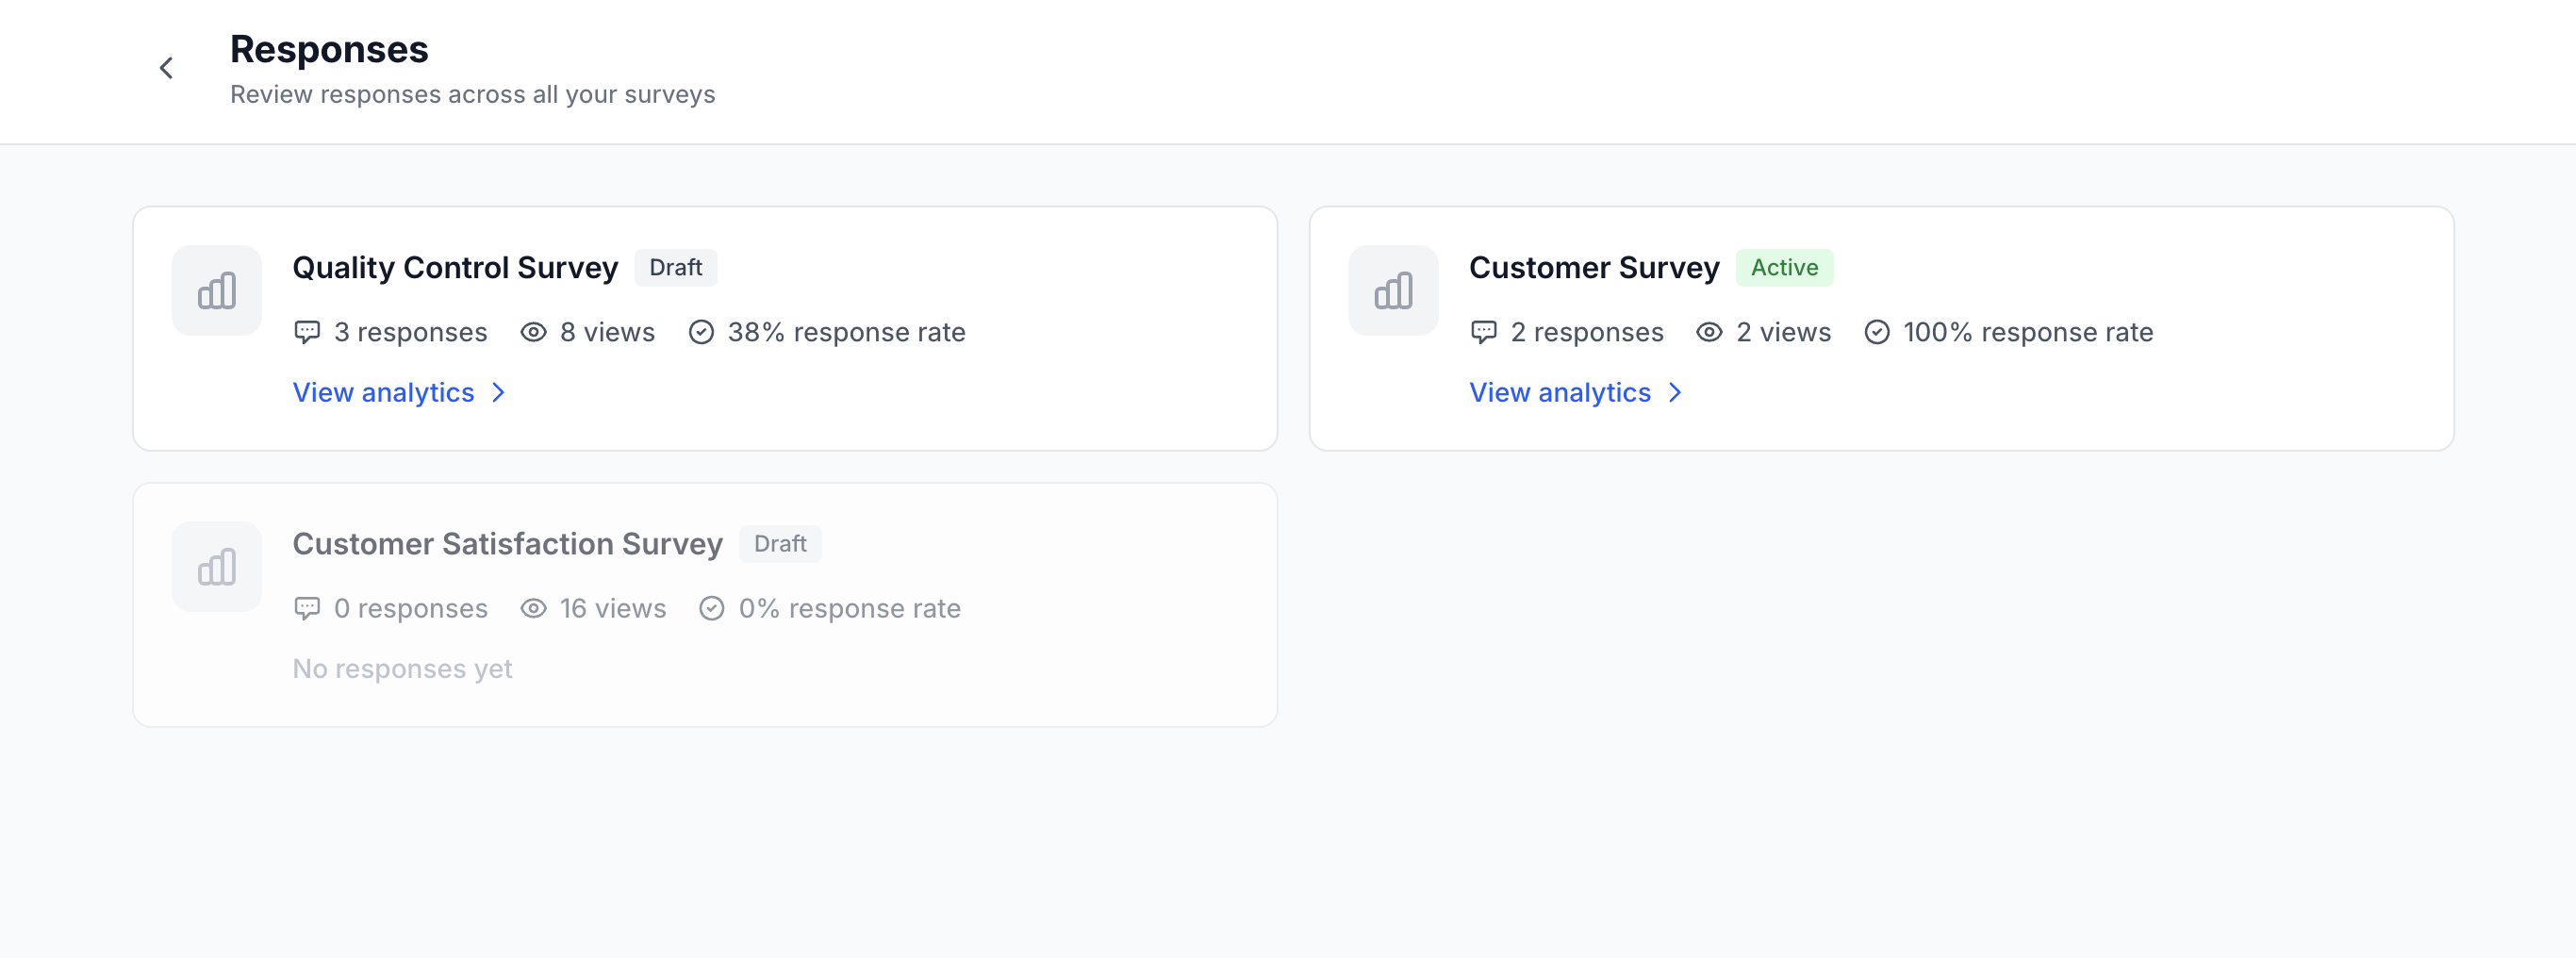
- From the Surveys page: Click "View analytics" next to any survey that has responses
- Navigate to the Responses section from the main menu to see all surveys
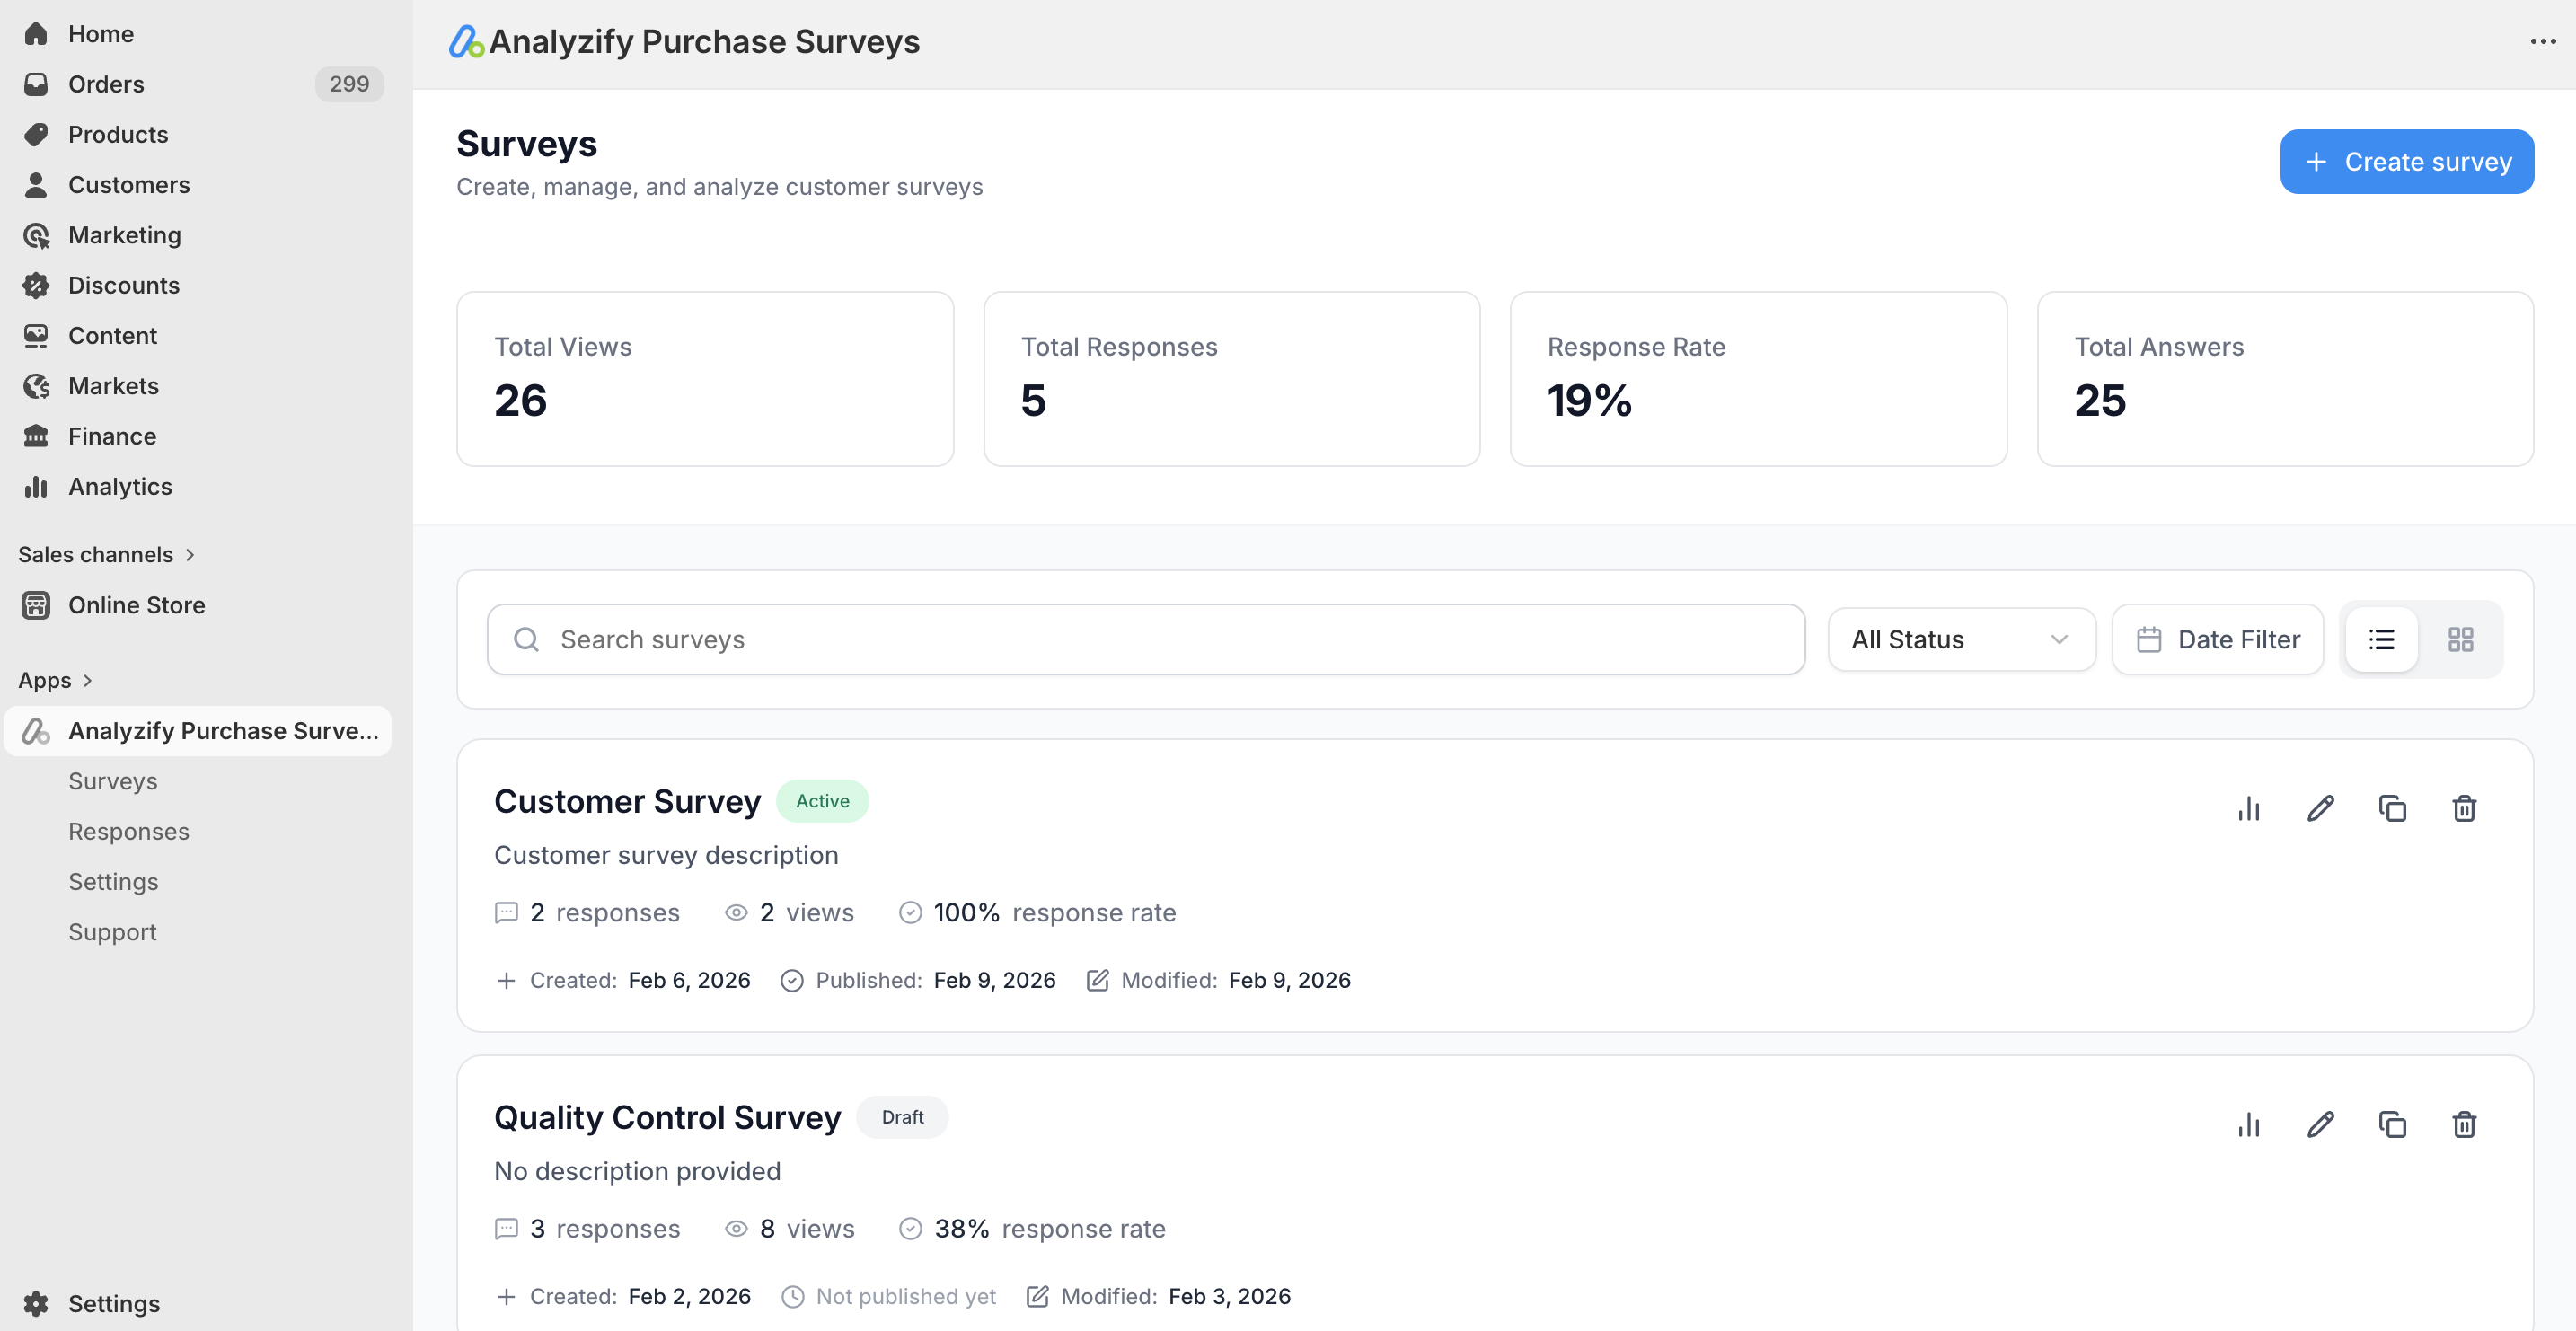
2.2 Analytics Dashboard
The Surveys page displays aggregate metrics across all surveys:
- Total Views: Number of times surveys have been displayed
- Total Responses: Number of completed survey submissions
- Response Rate: Percentage of views that resulted in responses
- Total Answers: Total number of individual question answers across all surveys
Each survey card in the list shows:
- Survey name and status badge (Active/Draft)
- Number of responses and views
- Response rate percentage
- Creation date and last modified date
- Quick action icons: Analytics, Edit, Duplicate, Delete
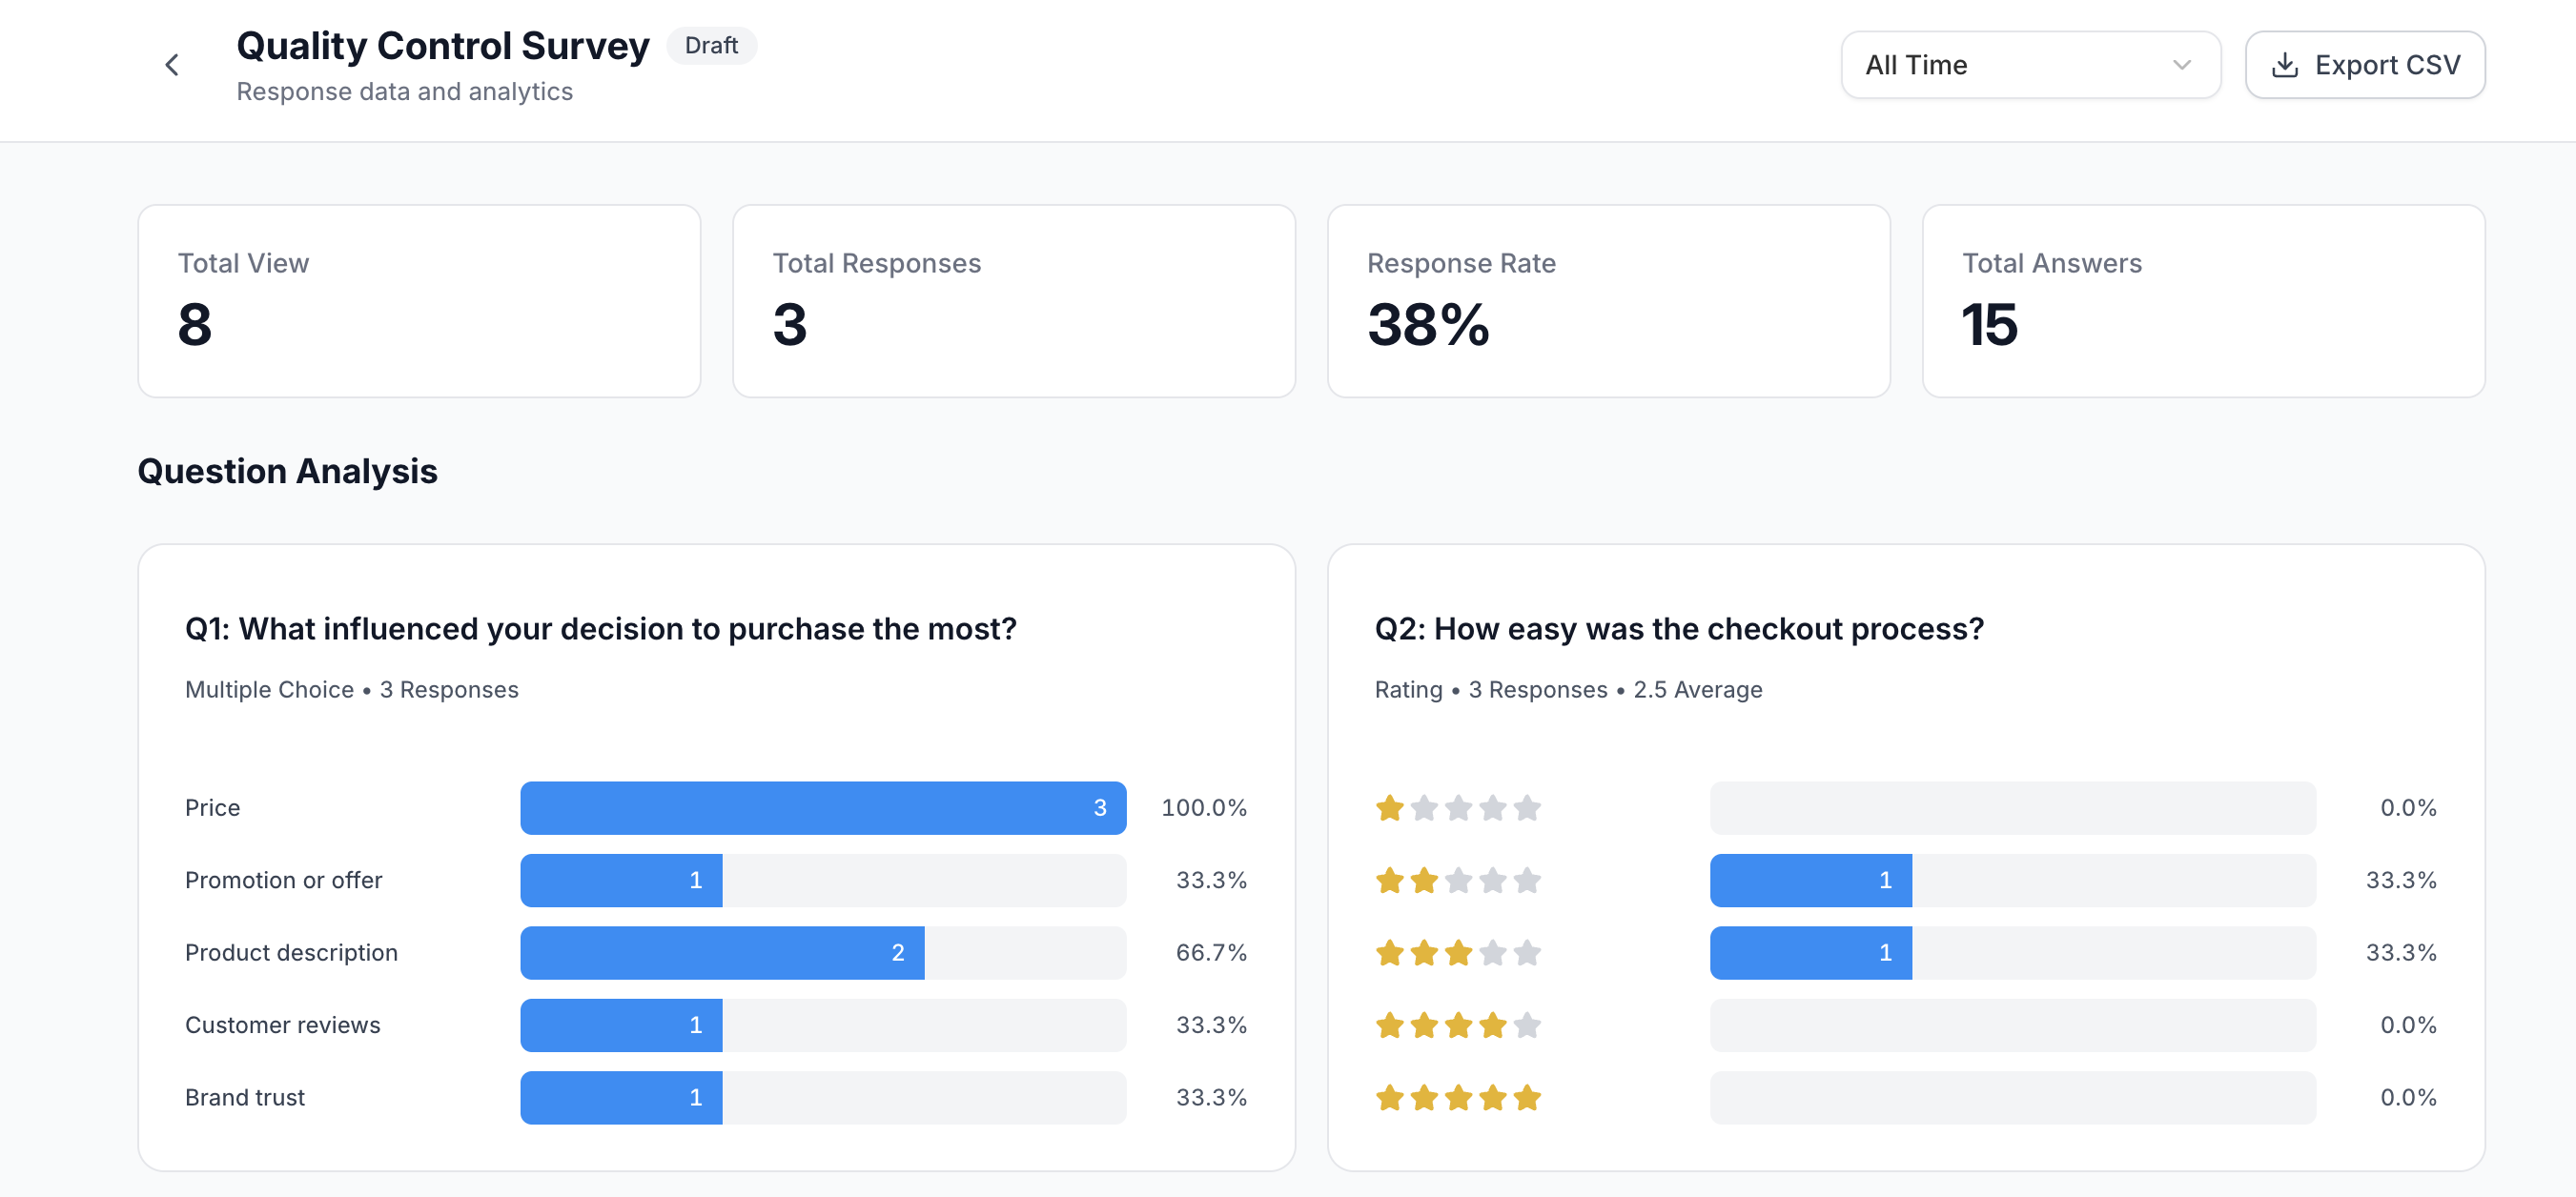
2.3 Individual Survey Analytics
When viewing analytics for a specific survey, you can:
- View summary statistics and performance metrics
- Examine charts and visualizations for each question
- Browse individual responses in a detailed table format
- Export all responses as a CSV file for external analysis
- Filter and search through response data
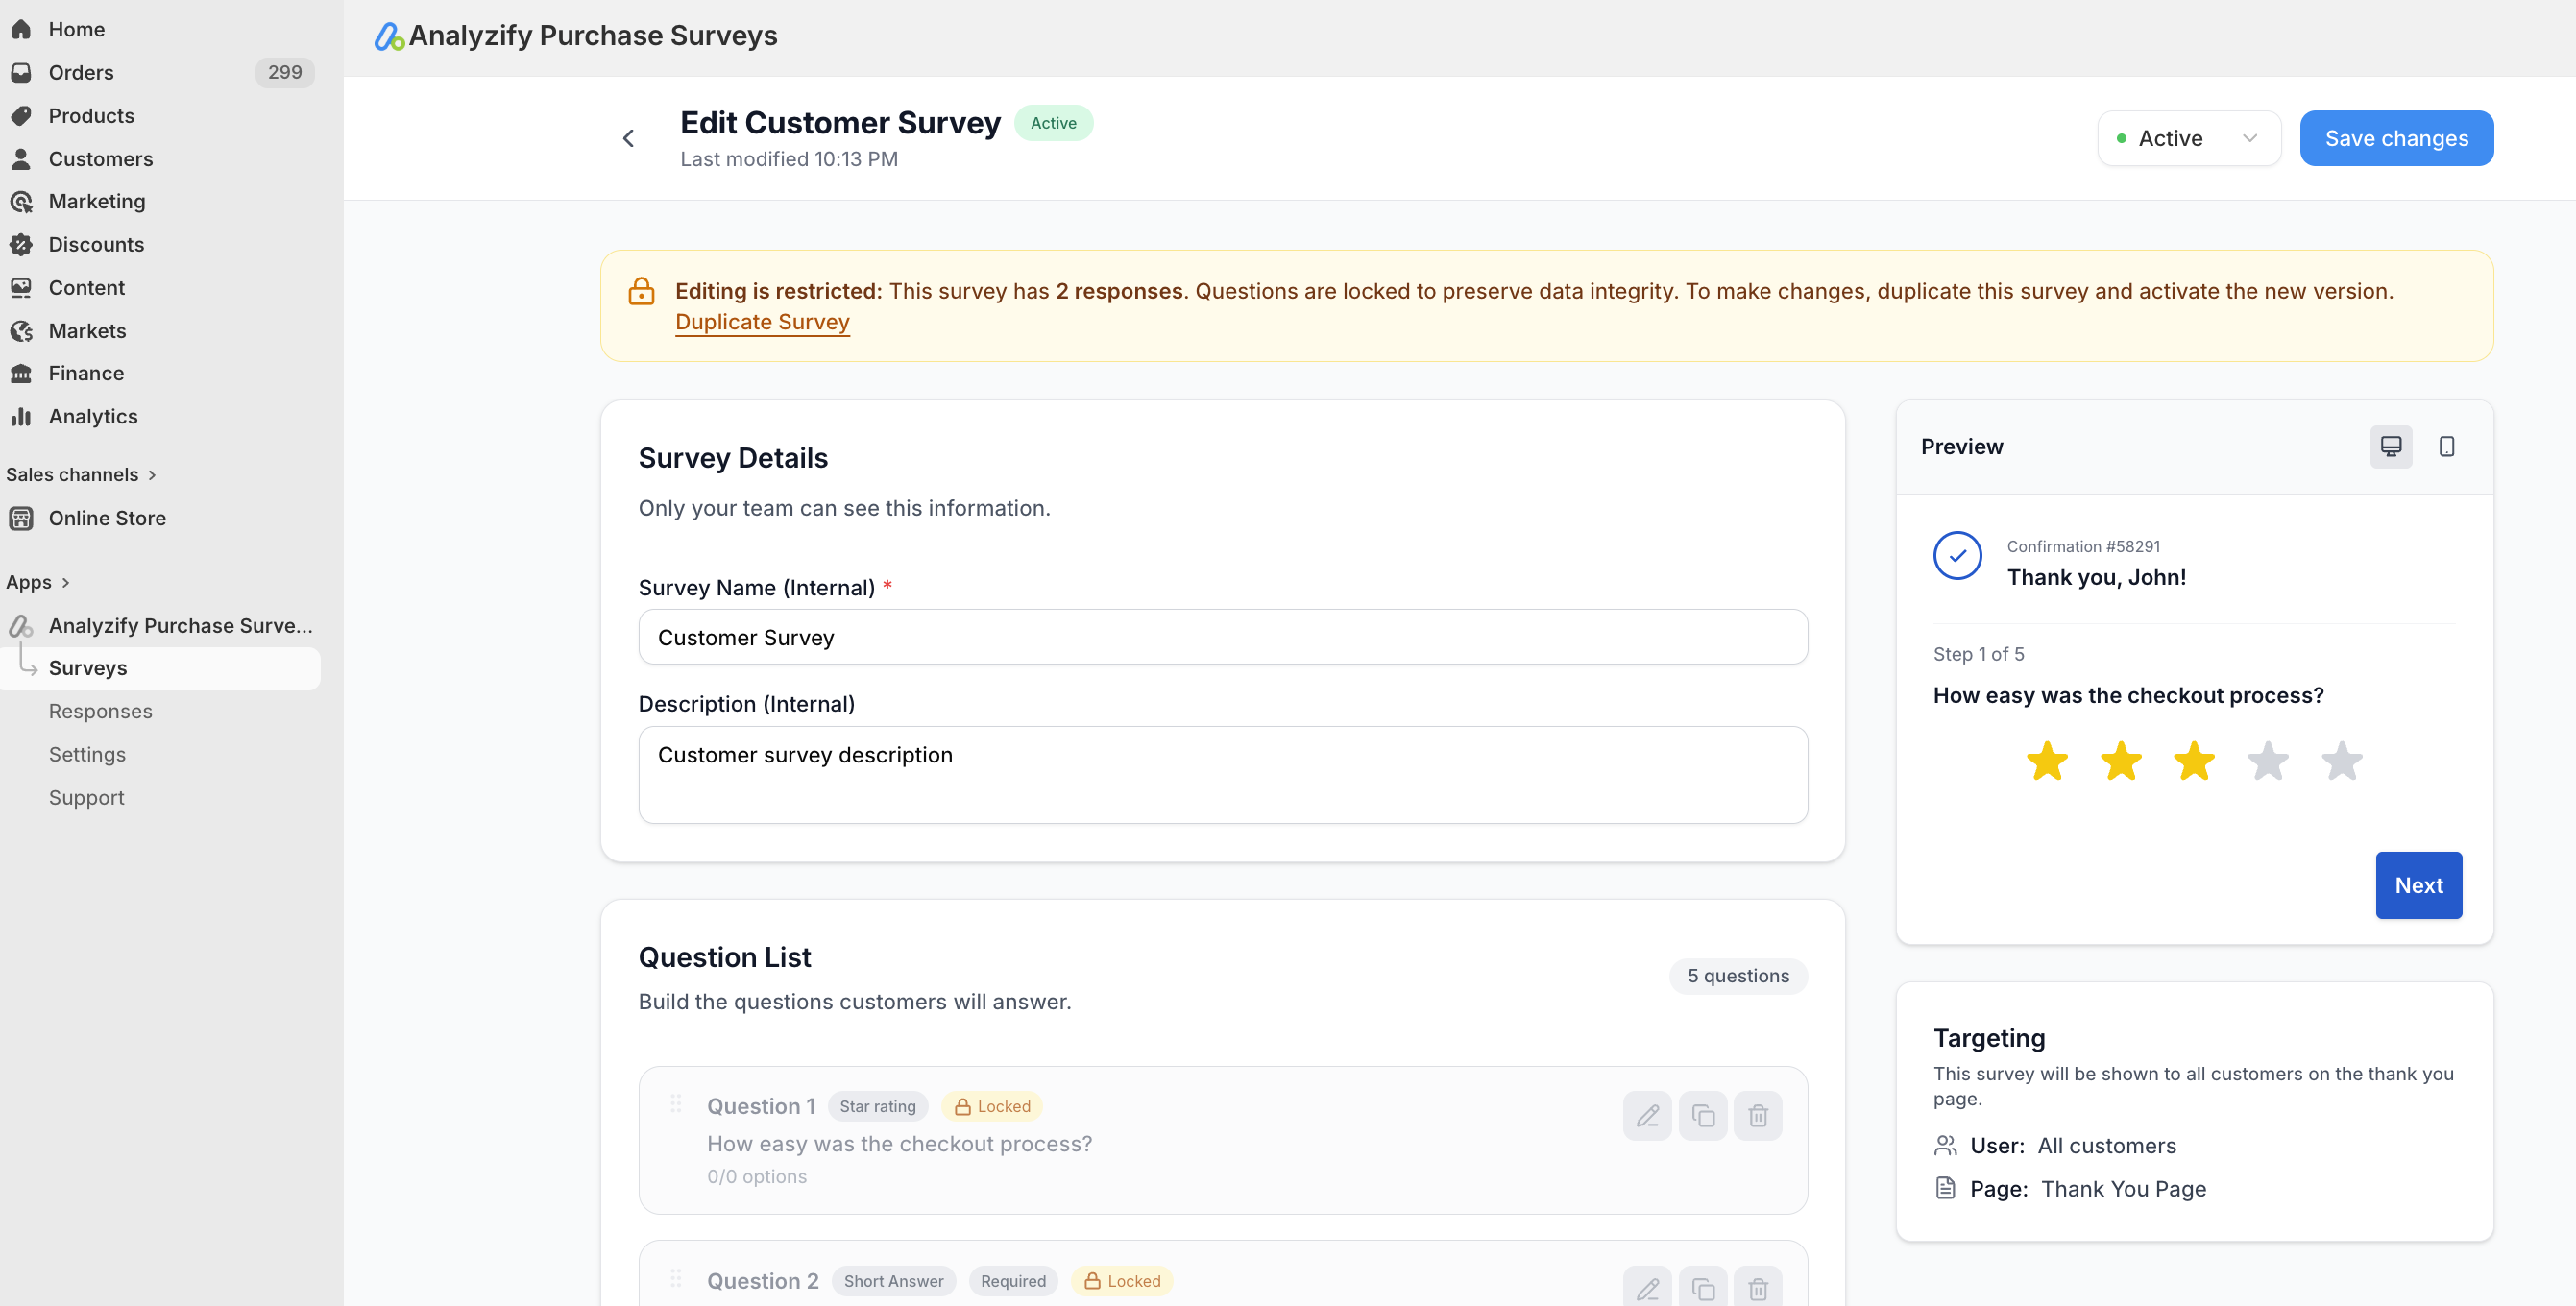
Flow 3: Edit a Survey with Existing Responses
3.1 Response Protection
To maintain data integrity and ensure consistent analytics, surveys that have collected responses cannot be edited directly.
3.2 What Happens When You Try to Edit
When attempting to edit a survey with responses:
- A warning banner appears at the top explaining why editing is locked
- All survey questions and settings are displayed in read-only mode
- You're presented with alternative options (see below)
3.3 Available Options
- Duplicate: Create a copy of the survey with all questions intact, which can then be edited freely
- Go Back: Return to the surveys list without making changes
- View Analytics: Navigate to the analytics dashboard to examine existing response data
Flow 4: Change Survey Status (Activate/Deactivate)
4.1 Single Active Survey Rule
The app enforces a one-active-survey-at-a-time policy to ensure customers have a clean, consistent experience. This prevents confusion and ensures clear analytics.
4.2 Activation Conflict Scenario
If you attempt to activate a survey while another is already active:
- A modal appears with the message "Only One Active Survey Allowed"
- The modal displays which survey is currently active
- You must choose between two options:
-
- Keep Current: Cancel the action and maintain the currently active survey
- Activate This: Deactivate the current survey and activate the selected one
4.3 No Conflict Scenario
If no survey is currently active when you activate one:
- The status changes immediately to "Active"
- No confirmation modal is required
- The survey begins displaying to customers based on targeting settings
Flow 5: Settings and Configuration
Navigate to Settings from the main menu to access app configuration:
5.1 Account
- View connected store information
- See account owner details
- Manage general account settings
5.2 Contacts (Team Management)
- Add new team members by email address
- Remove team member access
- Manage collaboration permissions
- View list of all users with access to the app
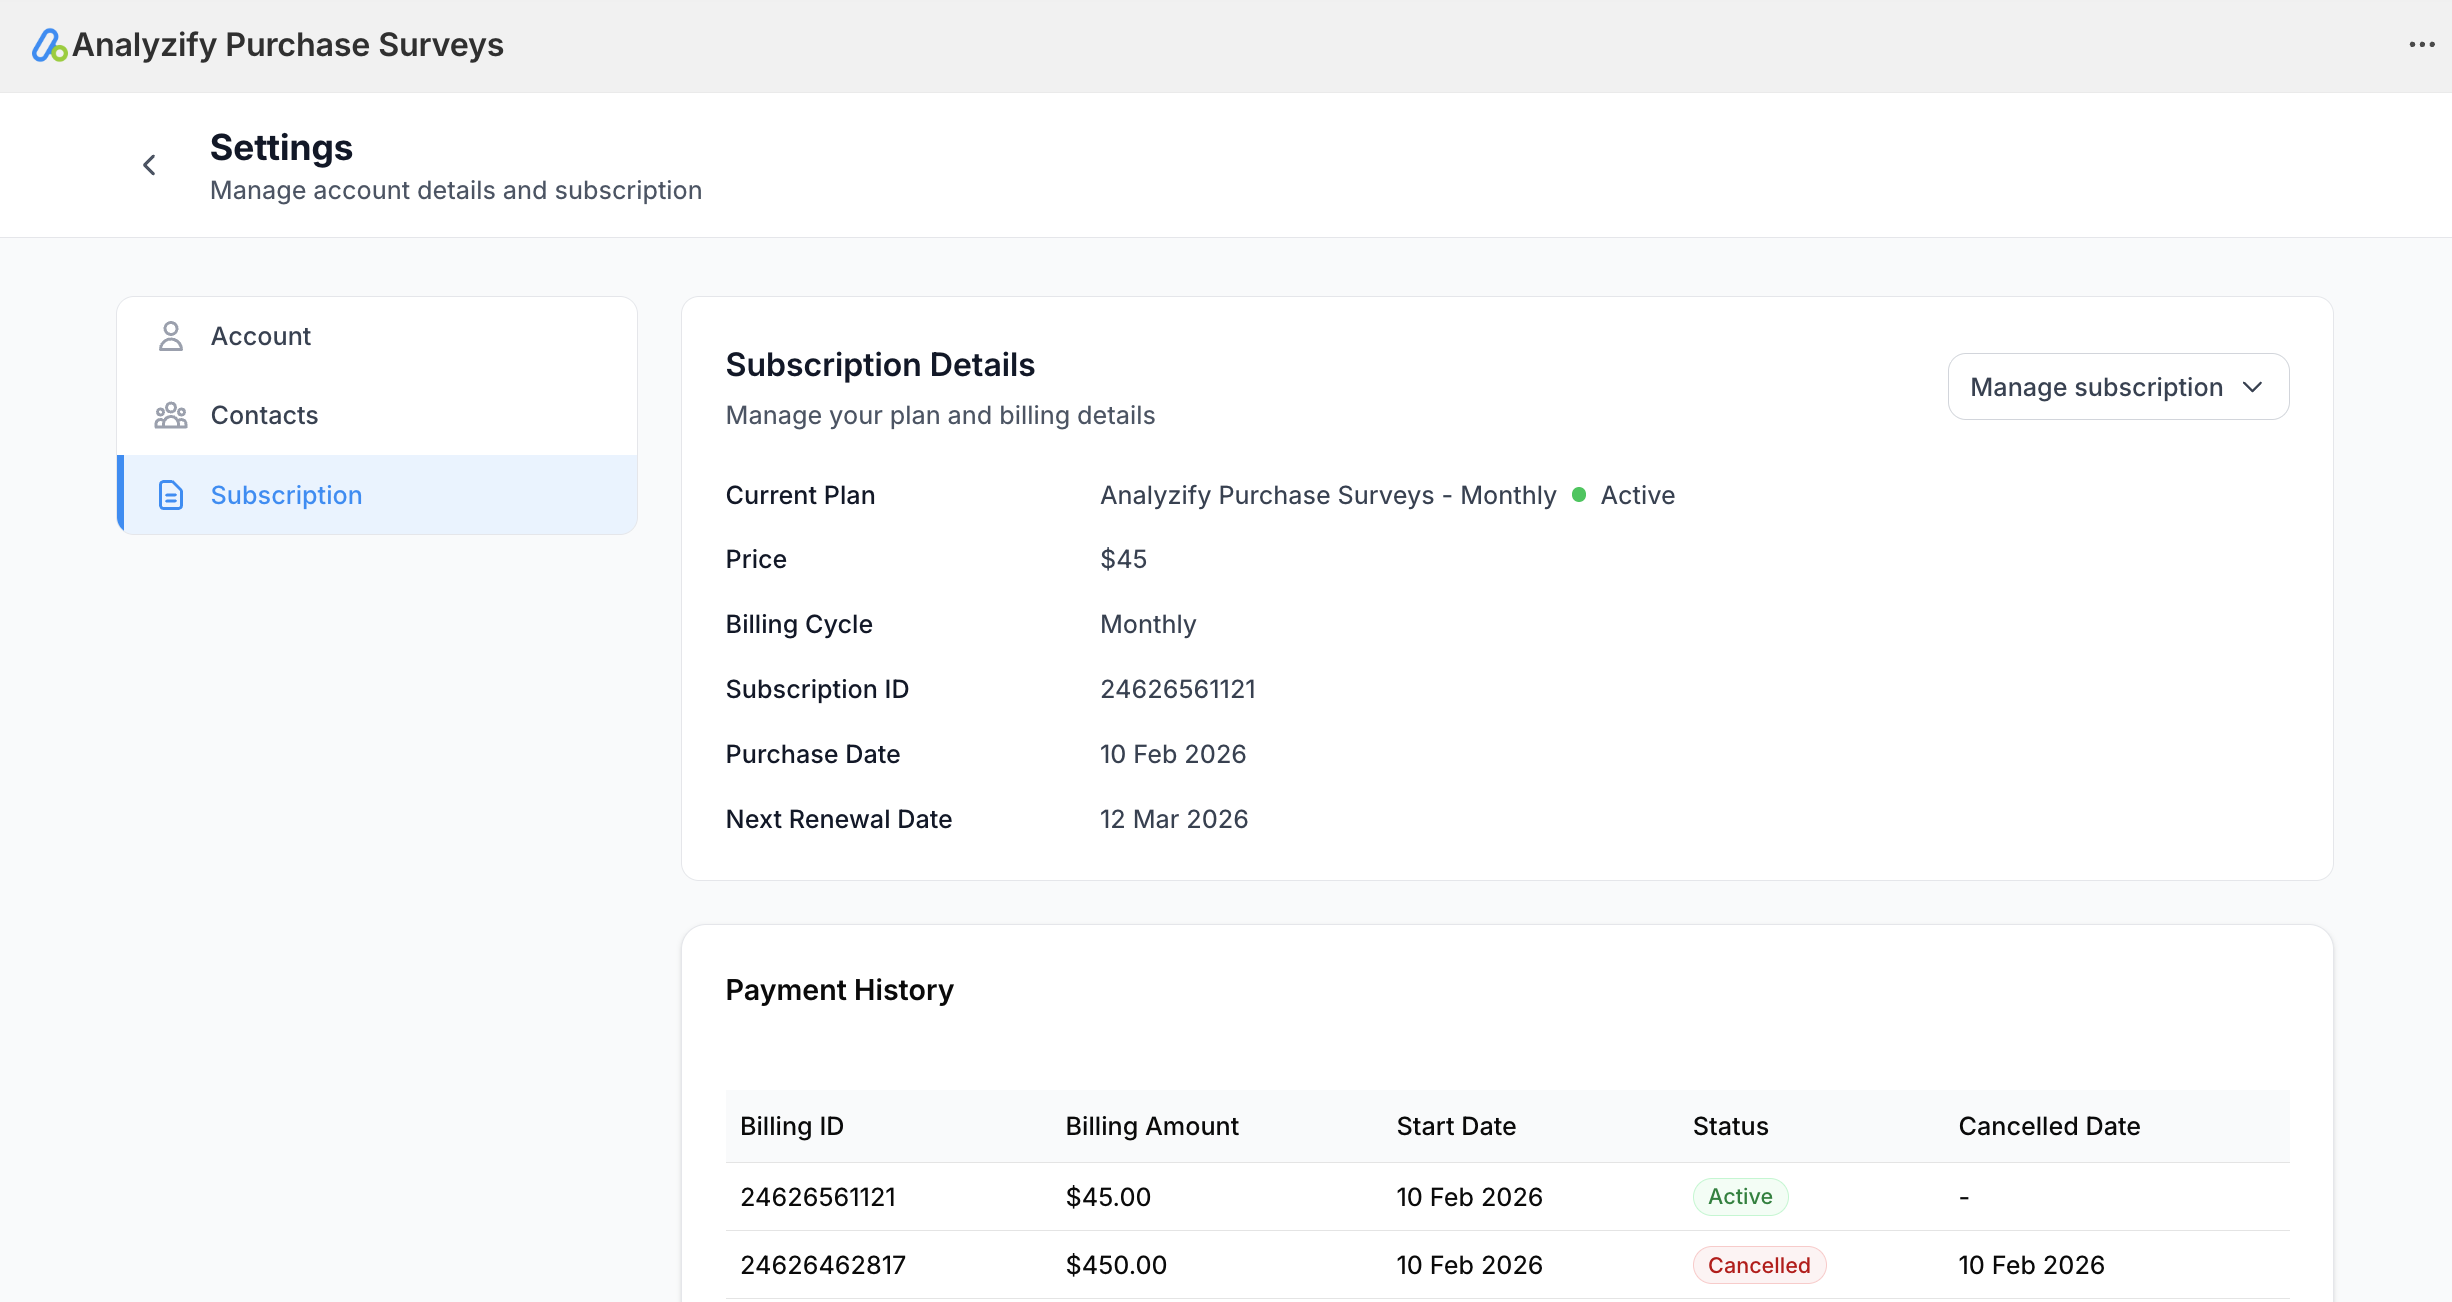
5.3 Subscription
The subscription section displays:
- Current plan name (e.g., "Analyzify Purchase Surveys - Monthly")
- Plan status (Active/Inactive)
- Monthly price
- Billing history
- Purchase date
- Next renewal date
- "Manage subscription" button for upgrades/cancellations
- FAQ section with common questions about billing
Technical Implementation Details
App Block Integration
The survey widget is implemented as a Shopify app block that:
- Integrates seamlessly with Shopify's checkout customization system
- Appears on Thank You page after purchase completion
- Respects merchant's theme styling and branding
- Loads asynchronously to avoid impacting page performance
- Is fully responsive for mobile, tablet, and desktop views
Data Collection and Privacy
- All survey responses are stored securely and associated with order IDs
- Response data is accessible only to authorized team members
- CSV exports maintain data integrity and formatting
- Data Deletion: If the app is uninstalled, all collected data is automatically deleted after a retention period (48 hours)
Data Retention and Deletion
- Active App: Data is stored securely while the app is installed
- App Uninstallation: All data is scheduled for automatic deletion after a retention period
- Merchant-Initiated Deletion: Merchants can export their data before uninstalling
Support
For questions, issues, or additional information during testing:
- Support Contact: Contact information available in Settings section
- Read our Privacy Policy .
