We can list down what causes tags to malfunction as follows:
Main Reasons
1. Checking the wrong theme
The most common scenario we encounter is actually checking for the wrong theme when in reality your tags are working perfectly. So, when you are checking your setup, make sure that you are on the right theme - which is the one you provided us with earlier.
Prior to publishing your GTM container, you should check out the link to the theme in which the codes were added during setup. If your setup is performed on your live theme, it’ll be enough once you preview the link to your website.
There are 2 things (you should check 3) if you use Shopify Plus to make sure you are on the right theme.
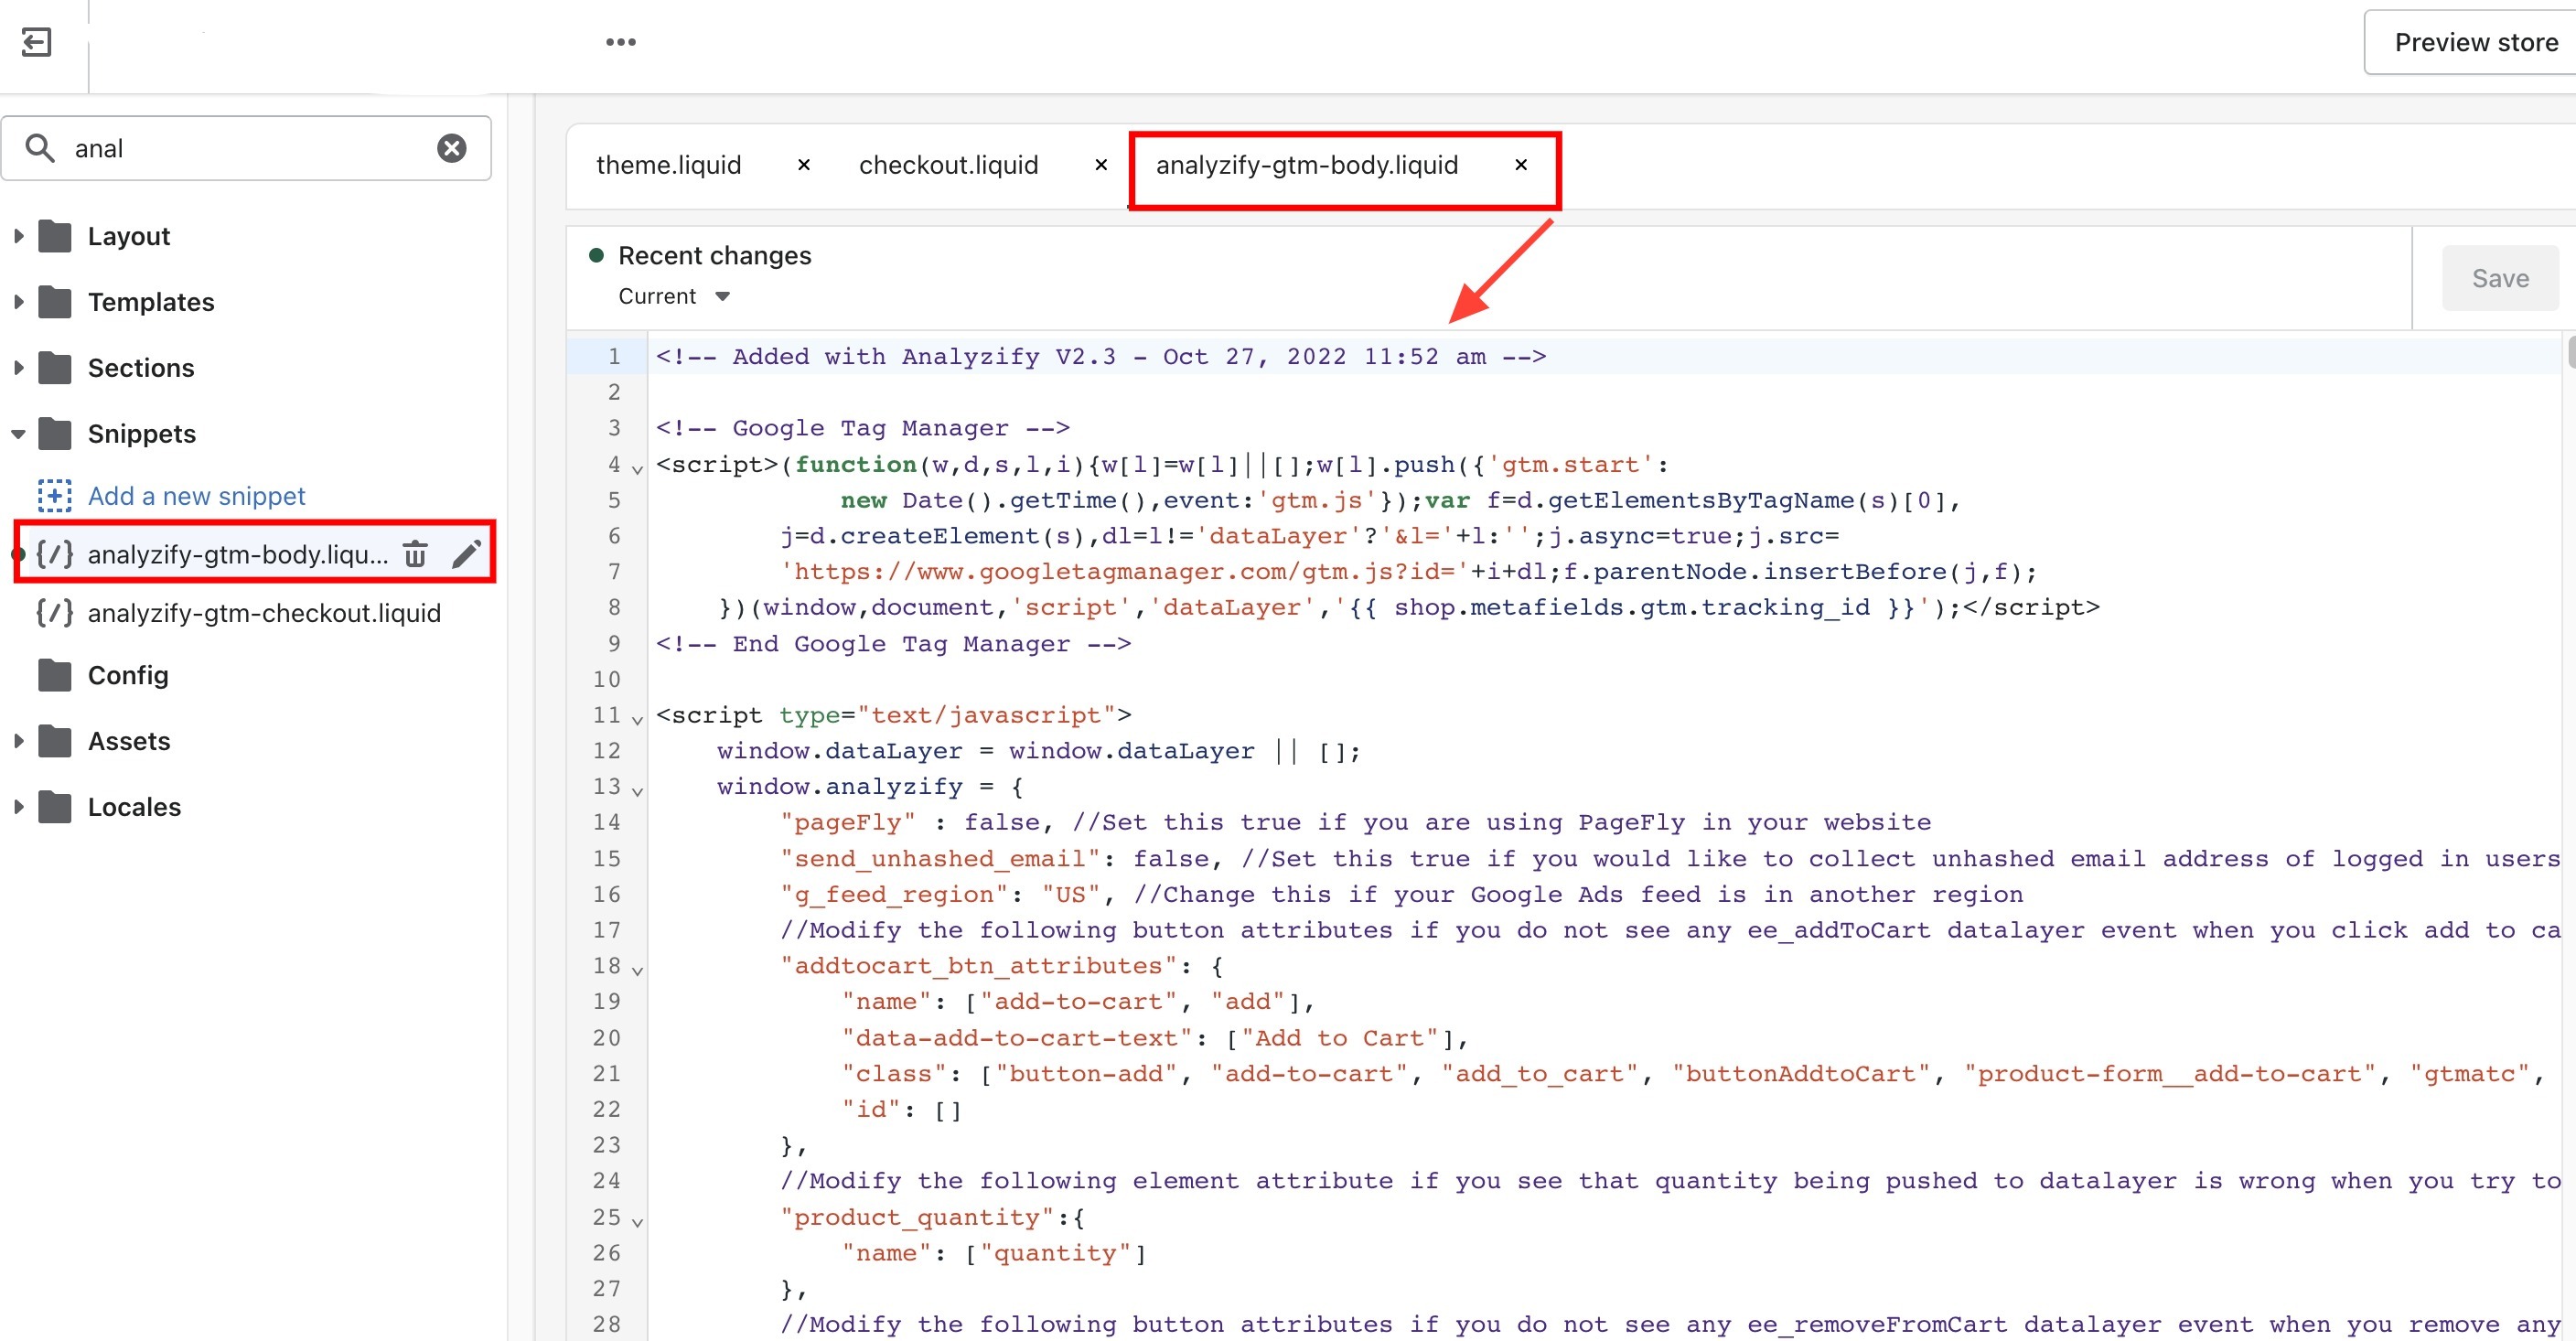
First, head to your Shopify Admin panel > “Online Store” > “Themes” > “Edit code”, and search for the analyzify-gtm-body.liquid file.
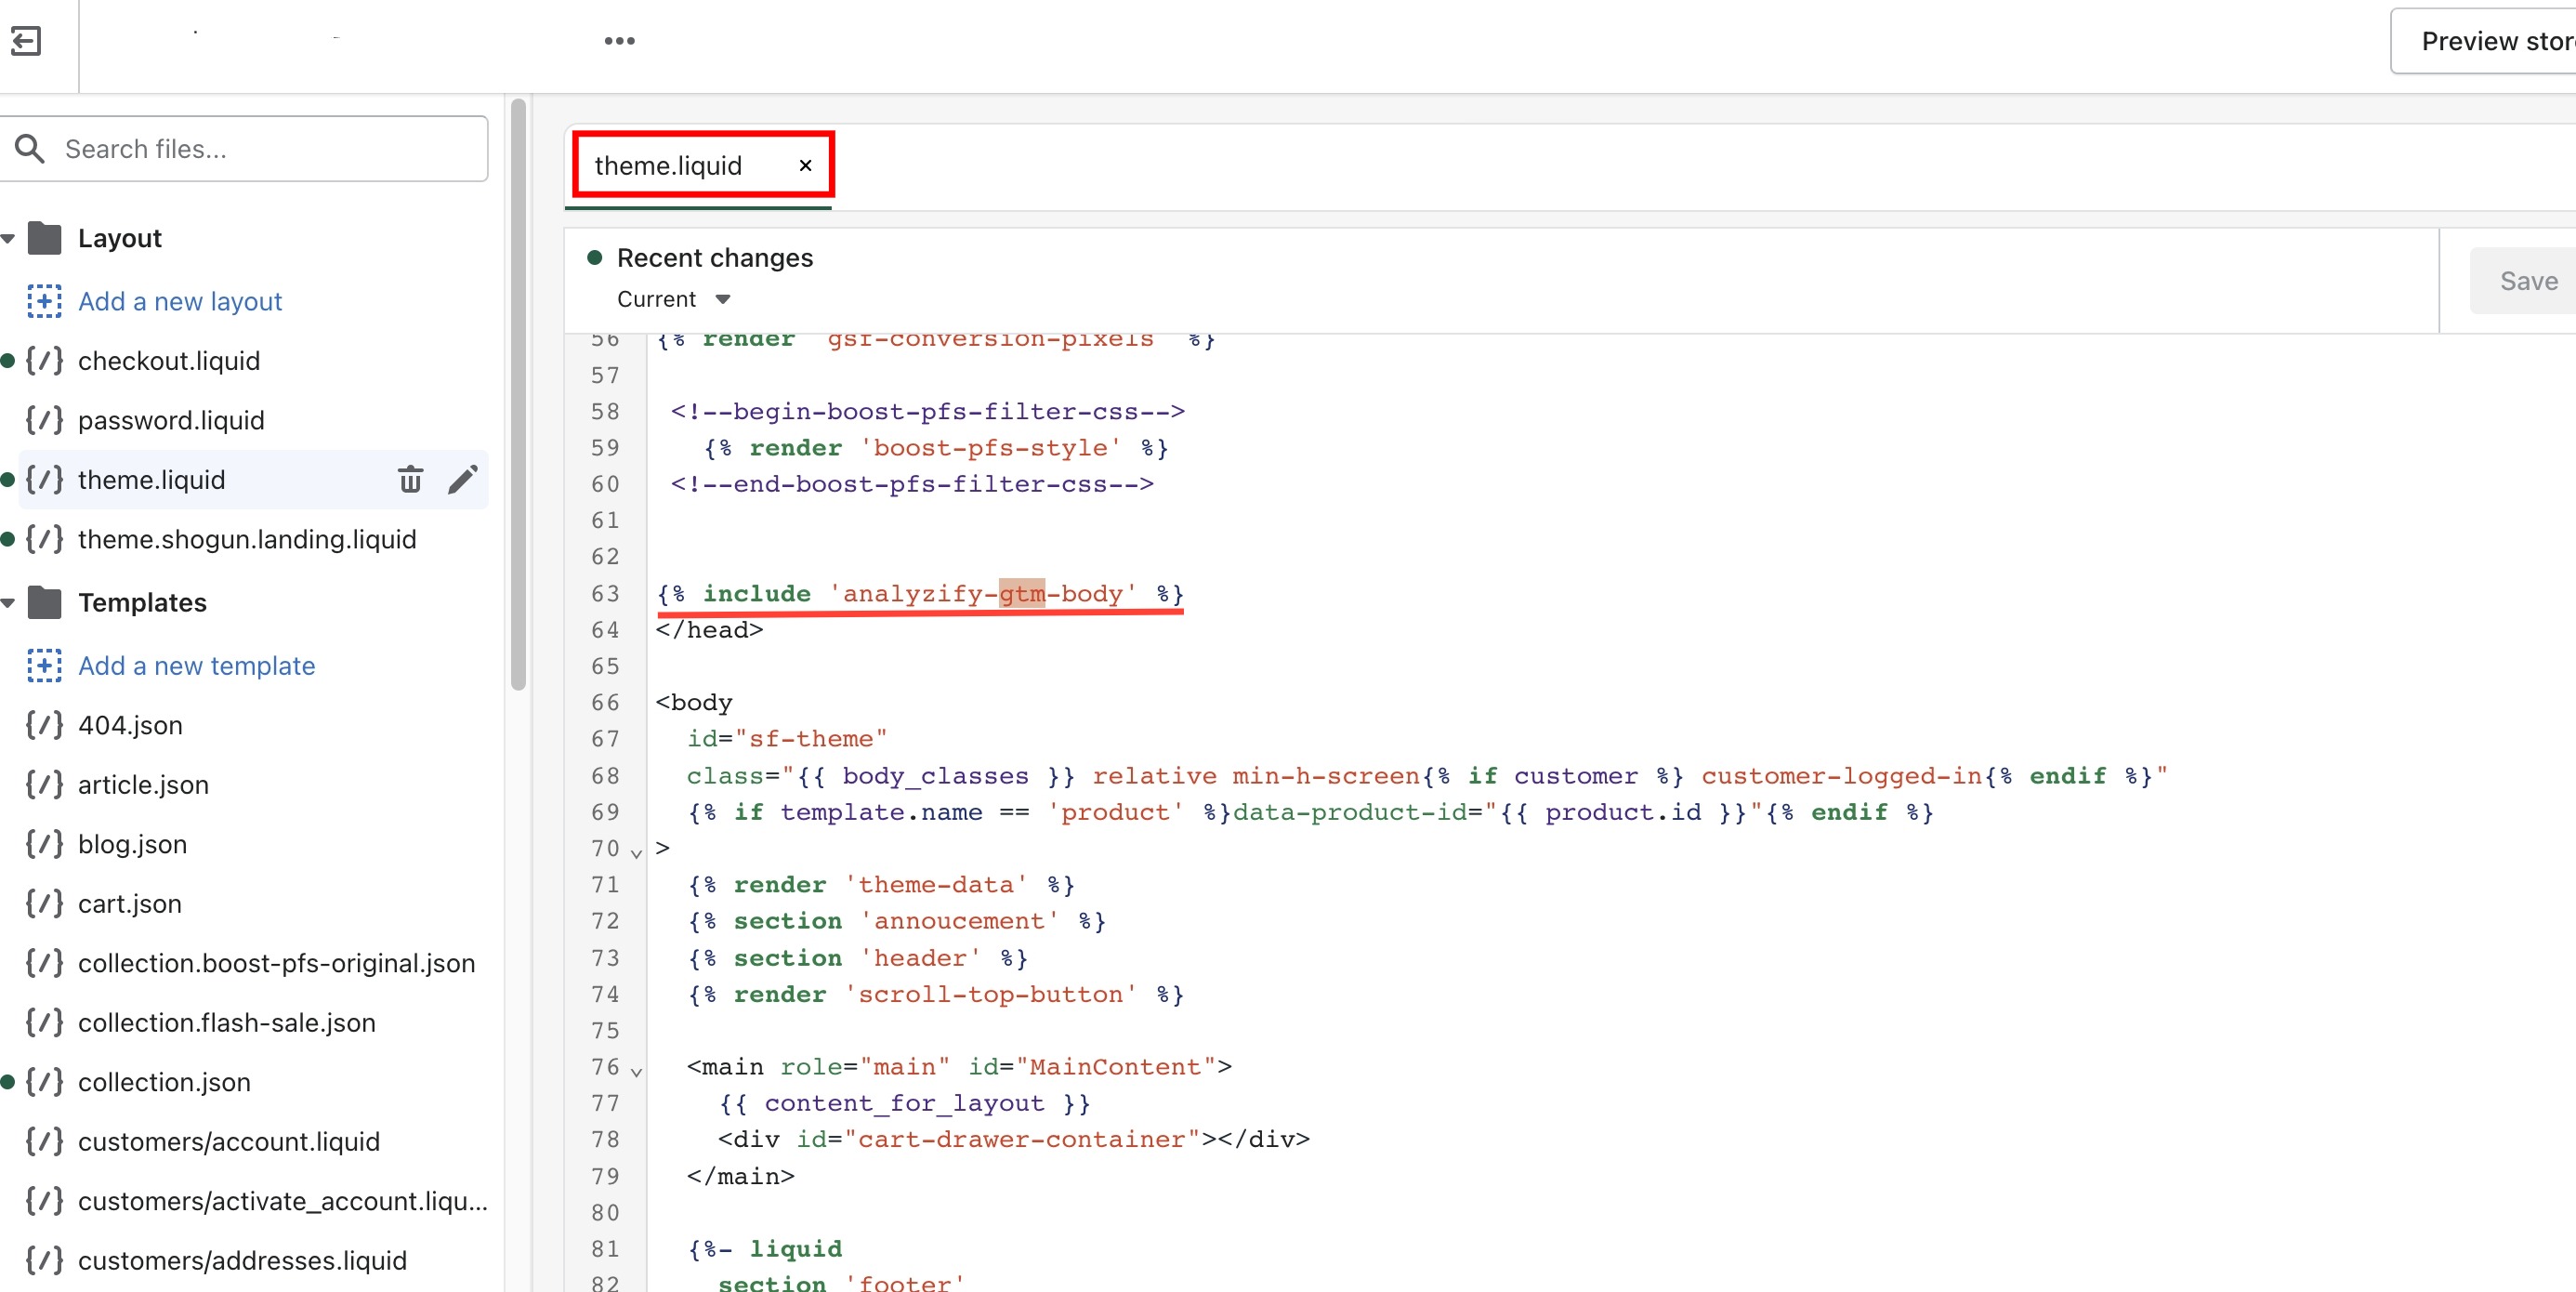
Then, search for the theme.liquid file and search the line where Analyzify was injected.
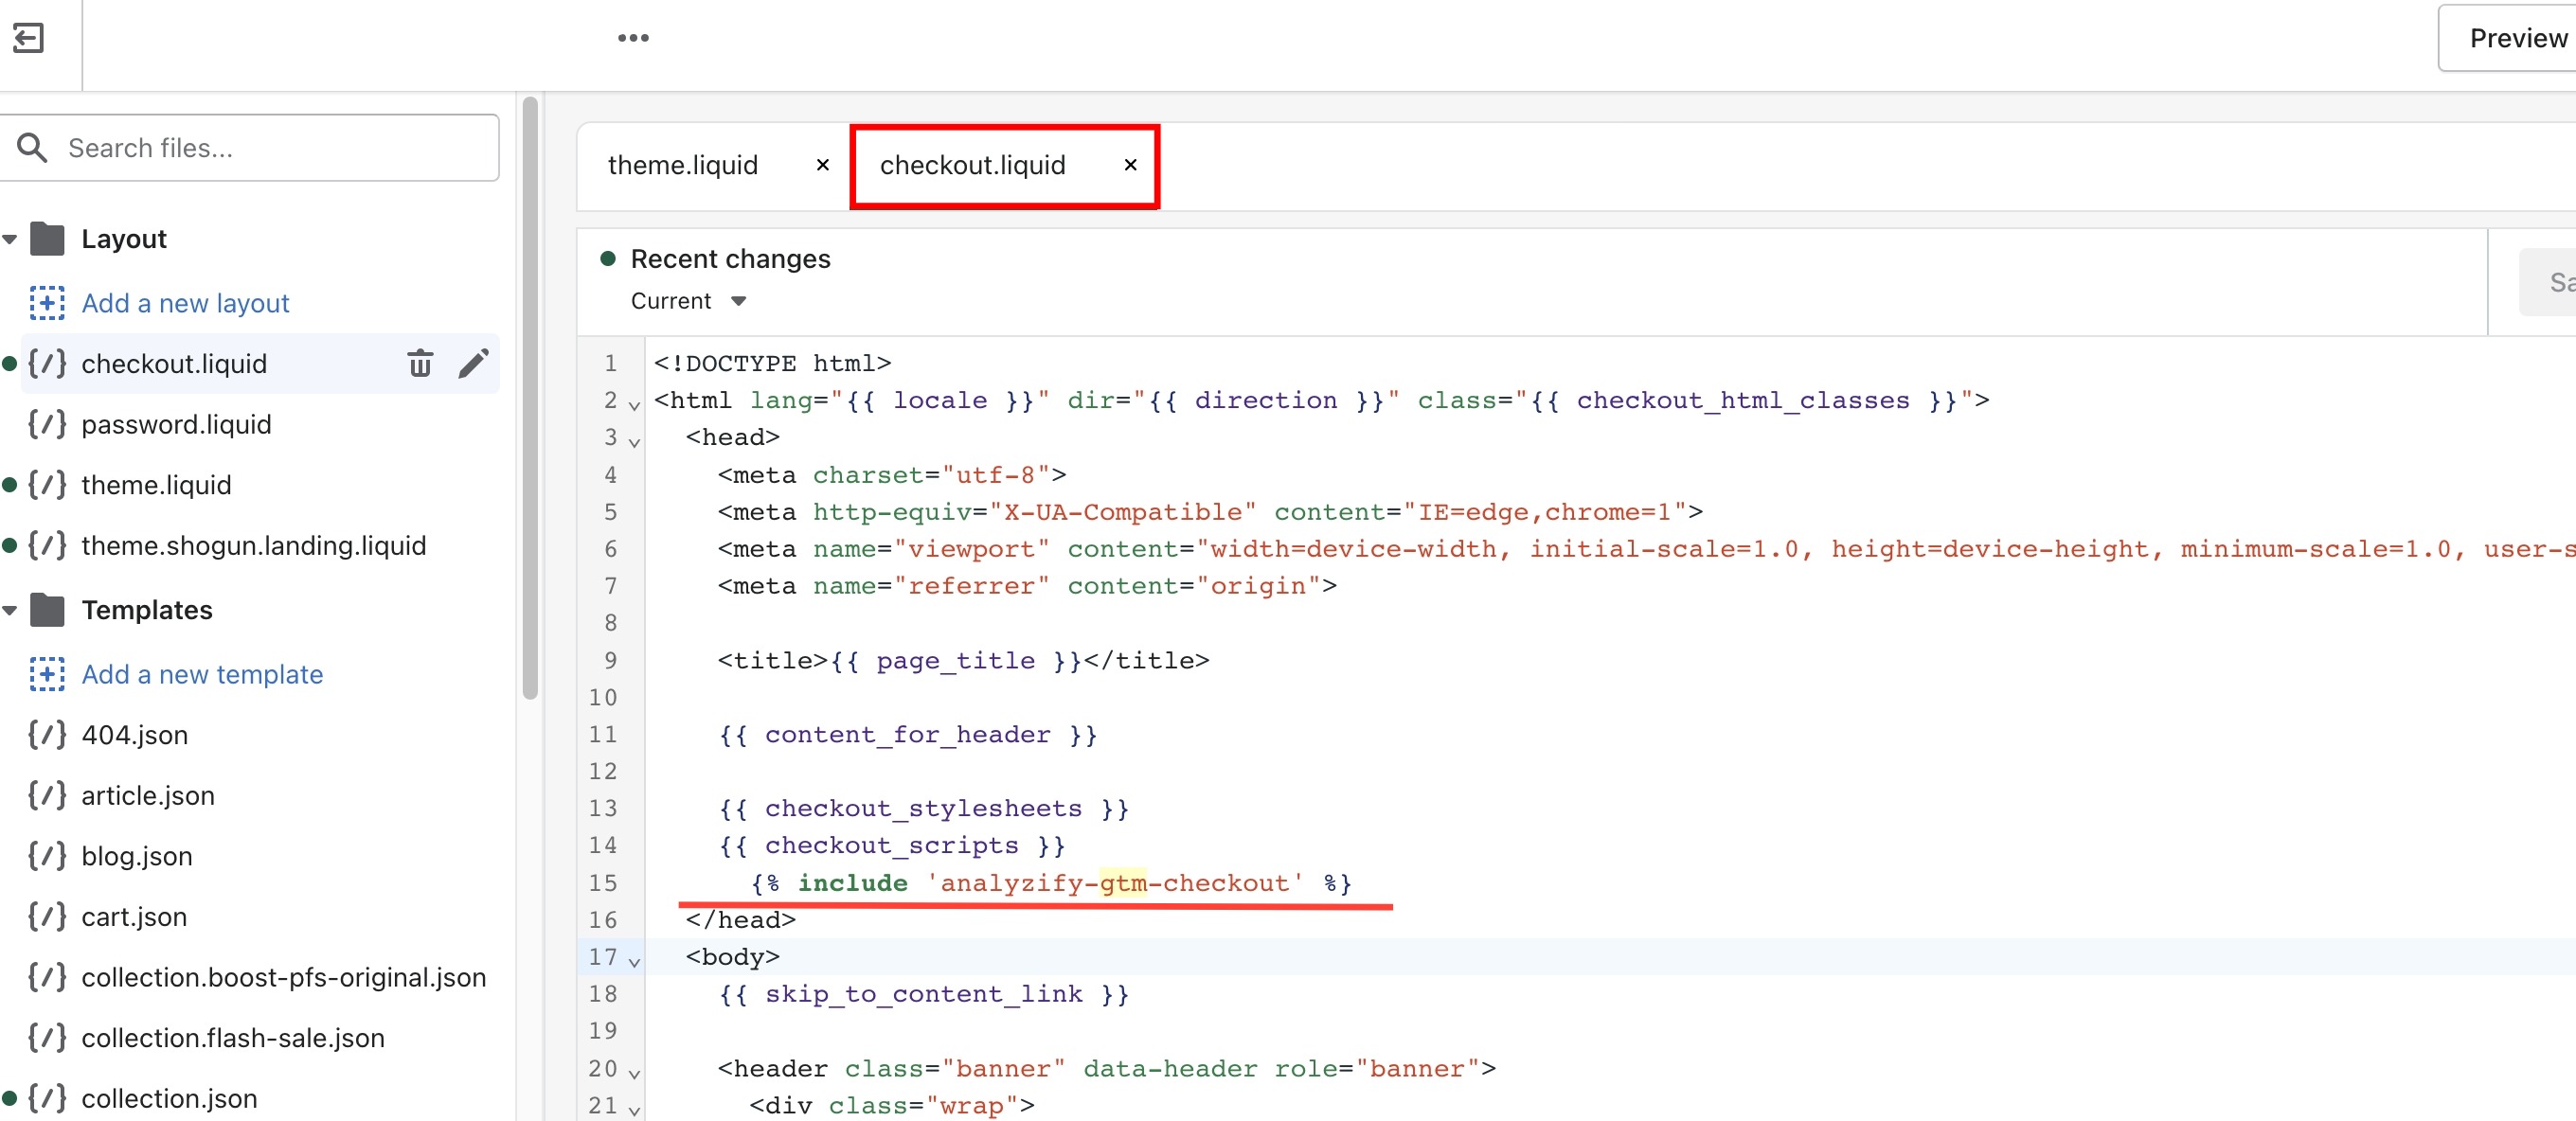
If you have a Shopify Plus plan, you should also check the “checkout.liquid” file. Search for checkout.liquid in the theme.liquid file, and again, find the Analyzify line.
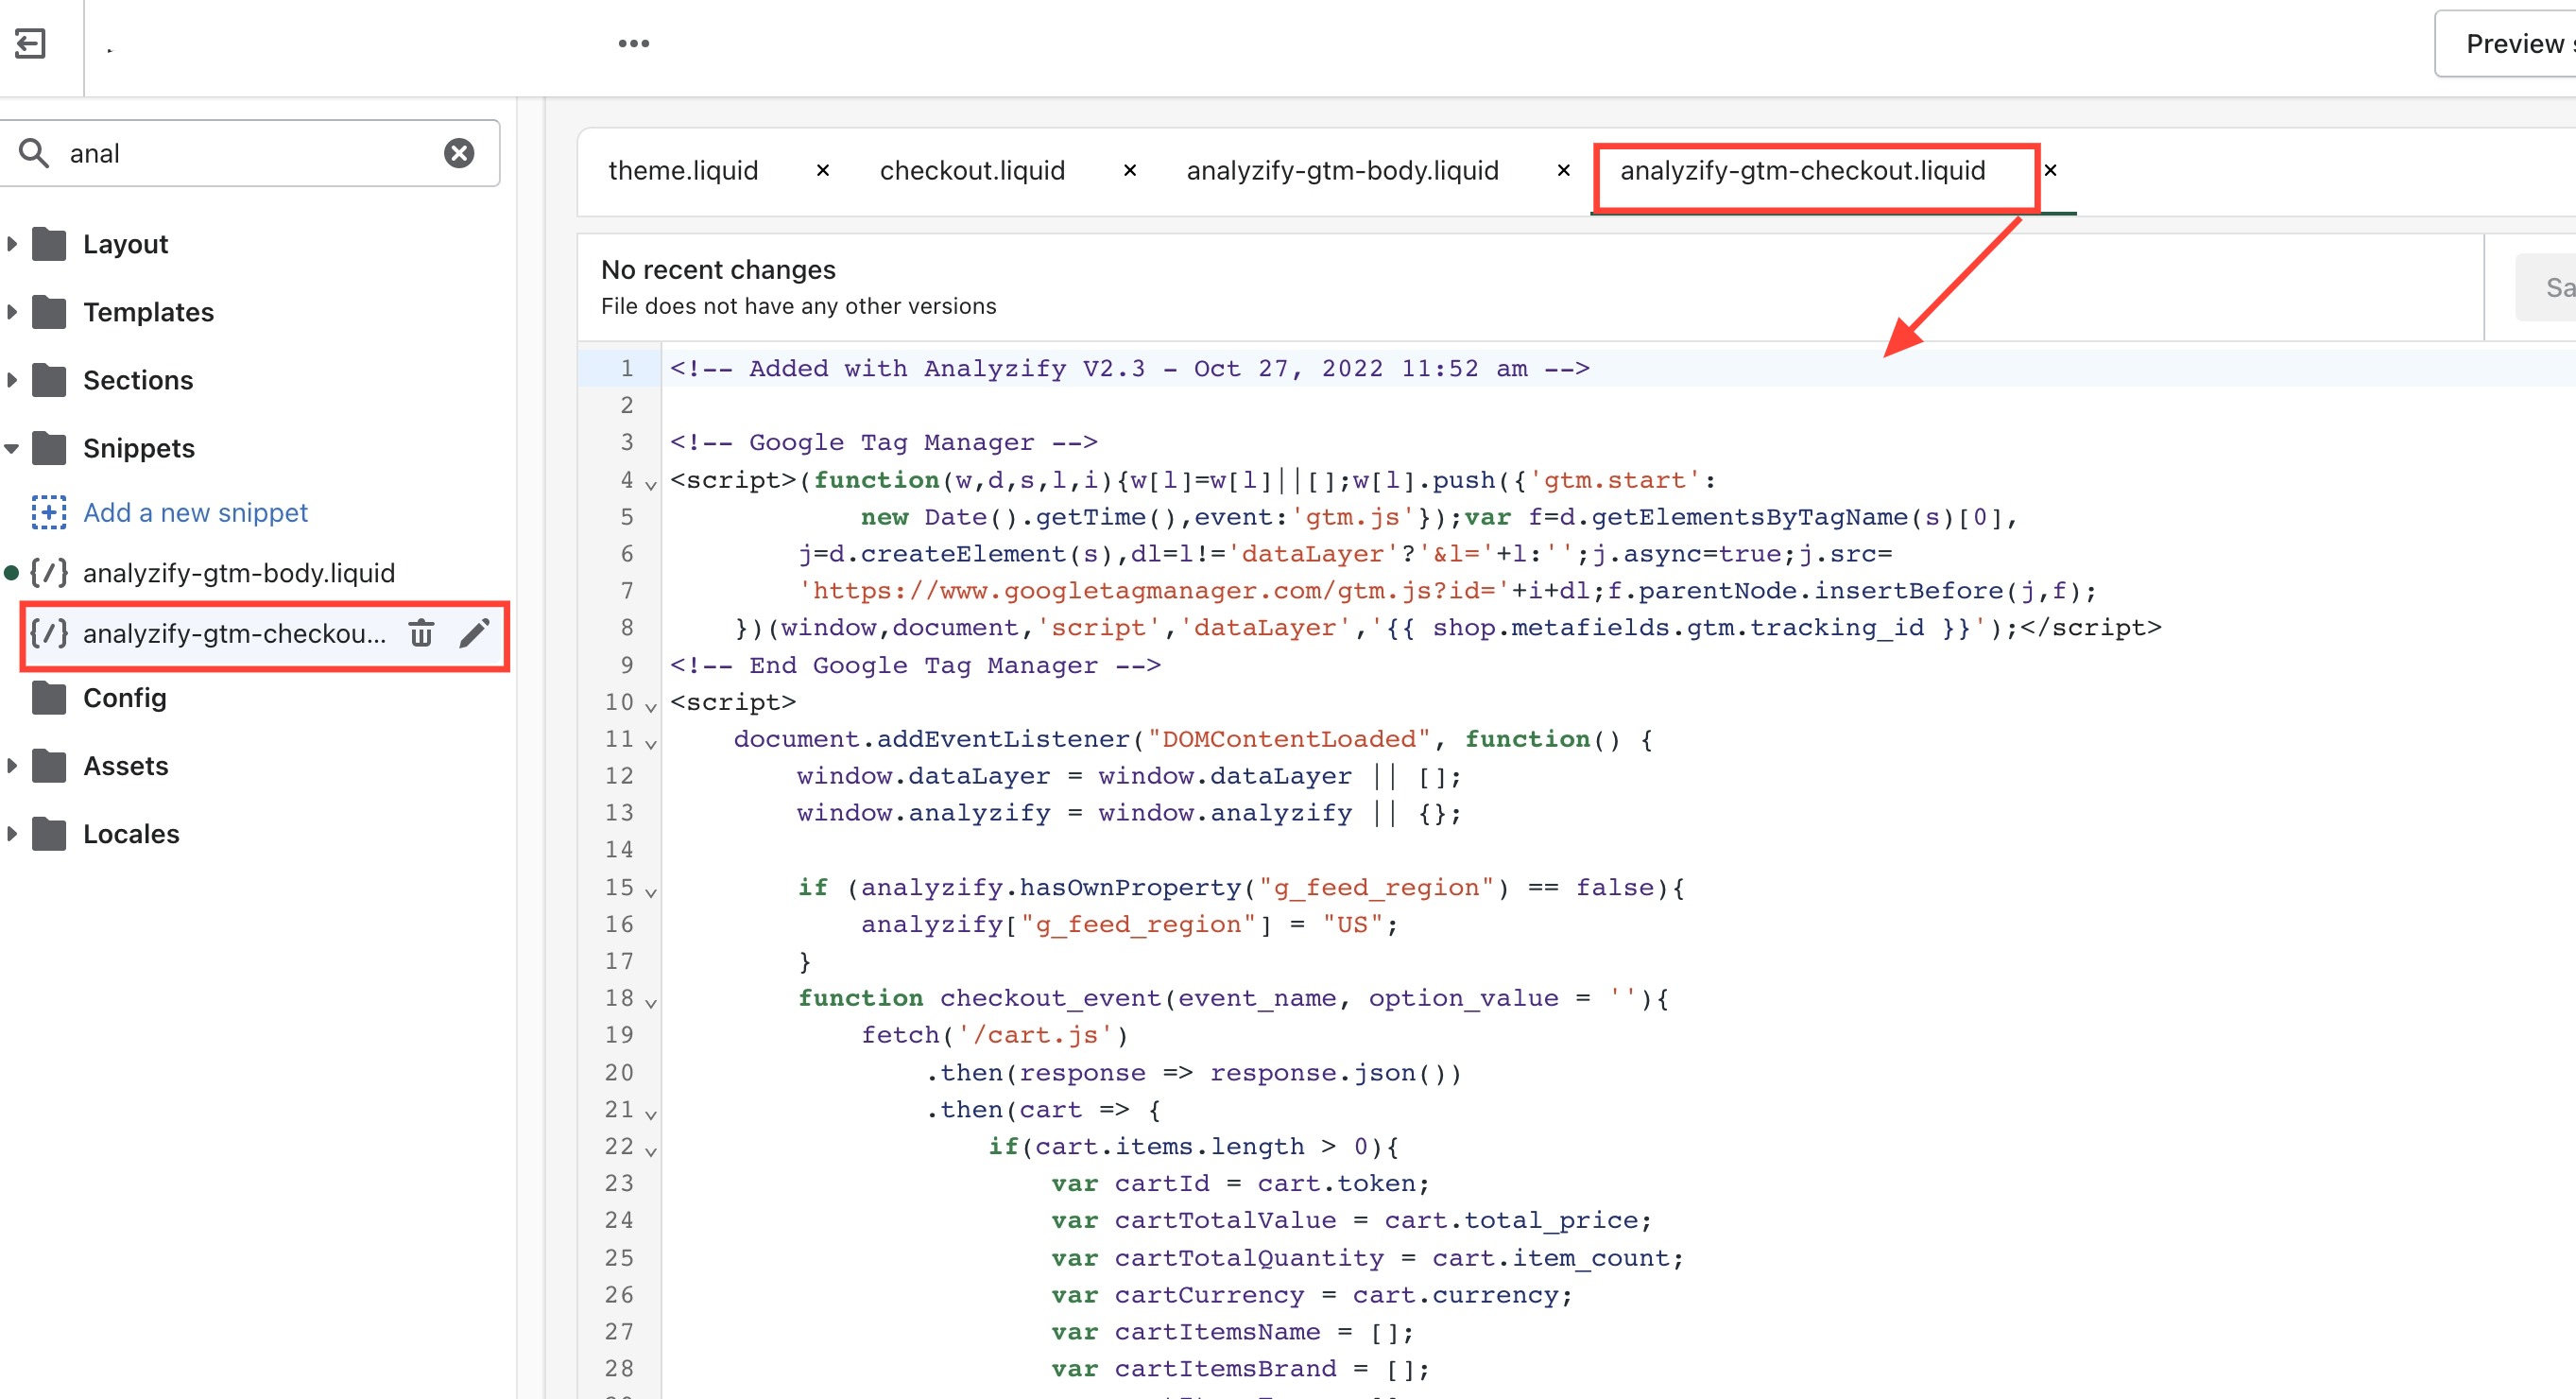
If all these lines & snippets are present, you can proceed to the third step. If not, then this means you injected Analyzify into another theme. Kindly check the other themes you have.
Note: You can skip this step if you have used your live / production theme.
Go to your Shopify Admin page > "Online Store" > "Themes". Then, click “Edit Code” for the theme you set up Analyzify on. You will see the “Preview Store” button. Hover over this button and right-click on it. Click the “Copy Link Address” option. This link will help you preview and debug your theme.

Log in to GTM and click "Preview". Then, paste the URL you have copied in the previous step (or type in your store's URL if you set up Analyzify on your existing theme), and click "Connect".
Google Tag Assistant (GTA) should be connected and your store should be opened. Move back to GTA.
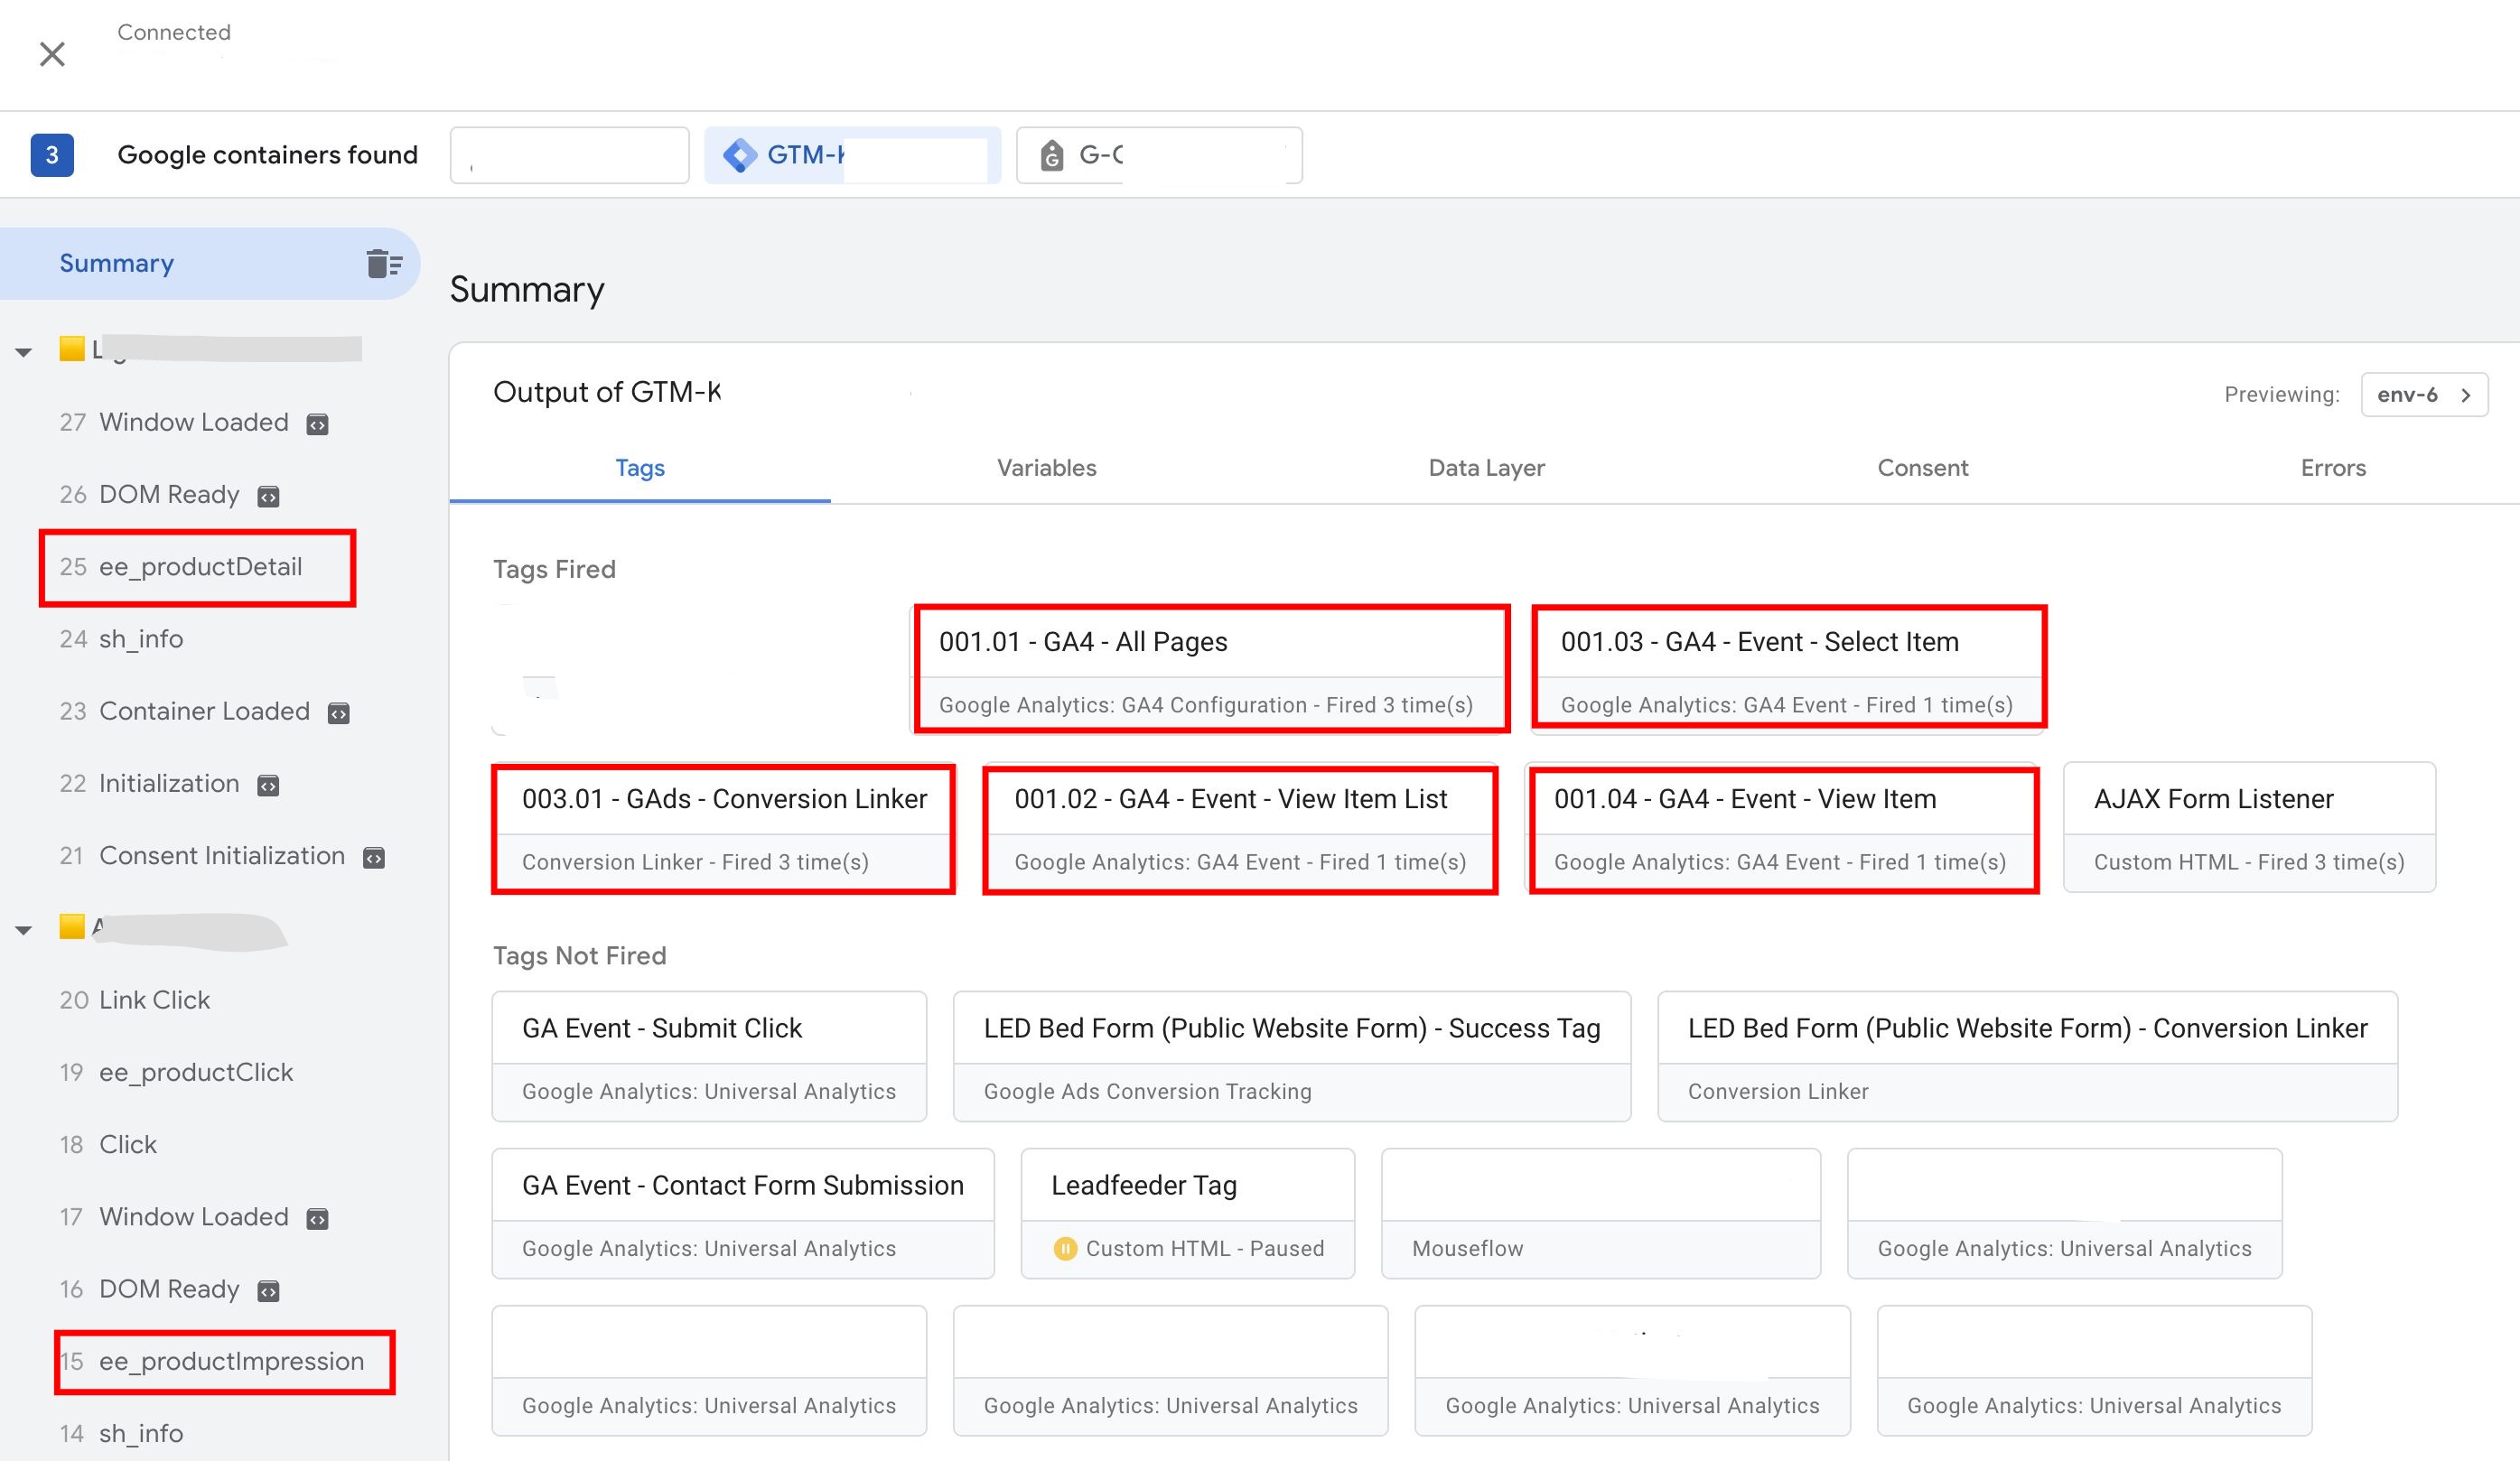
Verify the “GA4 - All Pages” tag through the Tag Assistant and double-check your GA4 measurement ID. Afterward, visit a product page and go back to GTA to see if your tags are being fired.

2. Incorrect GTM container ID
Another reason for your tags to not fire could be that the ID you’ve provided in Analyzify’s Onboarding phase isn’t correct, as any sort of little mistakes such as mistyping letters, adding spaces or a comma will cause GTM to not work properly.
Head to Google Tag Manager. You can find your GTM container ID on your workspace home page.
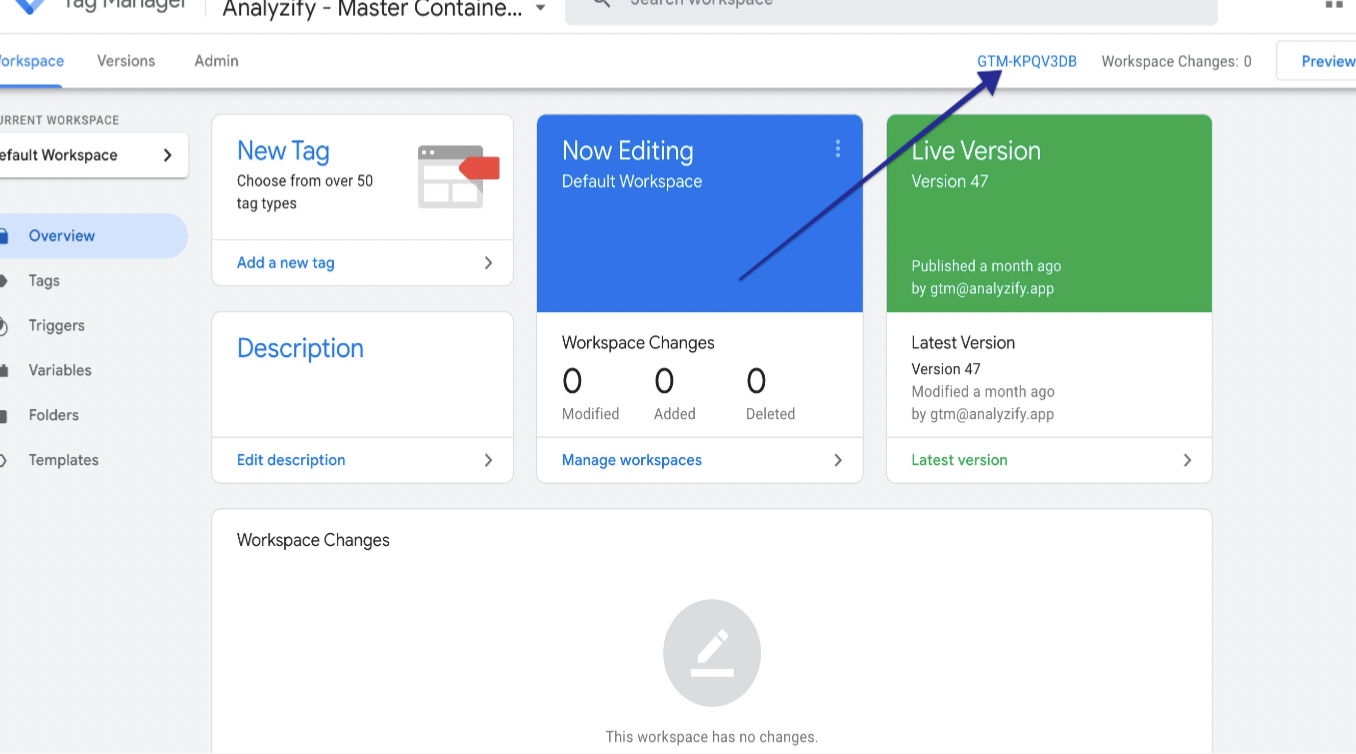
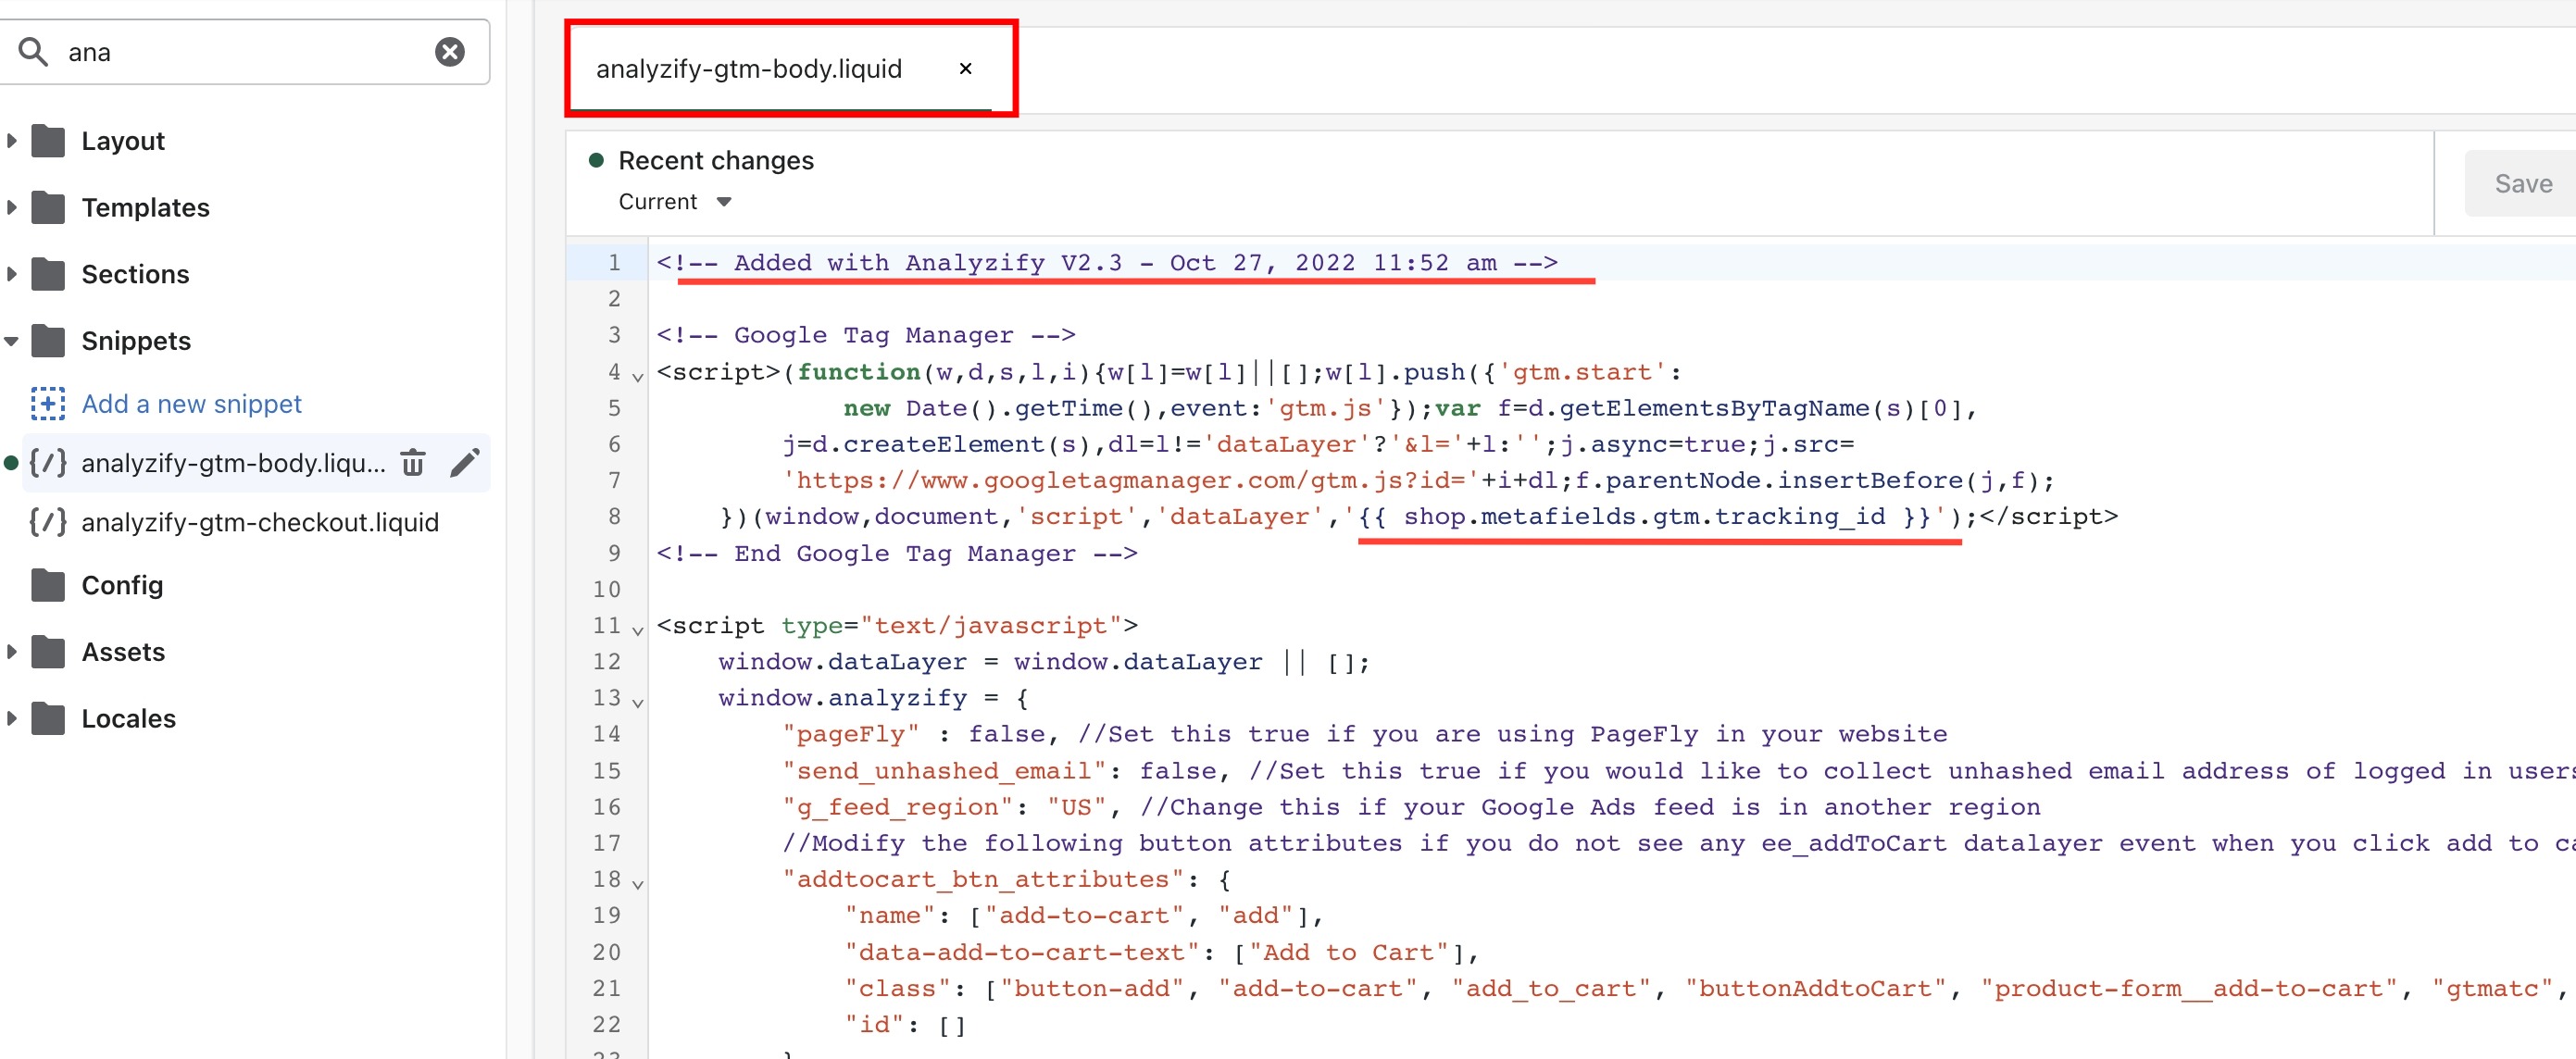
Head over to your Shopify Admin > “Themes”, and click on “Edit code” for the theme you set up Analyzify on. Click on the “analyzify-gtm-body.liquid” file and find the GTM snippet.
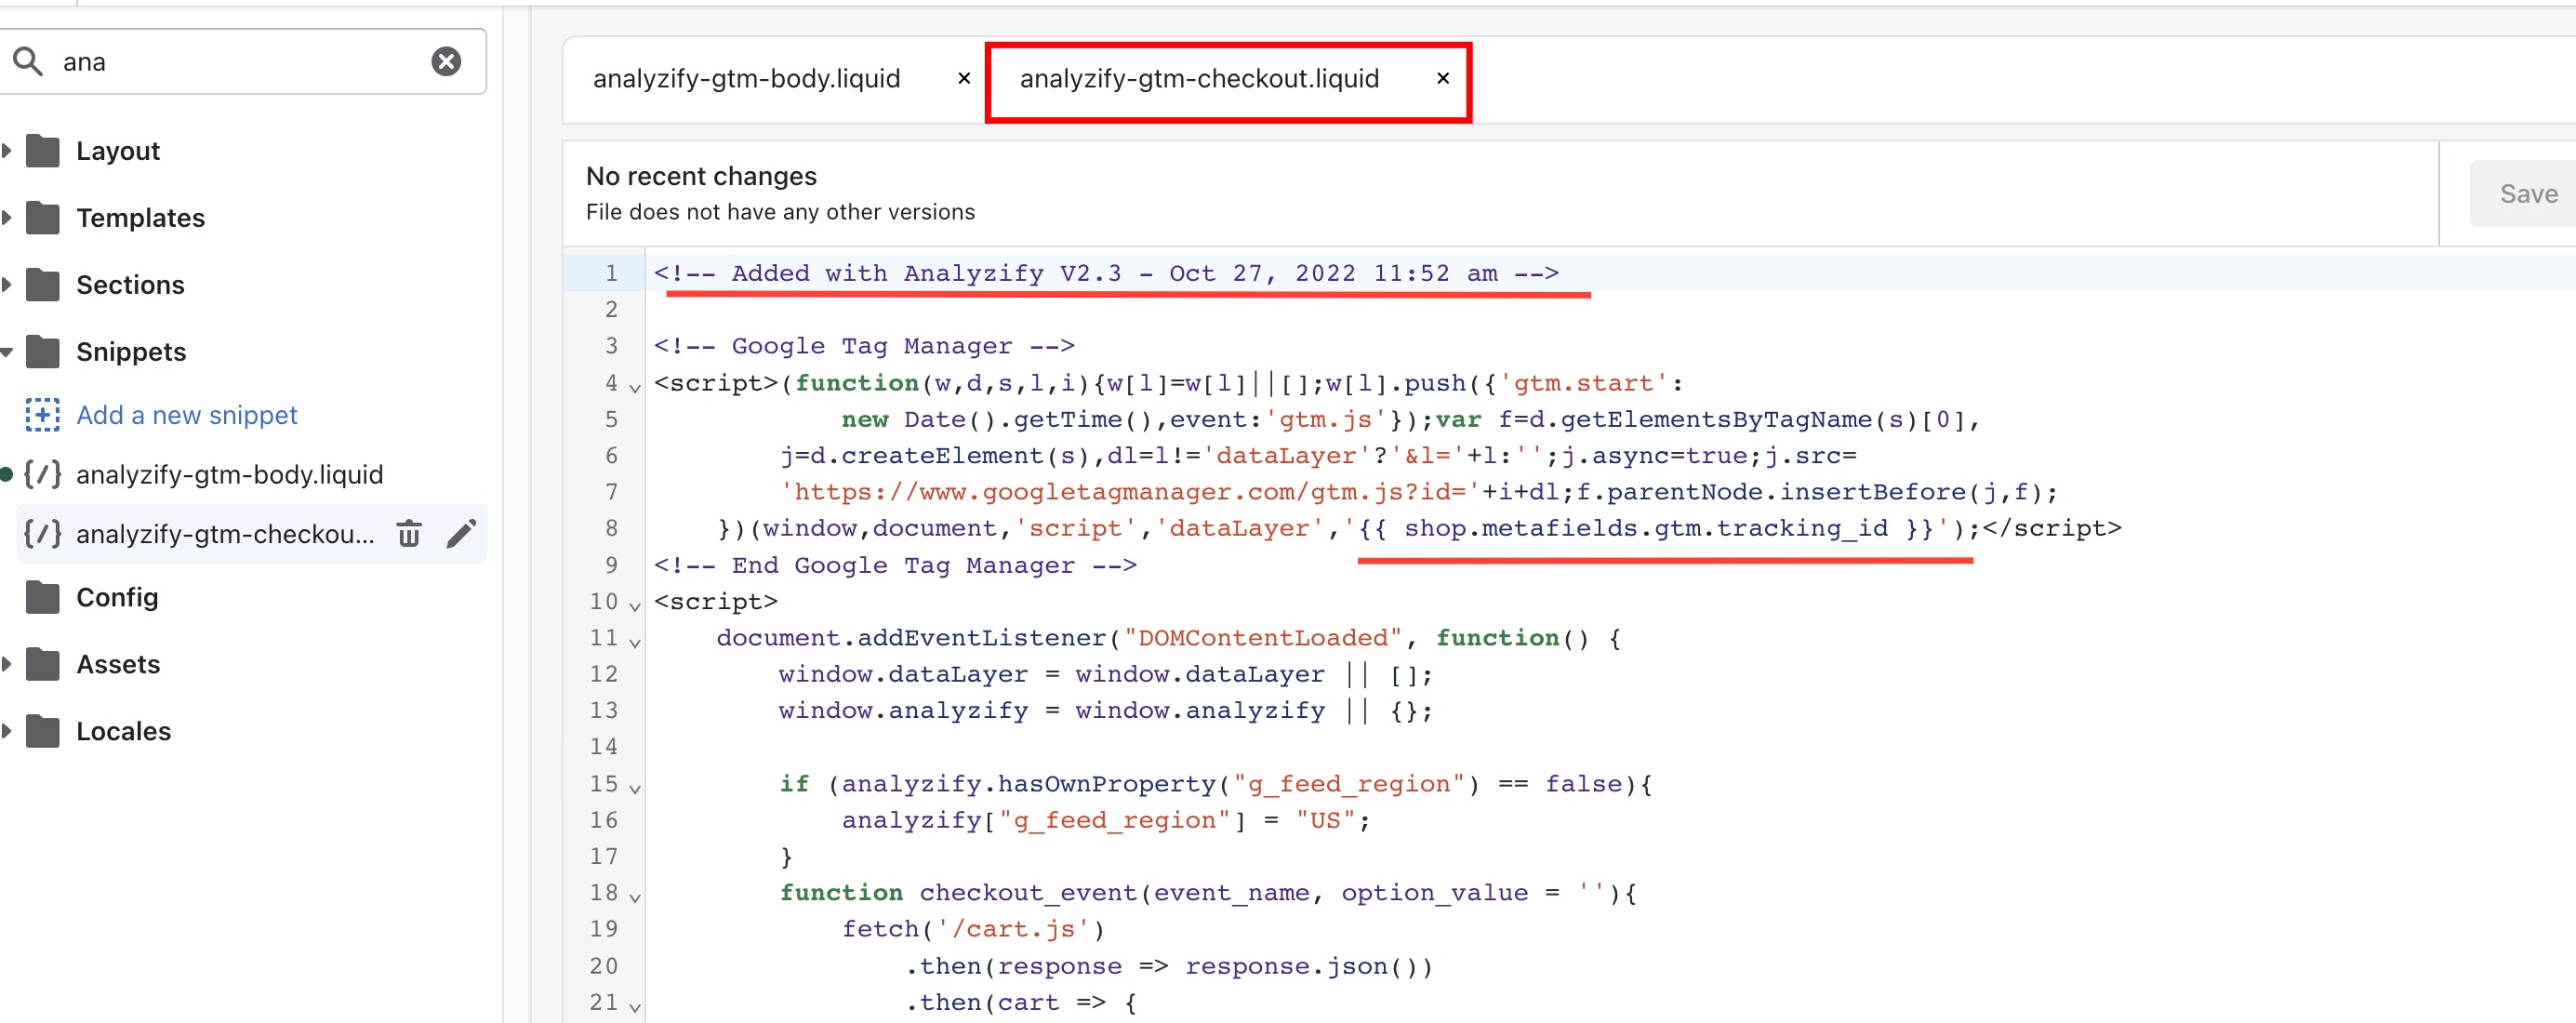
If you see a line that says “shop.metafields.gtm.tracking_id”, then this means your ID is correct.
However, if you see that your GTM ID is written in the form of “GTM-XXXXXX”, then you need to confirm the XXXXXX part is correct by comparing it through your GTM account.
If you have a Plus plan, you’ll need to check the same thing for the “analyzify-gtm-checkout.liquid” file as well.
3. Incorrect constants / inactive tags in GTM
If you use a number of other integrations (such as Universal Analytics, Facebook Pixels, Google Ads Remarketing etc.), you should make sure that the ID related to the tool exists and is correct when you activate the tags.
Oftentimes, these tags are not activated by default, because most of our clients already use the native versions. The tags will start working properly once you activate them when needed.
Copy the Pixel ID you wish to activate the tag of, such as TikTok, Pinterest, Microsoft Bing / Clarity, etc.
Head to GTM Admin > “Variables” > “User-defined Variables”. If, for example, you’ve opted for Pinterest in the previous step, click on “constant - Pinterest ID”. Here, paste the ID you’ve copied in the previous step in the variable bracket & click SAVE.
Now, click on “Tags” from the left-side menu. Again continuing from the Pinterest example, type “007.” to find and activate the tags for Pinterest.
If you wish to do this for other pixels, you can check out our Other Pixels category.
4. GDPR
There are a couple of important things to check to make sure it isn’t the GDPR solution you’re using that causes the tag problem for GTM:
If the banner does not appear, check the settings of your GDPR app to ensure the banner is enabled and implemented to the theme correctly.
If you deny the cookies, the tags will not fire.
In the GDPR setup, the tags do not fire with the events, because we created trigger groups so that the tags do not fire without consent. You can see all the tags fired when you open your GTM and click “Summary” at the top, or the events that are fired when you click the “Trigger Group” event.
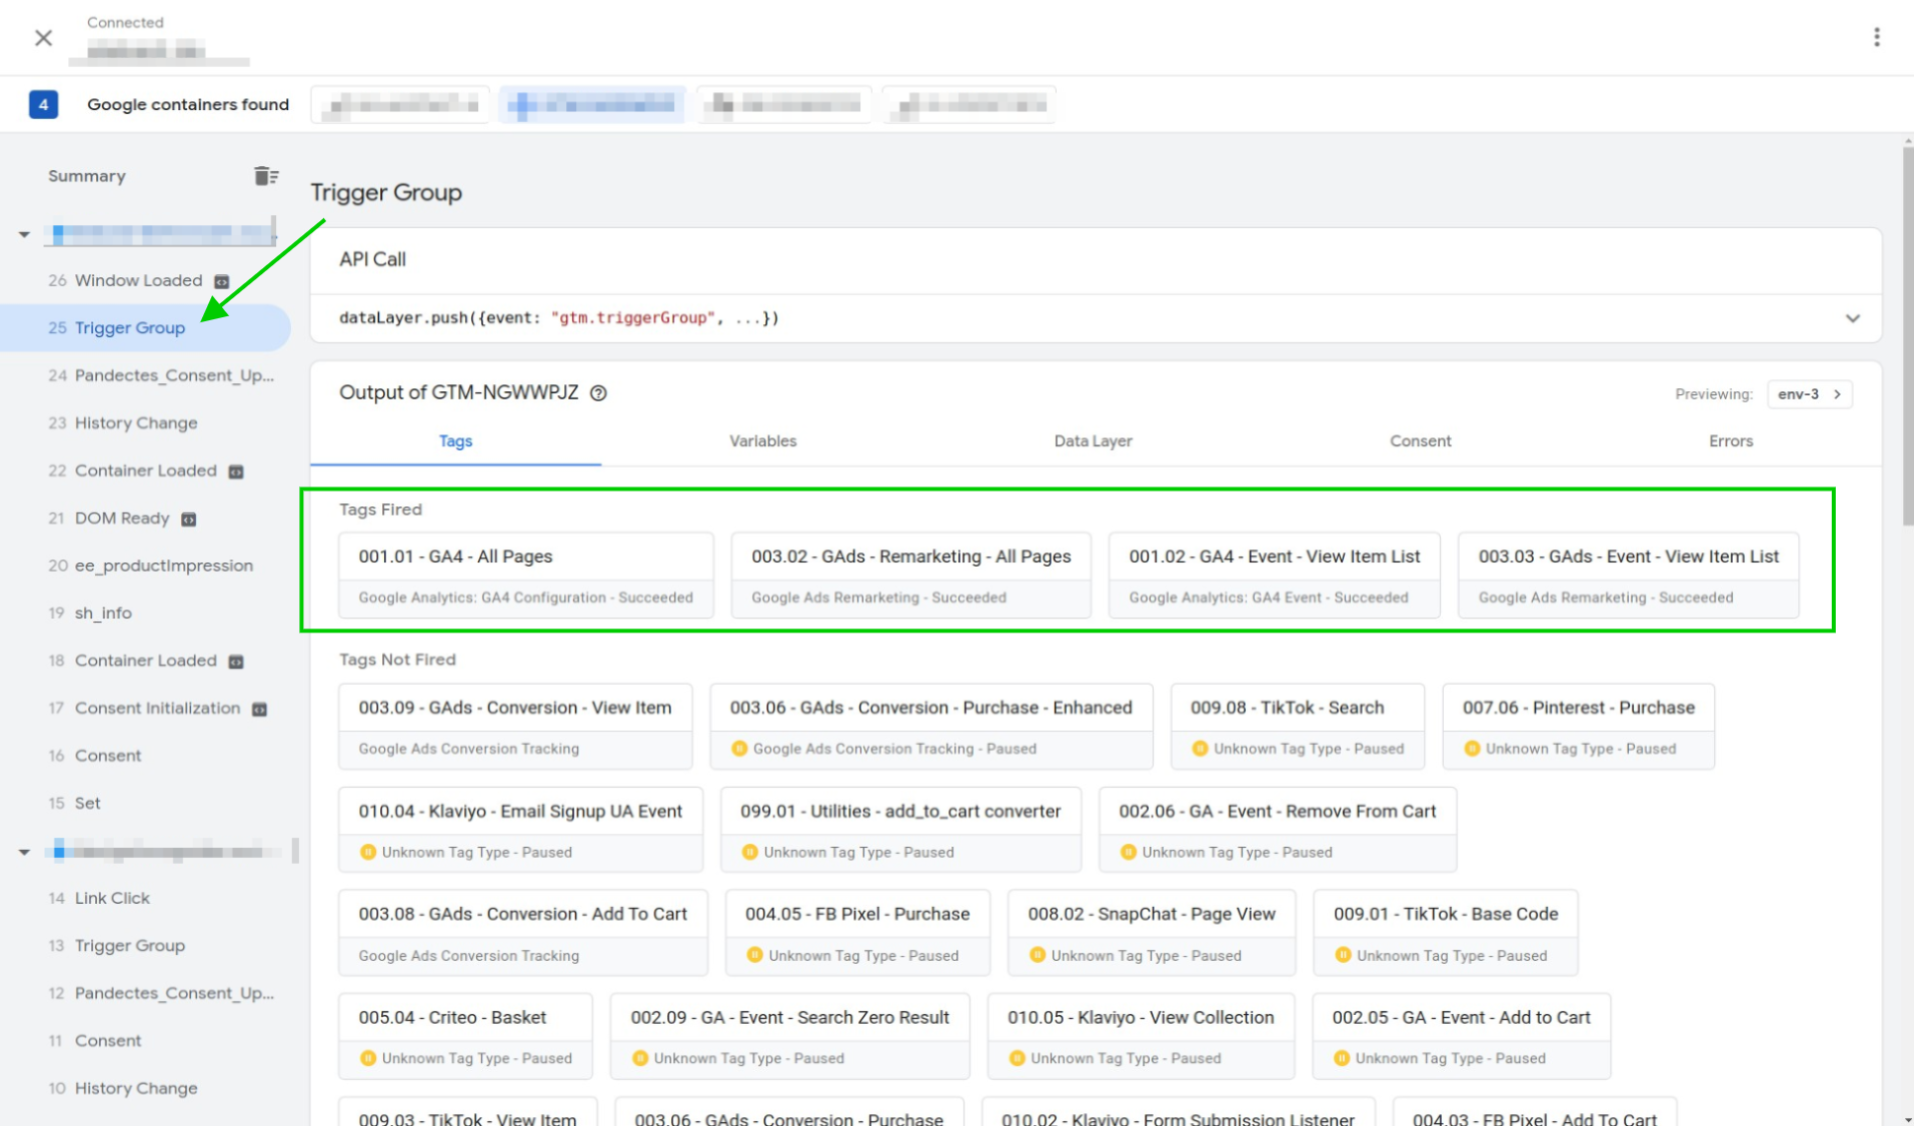
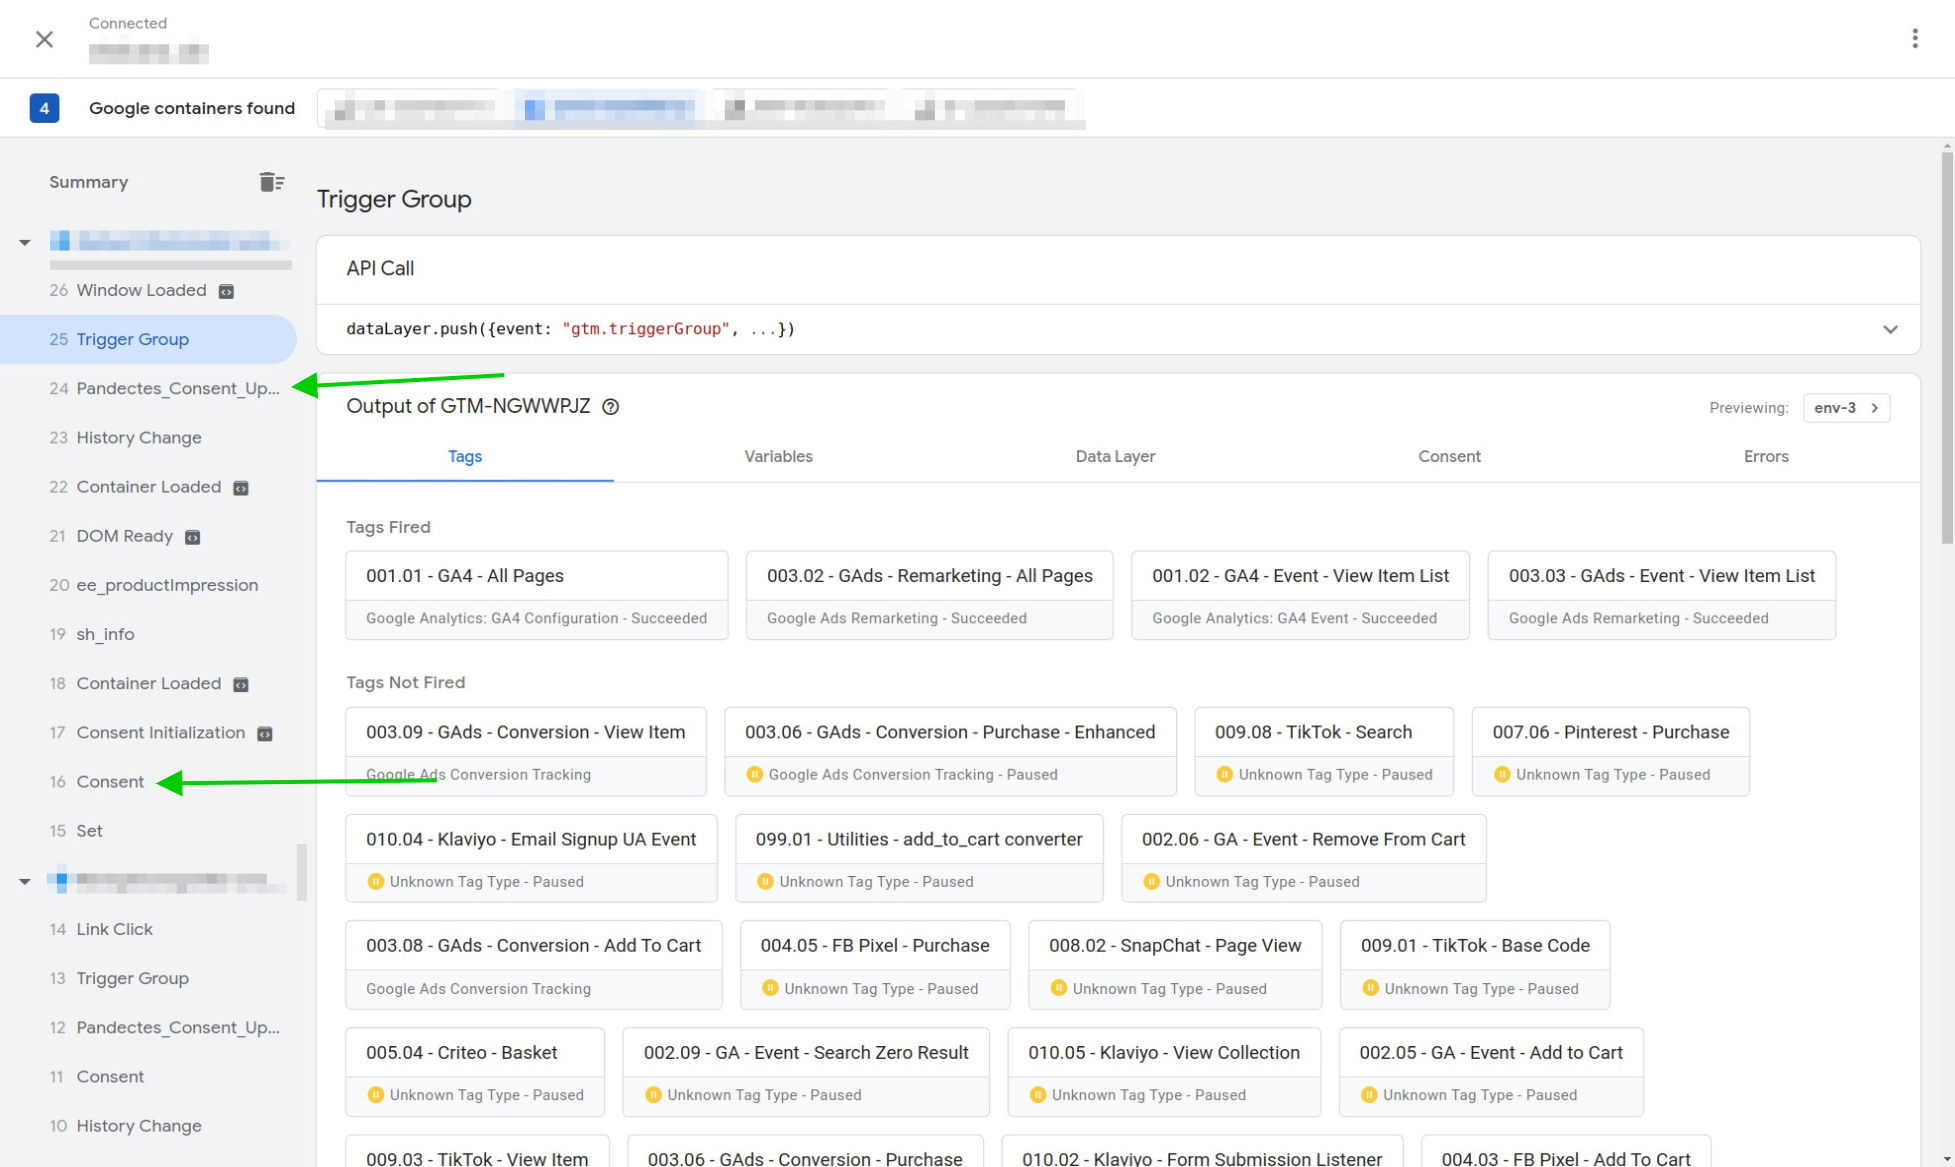
You should see the Analyzify events (like sh_info, ee_productView, etc.), and consent events (like consent_status, consent_update, etc.)
If you do not see the Analyzify events, it means that the problem is with the Analyzify data layers. In that case, you should inject the data layers again.
If you can’t see the consent events, then this means the problem is with the GDPR setup. We advise that you double-check the setup and app settings.
Other Reasons
5. Another app causing GTM setup issues
If your tags are still not firing after checking the previous steps, the issue you are experiencing might be due to a 3rd party app for GTM to not work properly. If you use any GDPR apps, subscription apps, or pagebuilder apps, they have a high change of being the culprit.
6. Having a browser extension that blocks GTM
There are times when some extensions (or even the browser itself) might be causing GTM to not work properly and for tags to not fire. We advise that you make sure there’s not an adblocker activated on your browser and that you use Google Chrome for the best possible results.
If you suspect it is your adblocker causing the issue, look for any checkboxes inside the adblocker settings that indicate the “ adblocker doesn’t function on a given site ”. If you see such a checkbox, uncheck it or try uninstalling the adblocker.
